...
- Go to
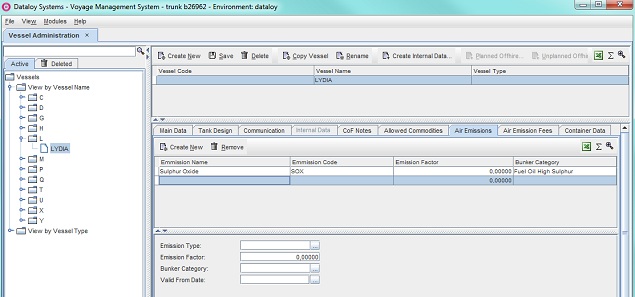
Modules > Master Data > Vessel Administration.The Vessel Administration window will open. - Select vessel in the left-hand menu tree. Its fields will appear to the right.
- Click the Air Emissions tab. Its fields will display.
- Click Create New. A blank row will appear display in the upper yab window tab field and its blank fileds fields in the lower.
Example: - Fill in the fields as follows:
- Enter either
- the emission type under Emission Type or
- click the Triple Dot Selector next to the field. A pop-up with a list of input values will
- open. Select field and click OK.
Example:
- Enter the emission factor under Emission Factor.
- Enter the bunker category under Bunker Category.
- Enter either
- a valid from date under Valid From Date or
- click the Triple Dot Selector next to the field. A pop-up calendar to select date will
- open. Select date and click OK.
Example:
- Enter either
- Click Save. The new emission details will appear display in the blank row in the upper tab windowfield.
- To continue adding a vessel - return to Vessel Administration.
...
Go to
Modules > Master Data > General Master Data Administration.The General Master Data Administration window will open.Click vessel to be edited in the left-hand menu tree. Its fields will display to the right.
- Click the Air Emissions tab and its fileds fields will display.
Click the emission row to be edited - it will highlight.
Edit as appropriate the fields displayed in the lower right-hand field.
Click Save.
...
- Go to
Modules > Master Data > Vessel Administration.The Vessel Administration window will open. - Click vessel with the emission to be removed in the left-hand menu tree. Its fields will display to the right.
- Click the Air Emissions tab and its fileds fields will display.
- Click the emission row to be removed - it will highlight.
- Click Remove. A pop-up appears will open asking to confirm deletion.
- Click Yes. The pop-up will vanish close and the selected row is removed.
To fill in the Air Emission Fees tab
- Go to
Modules > Master Data > Vessel Administration.The Vessel Administration window will open. - Select vessel in the left-hand menu tree. Its fields will appear to displayto the right.
- Click the Air Emission Fees tab. Its fields will display.
- Click Add Fee.
- A pop-up with a list of emission fees (defined in the Emission Fees module) will appearopen. Select field and click OK.
Example: - The added emission fee will appear display as a highlighted row in the upper tab window field and its field fields in the lower.
Example: - Enter either
- the valid from date under Valid From Date or
- click the Triple Dot Selector next to the field. A pop-up calendar to select date will appearopen. Select date and click OK.
Example:
The pop-up will close and the entered valid from date will appear display under Valid From in the highlighted emission fee row.
Example:To continue adding a vessel - return to Vessel Administration.
...
- Go to
Modules > Master Data > Vessel Administration.The Vessel Administration window will open. - Click vessel with the emission type to be removed in the left-hand menu tree. Its fields will display to the right.
- Click the Air Emission Fees tab and its fileds will display.
- Click the emission type row to be removed - it will highlight.
- Click Remove. A pop-up appears will open asking to confirm deletion.
- Click Yes. The pop-up will vanish close and the selected row is removed.
Related Content
...


