...
Long Description
| Anchor | ||||
|---|---|---|---|---|
|
...
Enter a Time Charter (TC) In Contract
- Go to
Modules > Contracts Management > Time Charter Contracts.The Time Charter Contracts window will openopens.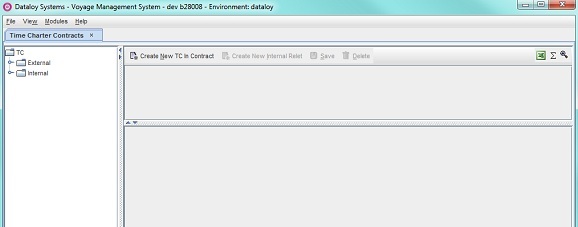
Click Create New TC In Contract. A separate pop-up will open:opens.
Example:

- Select a vessel to create a time charter (TC) in for and click OK.
- The pop-up will close and the vessel will appear appears in the left-hand menu tree and to the right, its fields will display.
Example:
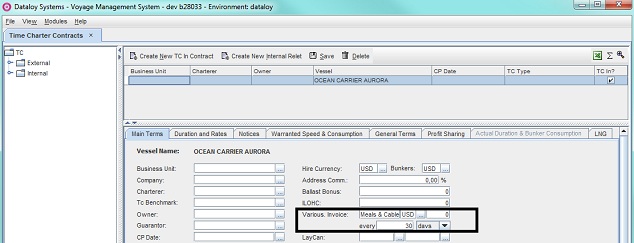
- In the Main Terms tab, fill in the fields as follows:
- Enter either:
- the name of the business unit entering into the TC (i.e. "owns" it internally) under Business Unit
- or click the Triple Dot Selector next to the field. A pop-up with a list of input values will openopens. Select field and click OK.
Example: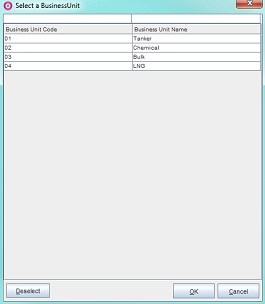
- Enter the name of the legal entity entering into the TC contract (i.e. signs the contract) under Company.
- Enter the business partner representing the Company (company, see above) under Charterer.
- Enter the index against which voyages performed under a TC will be measured (or benchmarked) under TC Benchmark and the TC benchmark percentage under %.
- Enter the name of the vessel owner under Owner.
- Enter the business partner/s that sets a guarantee for the TC under Guarantor.
- Enter either
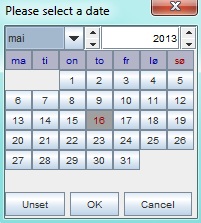
- the charter party (CP) date under CP Date
- or click the Triple Dot Selector next to the field. A pop-up with a calendar will openopens. Select date and click OK.

- Enter the time charter type under TC Type.
- Enter the charter party (CP) form for the TC contract under CP Form.
- Enter the name of the person responsible for operating the vessels under the TC contract under Vessel Operator.
- Enter the name of the person responsible for the TC contract in the Chartering department under Charterer.
- In the top right fields:
- Enter the currency to be used for the TC under Hire Currency.
Note: Defaults to USD. - Enter the currency to be used for bunkers under Bunkers.
Note: Defaults to USD. - Enter the address commission under Address Commission.
- Enter the agreed ballast bonus lumpsum (if applicable)under Ballast Bonus.
- Enter the agreed ILOHC lumpsum (if applicable) under ILOHC (In Lieu of Holds Cleaning).
Note: Only one ILOHC lumpsum can be entered into the contract. - In the Various Invoice fields:
- Enter the name for collected crew costs in the initial field.
Note: Defaults to Meals & Cables, also called C/V/E (Communication/Victuals/Entertainment) - Enter applicable currency for the Various Invoice cost in the second field.
Note: Defaults to USD. - Enter the agreed anount for the Various Invoice cost in the third field.
- Enter the interval number for Various Invoice cost payments and from the drop-down menu select if the payment cycle is in days or months.
- Enter the name for collected crew costs in the initial field.
- In the LayCan fields:
- Enter the start date for lay/can spread in the initial field.
- Enter the end date for lay/can spread under second field.
- Enter comments (if applicable) under Comments (textbox).
- Enter the currency to be used for the TC under Hire Currency.
- In the Delivery Terms panel:
- Enter the delivery port under Delivery Port.
- Enter the terms of delivery under Terms.
- Enter the delivery range (if applicable) under Delivery Range.
Example:
A range between two ports (e.g. Oslo - Bergen), worldwide, etc. - Enter the delivery date under Delivery Date.
- In the Bunkers on Delivery fields enter (as applicable):
- Under FO:
- the agreed amount of fuel oil (FO) onboard at the time of delivery in the first field.
- the agreed purchase price of the onboard FO at the time of delivery in the second field.
- Under DO:
- the agreedamount of diesel oil (DO) onboard at the time of delivery in the first field.
- the agreed purchase price of the onboard DO at the time of delivery in the second field.
- Under FO (Low Sulphur)
- the agreed amount of fuel oil low sulphur (FO LS) onboard at the time of delivery in the first field.
- the agreed purchase price of the onboard FO LS at the time of delivery in the second field.
- Under DO (Low Sulphur)
- the agreedamount of diesel oil low sulphur (DO LS) onboard at the time of delivery in the first field.
- the agreed purchase price of the onboard DO LS at the time of delivery in the second field.
- Under FO:
- In the Redelivery Terms panel:
- Enter the redelivery port under Redelivery Port (RED marking = required field).
- Enter the terms of redelivery under Terms.
- Enter the redelivery range (if applicable) under Delivery Range.
Example: A range between two ports (e.g. Oslo - Bergen), worldwide, etc. - Enter the redelivery date under Redelivery Date.
- In the Bunkers on Redelivery fields enter (as applicable):
Note: If index based - leave blank until just before redelivery. Return and update the contract with correct figures as currently Dataloy VMS cannot indicate if amounts are index based - only the actual.- Under FO:
- the agreed amount of fuel oil (FO) onboard at the time of redelivery in the first field.
- the agreed purchase price of the onboard FO at the time of redelivery in the second field.
- Under DO:
- the agreed amount of diesel oil (DO) onboard at the time of redelivery in the first field.
- the agreed purchase price of the onboard DO at the time of redelivery in the second field.
- Under FO (Low Sulphur):
- the agreed amount of fuel oil low sulphur (FO LS) onboard at the time of redelivery in the first field.
- the agreed purchase price of the onboard FO LS at the time of redelivery in the second field.
- Under DO (Low Sulphur):
- the agreedamount of diesel oil low sulphur (DO LS) onboard at the time of redelivery in the first field.
- the agreed purchase price of the onboard DO LS at the of time redelivery in the second field.
- Under FO:
- In the Invoice Parameters panel:
- Enter the interval number for invoice payments and from the drop-down menu select if the payment cycle is in days or months.
Note: The interval number will always display displays with five decimals.
Example:
- Select if the payment cycle is in days or months.
Note: By deafult the payment cycle is in days and the Invoices Follow Calendar Month checkbox deactivated. Selecting Months from the drop-down will activate the checkbox. It will by default be checked. If checked, an invoice must be generated from the delivery date up to the start of the next month. From then on, the system will automatically follow calendar months. - Enter applicable invoice timezone - GMT or LT (Local Time) - under Invoice Timezones.
Note: Defaults to GMT (Greenwich Mean Time) - Recommended. This will avoid the need for recalculation to obtain the accurate time duration of a voyage when invoicing. - Enter the the default owner's bank account number under Default Owner's Bank Account.
- Check Consumption Based Bunkers to indicate that the Charterer will not purchase bunkers, only pay for the consumption.
Note: If checked the Bunkers on Delivery and Bunkers on Redelivery are rendered invalid. However, the entered price data in the Bunkers on Delivery section will be used to calculate the price of consumed bunkers. The ROB on Delivery (bunkers remaining on board on delivery) is used as estimated consumption until the actual is known. Check Revaluate Bunker's CP Price to indicate that bunkers should not be re-evalueted upon delivery (only applicable when activated).
Note: This field is only activated if bunker consumption is not selected. For time charter out - always disabled.
- Enter the interval number for invoice payments and from the drop-down menu select if the payment cycle is in days or months.
- In the Commissions panel:
- To add Add a broker Broker with commissionCommission:
- Move the cursor to the Commissions field.
- Right-click. A menu will openopens.
- Select New. The menu will close and a row will display displays in the Commissions field.

- Enter the broker under Broker.
- Enter broker contact name under Contact.
- Enter the commission percentage under Percent.
- Enter the commission rate under Rate.
Note: The rate is per day - it is rarely used. - Enter applicable lumpsum under Lumpsum (if any).
- Enter the Commission under Commission.
- Check Credit Owner to indicate that the Owner will pay the commission to the broker.
Note: For Time Charter Out - change of function: Credit Charterer. Check Credit Charterer to indicate that the Charterer will pay the commission to the broker. - Check Charterer's Cost to toggle the commission between Owner and Charterer.
Note: Checked box indicates that the Charterer is to bear to cost of the commissions payable to brokers instead of the Owner. Post Fixture modules processes this type of commission invoices. - Check C/O (care/of) to indicate that invoices should be sent through the broker.
- To remove Remove a broker Broker with commissionCommission:
- Click the broker commission row to be deleted - it will highlight.
- Right-click and from the menu select Remove.
- The menu will close and the selected row delete.
- To add Add a broker Broker with commissionCommission:
- Enter either:
- Click Save. The row in the upper right-hand field will populate populates with additional newly entered data aside from the vessel name and the TC In Contract will appear appears in the left-hand menu tree both under View by Business Partner and View by Vessel (Charter In folder) in the External folder.
Example: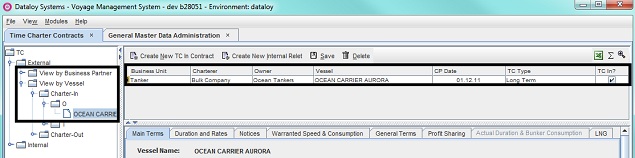
- Click the Duration and Rates tab. The Duration and Rates tab fields will displaydisplays.

- To add durations and ratesAdd Durations and Rates:
- Click Add Duration in the Duration panel. A row will displaydisplays.
Note: Duration refers to a time period a vessel is chartered under a TC contract. A duration can have one or more rates and each added duration is numbered in sequential order. The first entered duration will is therefore be labeled labelled 1, the second 2, etc.
- Fill in the row as follows:
- Enter the time unit to be used under Time Unit.
Note: Either M = Month, D=Days. Months vary in length and when converted to days will then ONLY be approximately correct. - Enter the +/- time available to reach set destination at agreed time under +/-.
- Enter agreed option (if applicable) under Option.
- Enter agreed option declaration (if applicable) unber Option Declaration.
- Enter the date if the Option Declatation (as applicable).
- Enter option status (if applicable) under Option Status.
- Enter index under Index.
- Enter index percent under Percent
- Enter floor limit under Floor.
- Enter roof limit under Roof.
- Enter the split percent (if applicable) under Split Percent.
- Enter the time unit to be used under Time Unit.
- Click Add Rate in the Rates panel. A row will display displays both in the Rates and in the Duration & Rates sections.
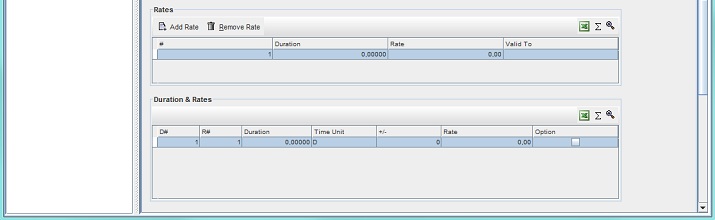
In the Rates panel, click each respective row field (except the # field) and as applicable:Anchor TC1 TC1
Note: Each added rate is numbered in sequential order. The first entered rate will therefore be labeled 1, the second 2, etc.- Enter the rate duration under Duration.
Note: The rate duration will always display with five decimals. - Enter the rate under Rate.
- Enter the date the rate is valid to under Valid To.
Note: Should ONLY be used if a rate is bound to a particular date/time, as opposed to a set number of days. Time and date should be entered into the Valid To field as for example: 1505131100 (=valid until 15 May 2013, 11 AM). The row field will automatically update to state the duration from the delivery date to the entered Valid To date. The Valid To field of the final rate of a duration should be left blank as that rate will always be valid to the end of the duration.
- Enter the rate duration under Duration.
- Repeat Step 8c i-iii as applicable until all rates for the duration have been entered.
Note: As each rate duration is entered the Duration row field in the Duration section will automatically update displaying the total duration of all rates.
Example: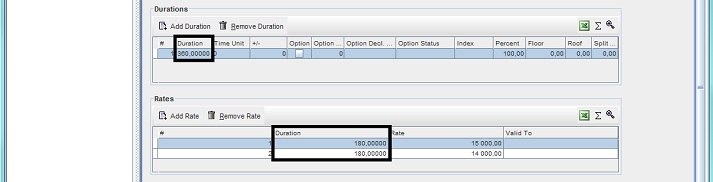
- In the Duration panel, click applicable rows and fill in as follows:
- Enter the unit time is to be measured in - day (D) or month (M) - under Time Unit.
Note: Defaults to days (D). - Enter the time duration flexibility (always in days) under +/-.
Example: A vessel is chartered for 90 days +/- 15 days. - Check Option to indicate if the duration period is optional.
Note: CANNOT be used for the initial duration period or if the TC contract only consists of one duration period. Should then be left blank. - If Option is checked (if not, go to Step 8e v):
- Enter the number of days before an optional duration starts - notice must be given if it will be taken - under Option Declaration.
- Enter the actual date notice was given under Option Decl. Date.
- Enter the duration period's option status (Not declared/Forfeited/Declared) from the drop-down menu under Option Status.
Note: For information purposes only to indicate the duration period's implementation status. Defaults to Not declared. Must be changed manually.
Enter the index the rates are based on (if TC rates are index based) under Index.Anchor TC2 TC2
Note: If TC rates are not index based - leave blank.- Enter a percentage of the index (if applicable) under Percent.
- Enter the agreed index floor amount (if applicable) under Floor.
Note: If the index amount drops below the agreed index floor amount - the floor amount is to be paid. - Enter the agreed index roof amount (if applicable) under Roof.
Note: If the index about rises above the agreed index roof amount - the roof amount is to be paid. - Enter the agreed split percentage (if applicable) under Spilt Percent.
Note: If the index amount drops below the agreed index floor amount - the amount is split between parties.
Example:
- Enter the unit time is to be measured in - day (D) or month (M) - under Time Unit.
- Click Add Duration in the Duration panel. A row will displaydisplays.
- The Duration & Rates panel automatically displays a merge between and summary of the Duration and the Rates fields.
Example:
- Click Save.
- Click the Notices tab. The Notices tab fields will displaydisplays.
Example: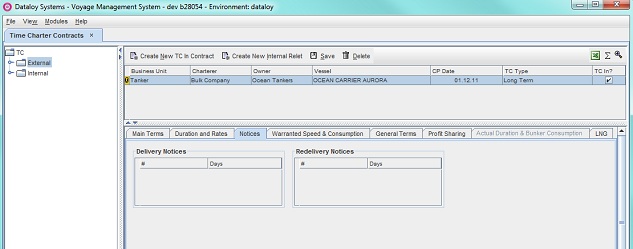
Enter all delivery notices:Anchor TC3 TC3 - To add a delivery noticeAdd a Delivery Notice:
- Move the cursor to the Delivery Notices field.
- Right-click. A menu will open.
- Select Add Delivery Notice. The menu will close and a row will open in the Delivery Notices field.
Note: Each added delivery notice is numbered in sequential order. The first entered notice will therefore be labeled 1, the second 2, etc under #. - Click the row field under the Days column and enter the number of days before an owner must notify the charterer of a vessel's expected arrival time to agreed delivery point.
- Repeat Step 12a i-iv as applicable until all delivery notices have been are entered.
- To remove a delivery noticeRemove a Delivery Notice:
- Click the delivery notice row to be removed - it will highlight.
- Right-click and from the menu select Remove Delivery Notice.
- The menu will close and the selected row is removed.
- To add a delivery noticeAdd a Delivery Notice:
Enter all redelivery noticesAll Redelivery Notices:Anchor TC4 TC4 - To add a redelivery noticeAdd a Redelivery Notice:
- Move the cursor to the Redelivery Notice field.
- Right-click. A menu will openopens.
- Select Add Redelivery Notice. The menu will close and a row will appear appears in the Redelivery Notice field.
Note: Each added redelivery notice is numbered in sequential order. The first entered notice will is therefore be labeled labelled 1, the second 2, etc under #. - Click the row field under the Days column and enter the number of days before an owner must notify the charterer of a vessel's expected arrival time to agreed redelivery point.
- Repeat Step 13a i-iv as applicable until all redelivery notices have been entered.
- To remove a redelivery noticeRemove a Redelivery Notice:
- Click the redelivery notice row to be removed - it will highlight.
- Right-click and from the menu select Remove Redelivery Notice.
- The menu will close and the selected row is removed.
- To add a redelivery noticeAdd a Redelivery Notice:
- Click Save.
- Click the Warranted Speed & Consumption tab. The Warranted Speed & Consumption tab fields will display.
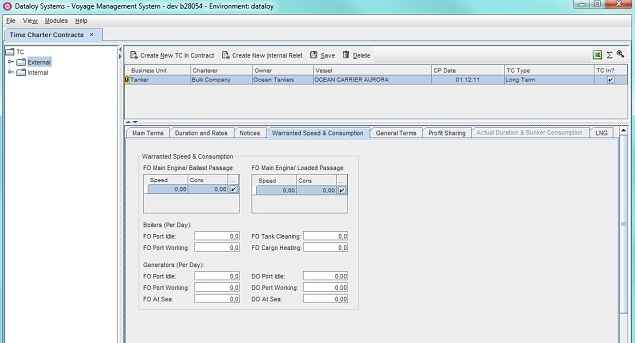
- Fill in the fields as follows:
Note: All fields are normally automaticaly populated with data retrieved from the Vessel Administration module.- Under Fuel Oil (FO) Main Engine/Ballast Passage:
- Double-click and enter the speed and fuel consumption under Speed and Consumption respectively.
- Check the Active box to indicate that they are active.
- Under Fuel Oil (FO) Main Engine/Loaded Passage:
- Double-click and enter the speed and fuel consumption under Speed and Consumption respectively.
- Check the Active box to indicate that they are active.
- Under Boilers (Per Day):
- Enter the fuel oil consumption/day while idle in port under FO Port Idle.
- Enter the fuel oil consumption/day while working in port under FO Port Working.
- Enter the fuel oil consumption/day when cleaning tank under FO Tank Cleaning.
- Enter the fuel oil consumption/day for heating cargo under FO Cargo Heating.
- Under Generators (Per Day):
- Under Fuel Oil (FO) Main Engine/Ballast Passage:
- Enter the fuel oil consumption/day while idle in port under FO Port Idle.
- Enter the fuel oil consumption/day while working in port under FO Port Working.
- Enter the fuel oil consumption/day while at sea under FO At Sea.
- Enter the diesel oil (DO) consumption/day while idle in port under DO Port Idle.
- Enter the diesel oil (DO) consumption/day while working in port under FO Port Working.
- Enter the diesel oil (DO) consumption/day while at sea under FO At Sea.
- Click Save.
Click the General Terms tab. The General Terms tab fields will display.Anchor qa1 qa1 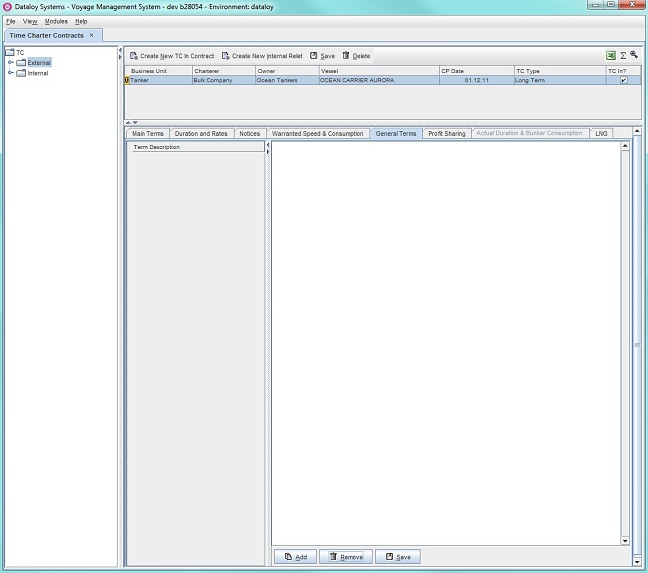
- Enter detailed, text based clauses (terms & conditions) of the TC Contract as defined in the Terms module (as applicable):
- Click Add. A pop-up will open opens displaying in the upper field entered Term Types and in the lower applicable terms (or text summary of the contract) as entered in the Terms module.
Note: Often the terms (or text summary of the contract) are not broken down into several sections, but clustered together under a single term: Recap. - In the upper field, select term type - it will highlight and in the lower field its added terms display.
Example: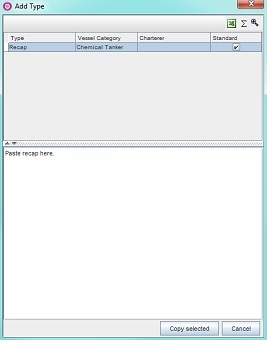
- Click Copy selected. The pop-up will close and the selected term and contents will appear appears (i.e. pasted in) in the General tab fields.
Note: Recommendation - to attach a hardcopy of the TC Contract, (for example in PDF-format), use the Remarks & Attachment functionality (will not display in the General Terms tab).
Example: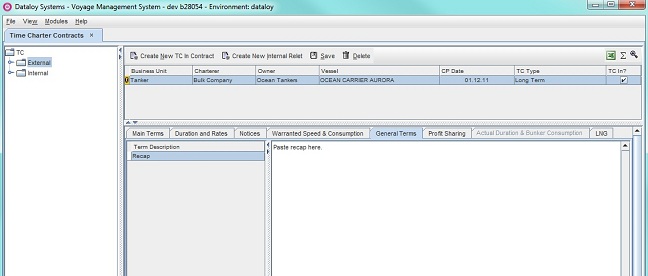
- To edit/remove terms - go to To edit/remove terms in the Gerneral Terms tab.
- Click Add. A pop-up will open opens displaying in the upper field entered Term Types and in the lower applicable terms (or text summary of the contract) as entered in the Terms module.
- Click Save.
- Click the Profit Sharing tab. The Profit Sharing tab fields will display.
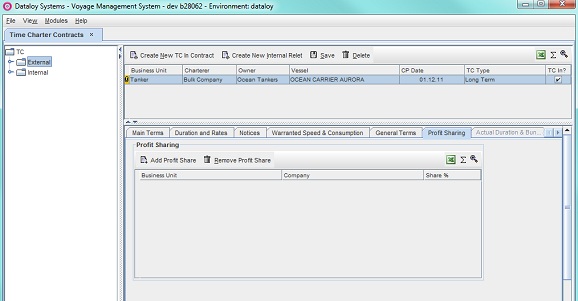
- Enter all internal profit shares for all activities performed by a vessel during the TC contract (If none - leave blank):
- To add Add a profit share entry:
Click Add Profit Share. A row will display in the Profit Sharing field.Anchor TC5 TC5 - Click each respective row field and
- enter either
- the name of the business unit entering into profit share under Business Unit
- or click the Triple Dot Selector next to the field. A pop-up with a list of input values will openopens. Select field and click OK.
- enter either
- the name of the legal entity entering into the profit share under Company or
- or click the Triple Dot Selector next to the field. A pop-up with a list of input values will openopens. Select field and click OK.
- enter the profit share dividend (in per cent) under Share %
- Repeat Step 22a i-ii as applicable until all profit shares have been entered
- To remove Remove a profit sharing entry:
- Click the profit share row to be removed - it will highlight
- Click Remove Profit Share. A pop-up will open opens asking to confirm removal.
- Click Yes. The pop-up will close and the selected profit share is removed.
- Click Save.
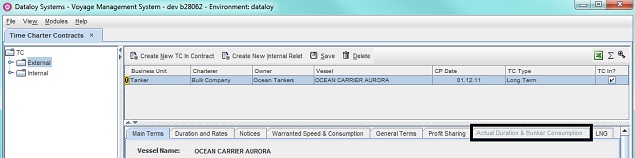
- The Actual Duration & Bunker Consumption tab will always be deactivated for time charter in contracts - ONLY active for time charter out contracts.
- Click the LNG tab. The LNG tab fields will display.
Note: This tab will only activate activates if the vessel is an LNG vessel.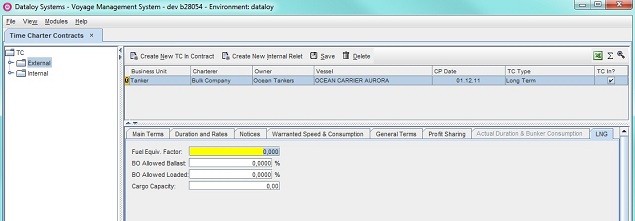
- In the LNG tab (if applicable), fill in the fields as follows:
- Enter the agreed fuel equivalent factor under Fuel Equiv. Factor.
- Enter the agreed allowed boil/off during ballasting (in per cent) under BO Allowed Ballast (Boil Off).
- Enter the agreed allowed boil/off during laden condition (in per cent) under BO Allowed Loaded.
- Enter the agreed cargo capacity of the vessel under Cargo Capacity.
- Click Save.
...
Edit/Delete a Time Charter (In) Contract
- To edit Edit a Time Charter (In) Contract:
- Go to
Modules > Contracts Management > Time Charter Contracts.The Time Charter Contracts window will openopens. - Click applicable vessel in the left-hand menu tree. Its fields will display displays to the right.
- Click the TC contract to be edited in the upper right-hand field - it will highlight.
- Edit as appropriate the fields displayed in the respective tabs in the lower right-hand field.
- Click Save.
- Go to
- To delete Delete a Time Charter (In) Contract:
- Go to
Modules > Contracts Management > Time Charter Contracts.The Time Charter Contracts window will openopens. - Click applicable vessel in the left-hand menu tree. Its fields will display displays to the right.
- Click the TC contract to be edited in the upper right-hand field - it will highlight.
- Click Delete. A pop-up will open opens asking to confirm deletion.
- Click Yes. The pop-up will close and the selected TC Contract is deleteddelete.
- Go to
...
Edit/Remove Terms in the Gerneral Terms Tab
- To edit Edit terms in the General Terms tab:
- Go to
Modules > Contracts Management > Time Charter Contracts.The Time Charter Contracts window will openopens. - Click the applicable vessel in the left-hand menu tree. Its fields will display displays to the right.
- Click the TC contract to be edited in the upper right-hand field - its fields will display displays in the lower right-hand field.
- Click the General Terms tab. Its fields will displaydisplays.
- Click the Terms row to be edited in the lower left-hand menu tree - it will highlight.
- Edit as appropriate in the lower right-hand field (text-box).
- Click Save.
- Go to
- To remove terms Remove Terms in the General Terms tab:
- Go to
Modules > Contracts Management > Time Charter Contracts.The Time Charter Contracts window will openopens. - Click applicable vessel in the left-hand menu tree. Its fields will display displays to the right.
- Click the TC contract to be edited in the upper right-hand field - its fields will diaplay displays in the lower right-hand field.
- Click the General Terms tab. Its fields will displaydisplays.
- In the lower left-hand field click the Terms row to be removed - it will highlight.
- Click Remove. A pop-up will open opens asking to confirm removal.
- Click Yes. The pop-up will close and the selected term is removed.
...
Create an Internal Relet
Go to
Modules > Contract Management > Time Charter Contracts.The Time Charter Contracts window will openopens.- Click the time charter (TC) contract to make the internal relet with in the left-hand menu tree (External folder). Its fields will appear appears to the right.
Note: Creating internal relets REQUIRES an existing Time Charter (TC) In contract. - Click Create New Internal Relet. The Creat Internal relet fields will display displays in the lower right-hand field.
Example: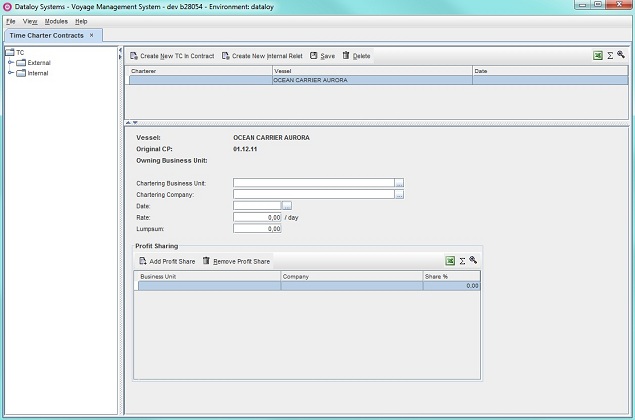
- Fill in the fields as follows:
- Enter either
- the name of the business unit entering into the relet under Chartering Business Unit
- or click the Triple Dot Selector next to the field. A pop-up with a list of input values will openopens. Select field and click OK.
Example: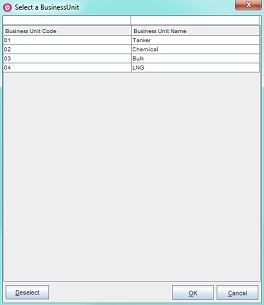
- Enter either
the name of the legal entity entering into the relet under Chartering Company or
or click the Triple Dot Selector next to the field. A pop-up with a list of input values will openopens. Select field and click OK.
- Enter either
the date the relet was entered into under Date
or click the Triple Dot Selector next to the field. A pop-up with a calendar will openopens. Select date and click OK.
Enter the rate (per day) under Rate.
Enter applicable lumpsum under Lumpsum (if any).
- In the Profit Sharing panel, enter all internal profit shares for all activities performed by a vessel during the TC contract relet (If none - leave blank):
To add Add a profit share entry:Anchor TC6 TC6 - Click Add Profit Share. A row will appear in the Profit Sharing field.
- Click each respective row field and
- enter either
- the name of the business unit entering into profit share under Business Unit
- or click the Triple Dot Selector next to the field. A pop-up with a list of input values will openopens. Select field and click OK.
- enter either
- the name of the legal entity entering into the profit share under Company.
- or click the Triple Dot Selector next to the field. A pop-up with a list of input values will openopens. Select field and click OK.
- enter the profit share dividend (in per cent) under Share %.
- enter either
- Repeat Step 4f i as applicable until all profit shares have been entered.
- To remove Remove a profit sharing entry:
- Click the profit share row to be removed - it will highlight.
- Click Remove Profit Share. A pop-up will open opens asking to confirm removal.
- Click Yes. The pop-up will close and the selected profit share is removed.
- Click Save. The relet will display displays in the theft-hand menu tree both under View by Business Unit and View by Vessel in the Internal folder.
...
Edit/Delete an Internal Relet
- To edit Edit a Internal Relet:
- Go to
Modules > Contracts Management > Time Charter Contracts.The Time Charter Contracts window will openopens. - Click applicable vessel (Internal folder) in the left-hand menu tree. Its fields will display displays to the right.
- Click the internal relet to be edited in the upper right-hand field - it will highlight.
- Edit as appropriate the fields displayed in the respective tabs in the lower right-hand field.
- Click Save.
- Go to
- To delete Delete a Internal Relet:
- Go to
Modules > Contracts Management > Time Charter Contracts.The Time Charter Contracts window will openopens. - Click applicable vessel (Internal folder) in the left-hand menu tree. Its fields will display displays to the right.
- Click the internal relet to be deleted in the upper right-hand field - it will highlight.
- Click Delete. A pop-up will open opens asking to confirm deletion.
- Click Yes. The pop-up will close and the selected internal relet is deleted.
Related Content
| Expand | ||
|---|---|---|
| ||
|