...
- Additional (or extra) ports are any type of port call aside from load and discharge ports, for example bunkering. Prerequisites are the prior entry of a vessel and existence of a ballast port.
Note: Extra ports are only linked to the voyage and an unlimited number of extra ports may be added to an estimate. A blank cargo is automatically created and added to the calculation in the Cargoes field when opening a new voyage estimate. Extra ports will not display in the Cargo Ports field as they are not dependent on any specific cargo. - Extra ports can be added to any voyage port rotation either through
- quickkey entry in the Ports field of the Main Calculation field (Cargo panel):
- Enter applicable port rotation string, i.e. load, discharge, extra ports, etc. in the Ports (or Port Rotation) field (see To enter load and discharge ports, Step 2a i-ii above), extra ports indicated by an asterix ("*") at the end of the port name.
Note: The extra port/s can be entered on either side of the port call type divider ("/"), but the Port Rotation field only allows same port call to be entered ONCE on either side of the port call type divider ("/") when entered via the quickkey. If the same port is for example visited twice as an extra port on the same side of the port call type divider ("/"), the second visit must be entered manually to the Port Rotation field. Extra ports are only linked to the voyage but can be entered together with (in the same or in different) cargo specific rotations for simplicity.
Example:
Kandla/Vadinar-Singapore* (i.e. load/discharge-extra port) - Click Enter. The corresponding port rotation automatically displays as rows in the Ports (or Port Rotation) field, the reason for call stated under Reason for Call. All extra ports entered using quickkey will by default display as E (Extra Port).
Note: All extra ports displays in the order they were entered and according to what side of the port call type divider they are placed, i.e. if entered amongst load ports they display amongst load ports and vice versa. Extra ports can be added or removed at any time during a calculation.
Example:
- Change reason for call in extra ports:
- Double-click the row field under the Reason for Call column of the extra port that needs a change of reason for call in the Ports (or Port Rotation) field - it will highlight.
- Enter either
- applicable reason for call code under
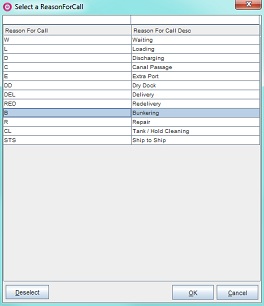
- or click the Triple Dot Selector next to the field. A pop-up with a list of reason for calls opens. Select reason for call and click OK.
Example:
Changing from E=Extra Port to B=Bunkering
- The new reason for call code will display and the estimate will automatically recalculate and update as a parameter changed.
Example:
- Enter applicable port rotation string, i.e. load, discharge, extra ports, etc. in the Ports (or Port Rotation) field (see To enter load and discharge ports, Step 2a i-ii above), extra ports indicated by an asterix ("*") at the end of the port name.
or through manual entry into the Ports (or Port Rotation) field:.Anchor ADVPR4 ADVPR4 Multiexcerpt MultiExcerptName nr2 In the Ports field, select the port call to add a port call before or after in the rotation - it will highlight. If initial port call is to be entered - go to next step.
- Either
- click Insert and from the menu, depending on where in the new port is to be added, select Before or After.
Note: If no previous entry to the Ports field has been made - the Before option will be disabled. Activates after first port call entry. If so, select After. - or go to the Port Call menu and from the drop-down select Insert either Before or After depending on where the extra port is to be added.
- click Insert and from the menu, depending on where in the new port is to be added, select Before or After.
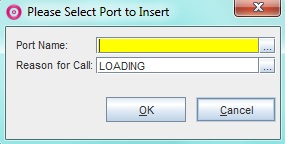
- The Please Select Port to Insert pop-up opens.
- Fill in the fields as follows:
- Enter either
- the port call name under Port Name
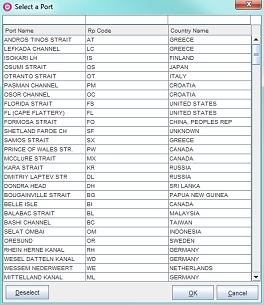
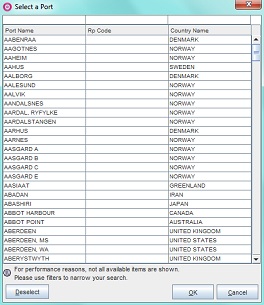
- or click the Triple Dot Selector next to the field. A pop-up with a list of port calls opens. Select port call and click OK.
Example:
- Enter either
- the reason for call under Reason for Call or
Note: Defaults to Loading. - or click the Triple Dot Selector next to the field. A pop-up with a list of input values opens. Select reason for call and click OK.
- the reason for call under Reason for Call or
- Enter either
- Click OK. The pop-up will close and the new extra port will display as a row in its designated place (i.e. before/after the selected port call) in the Ports (or Port Rotation) field, including selected reason for call. The estimate will automatically recalculate and update as a parameters changed - but NOT the cargo port rotation displayed in the Main Calculation field (Cargo panel) as extra ports are only linked to the voyage.
Example:
- quickkey entry in the Ports field of the Main Calculation field (Cargo panel):
...
Routing points can be defined as specific locations that a vessel pass through when en route between port calls and are used in Dataloy VMS when scheduling voyage rotation. Prerequisites are the prior entry of a vessel and existence of a ballast port and cargo (a blank cargo is automatically created and added to the calculation in the Cargoes field when opening a new voyage estimate). (View list of most common routing points, go to Routing Points, Canals, Piracy Routing Lists).
Note: ONLY use a routing point's individual code when entering a specific routing point, (for example GI=Gibraltar Strait), or it will not be recognised as a routing point. Routing points are only linked to the voyage and an unlimited number of routing points may be added to an estimate. Routing points will not display in the Cargo Ports field as they are not dependent on any specific cargo but can be entered together with (in the same or in different) cargo specific rotations for simplicity.- Routing points can be added as part of a voyage rotation and used to re-route a voyage by manual override.
- Add routing points either by
- automatic scheduling by Dataloy VMS
- Enter applicable port rotation string, i.e. load, discharge, extra ports, etc. in the Ports (or Port Rotation) field.
- Dataloy VMS calculates and displays the shortest route for the entered rotation in the Ports (or Port Rotation) field, automatically inserting, where needed, available default routing points.
Note: The routing point code of each added routing point will display in the Ports (or Port Rotation) field under the Routing Point column in the row of the port call it precedes. Can be manually overridden.
Example:
Port rotation: Oslo/Bristol-Algiers
Displays in the Ports field (including routing points) as: Oslo/Dover Strait (DS)-Bristol-Gibraltar Strait (GI)-Algiers
or by quickkey entry in the Ports field of the Main Calculation field (Cargo panel)Anchor ADVPR7 ADVPR7
Note: Routing points can be entered alongside cargo port calls, but are only linked to the voyage and not dependent on any specific cargo. They will therefore not display in the Cargo Ports field.- Enter applicable routing point code as if it were a port call together with the port rotation string, i.e. load, discharge, extra ports, etc. in the Ports (or Port Rotation) field.
Note: The routing point code is to be entered in the row of the port call it precedes. - Click Enter. The corresponding port rotation will automatically display as rows in the Ports (or Port Rotation) with entered routing points under the Routing Point column in the row of the port it precedes.
Note: Can be manually overridden.
Example:
GH-Oslo/Stavanger -Bergen (GH=Cape Agulhas (Cape Good Hope))
- Enter applicable routing point code as if it were a port call together with the port rotation string, i.e. load, discharge, extra ports, etc. in the Ports (or Port Rotation) field.
- or by manual entry into the Ports (or Port Rotation) field.
- Click the row field of the port call to be preceded by a routing point under the Routing Point column - it will highlight.
- Enter either
- new routing point code into the row field or
- click the Triple Dot Selector next to the field. A pop-up with a list of routing points opens. Select routing point and click OK.
Example:
- Repeat as applicable to the routing point row fields until all applicable routing points have been entered.
- automatic scheduling by Dataloy VMS
Re-route a voyage rotation either byAnchor ADVPR8 ADVPR8 - quickkey entry in the Ports field of the Main Calculation field (Cargo panel):
- Open the voyage calculation with the port rotation to be re-routed.
Example:
Oslo/Vadinar-Singapore. Ballast port: Kandla, shortest shortest route: via the Suez Canal twice. - Enter applicable routing point codes (as port calls) in the Cargo panel Ports field either prior to the port call it precedes or where the one to be replaced is in the Port (or Port Rotation) field.
Example:
Oslo/Vadinar-Singapore. Ballast port: Kandla, shortest route: via the Suez Canal before both Oslo and Vadinar. Replace the Suez Canal with routing point Cape Agulhas (GH) (Cape Good Hope).
Quickkey entry should be: GH-Oslo/GH-Vadinar-Singapore.
- Click Enter. The calculation and rotation updates and recalculates as parameters changed.
Example:
- Open the voyage calculation with the port rotation to be re-routed.
or by manual entry into the Ports (or Port Rotation) field.Anchor ADVPR9 ADVPR9 - Open the voyage calculation with the port rotation to be re-routed.
- In the Ports field, click the row field of the port call to be preceded by a routing point/have prior routing point/canal amended under the Routing Point column - it will highlight.
- Enter the new routing point code into the row field.
- Selected routing point code will appear in the row field.
- Remove canal row if re-routing from canal - if not - go to Step 6:
- Click the canal row to be removed - it ill highlight.
- Either
- Click Remove
- or go to the Port Call menu and from the drop-down select Remove.
A pop-up opens asking to confirm removal.
Click Yes. Selected row will delete.
- The calculation will update and recalculate as parameters changed.
- Repeat as applicable until re-routing is complete.
...
Canals are routing points that will by default show as a separate port call in the port rotation in order to address the time and cost involved with canal passages directly to the canal. The canal time and cost has a direct impact on the result and length of a voyage. To each canal a default passage time is added automatically added to the calculation, for example the Suez Canal = one day time passage (time default can be manually overridden by Administrator/Superuser). The Canal passage cost must be manually entered under the Cost LC (Cost Local Currency) column and reason for call will display as C (=Canal Passage). Dataloy VMS only treats canals as routing points when routing between port calls, but displays canals as port call rows in the Ports (or Port Rotation) field. As canals are routing points, they are only linked to the voyage and are not dependent on any specific cargo, but can be entered together with (in the same or in different) cargo specific rotations for simplicity. They will therefore not display in the cargo Ports field or in the Ports field of the Cargo panel (Main Calculation field) if entered manually. (View list of most commonly used canals, go to Routing Points, Canals, Piracy Routing Lists).
Canals can be added Added as part Part of a voyage rotation Voyage Rotation either by
- automatic scheduling by Dataloy VMS
- Enter applicable port rotation string, i.e. load, discharge, extra ports, etc. in the Ports (or Port Rotation) field.
- Dataloy VMS calculates and displays the shortest route for the entered rotation in the Ports (or Port Rotation) field, automatically inserting, where needed, available default routing points and canals.
Note: The canal will be inserted as a row before the port call it precedes. Can be manually overridden.
Example:
Port rotation: Oslo/Kandla-Singapore
Displays in the Ports field (including canal as routing point, but displayed as port call) as: Oslo/Suez Canal-Kandla-Singapore
- or by quickkey entry in the Ports field of the Main Calculation field (Cargo panel) - can be entered either as port call (full name) or as routing point (routing point code), for example Suez Canal or SC. Either will display as a port call row in the Ports (or Port Rotation) field. (To enter as port call go to Enter Load and Discharge Ports, Step 2a i-ii or as routing point go to Routing Points, Step 2aii 1-2 above).
Example:
Casablanca/SC-Durban
- or by manual entry into the Ports (or Port Rotation) field - can only be entered as port call and will only display in the Port (or Port Rotation) field.
- In the Ports field click the port call to enter a canal before or after in the rotation - it will highlight.
Either
click Insert and from the menu, depending on where in the new port is to be added, select Before or After.
- or go to the Port Call menu and from the drop-down select either Before or After depending on where the extra port is to be added.
- The Please Select Port to Insert pop-up opens.
- Fill in the fields as follows:
- Enter either
- the canal name under Port Name
- or click the Triple Dot Selector next to the field. A pop-up with a list of port calls opens. Select port call and click OK.
Example:
- Enter either
- the Canal Passage under Reason for Call
Note: Defaults to Loading. - or click the Triple Dot Selector next to the field. A pop-up with a list of input values opens. Select Canal Passage and click OK.
- the Canal Passage under Reason for Call
- Click OK. The pop-up will close and the newly entered canal display as a row in it's designated place (i.e. before/after the selected port call) in the Ports (or Port Rotation) field, including selected reason for call. The estimate automatically recalculates and updates as a parameters changed - but NOT the cargo port rotation displayed in the Main Calculation field (Cargo panel) as canals are only linked to the voyage.
- Enter either
...
- Open applicable voyage charter calculation. Its fields will display.
- In the Ports (or Port Rotation) field click the port call to be moved - it will highlight.
- Either
- click Move and from the menu, depending on which way the port call is to be moved in the rotation, select Up or Down
Note: The port will move one step, i.e. be sorted above or beneath the port calls either preceding or following it.
- or go to the Port Call menu and from the drop-down select Move and then either Up or Down depending on where the port is to be moved to.
- The estimate automatically recalculates and update parameters have changed - but NOT the port calls in the Cargo Ports field as these are linked to individual cargo rotation/s, not the voyage rotation.
...
- Edit a Port Rotation:
- Go to
Modules > Voyage Estimate.The Voyage Estimate window opens. - Open applicable voyage calculation to be edited - it will display.
- Edit the port rotation either
- through the quickkey in the Ports field of the Main Calculation field (Cargo panel)
- Click the quickkey field where the port rotation is entered - it will highlight (yellow) - and edit.
- Click Enter. The estimate recalculates and updates. All changes auto-save.
- or by editing manually in the Ports (or Port Rotation) field.
- Click the port call row to be edited - it will highlight.
- Edit port call row fields as applicable.
The estimate recalculates and updates. All changes auto-save.
- Delete a Port Call:
- Go to
Modules > Voyage Estimate.The Voyage Estimate window opens. - Open applicable voyage calculation to be edited - it will display.
- Delete applicable port call/s either
- through the quickkey in the Ports field of the Main Calculation field (Cargo panel)
- Click the quickkey field where the port rotation is entered - it will highlight (yellow).
- Delete applicable port calls using the delete-key.
- Click Enter. The estimate recalculates and updates. All changes auto-save.
- or by deleting manually in the Ports (or Port Rotation) field
- Click the port call row to be edited - it will highlight.
- Either
- click Remove
- or go to the Port Call menu and from the drop-down select Remove.
- click Remove
- A pop-up opens asking to confirm removal.
- Click Yes. The pop-up will close and the selected row delete.
- The estimate recalculates and updates. All changes auto-save.
- through the quickkey in the Ports field of the Main Calculation field (Cargo panel)
- Go to
- Delete a Port Rotation:
- Go to
Modules > Voyage Estimate.The Voyage Estimate window opens. - Open applicable voyage calculation to be edited - it will display.
- Delete applicable port rotation either through
- the quickkey in the Ports field of the Main Calculation field (Cargo panel):
Note: If multiple cargoes: Select cargo first. The individual port rotation of the cargo will display (quickkey).- Click the quickkey field where the port rotation is entered - it will highlight (yellow).
- Delete entered port rotation string using the delete-key (or highlight and press delete).
- Click Enter. The estimate recalculates and updates. All changes auto-save.
- or by deleting manually in the Ports (or Port Rotation) field
- Click the port call row to be deleted- it will highlight.
- Either
- click Remove
- or go to the Port Call menu and from the drop-down select Remove.
- A pop-up opens asking to confirm removal.
- Click Yes. The pop-up will close and the selected row delete.
- Repeat as applicable until all port call in the port rotation have been deleted.
- The estimate recalculates and updates. All changes auto-save.
- the quickkey in the Ports field of the Main Calculation field (Cargo panel):
- Go to
...


