...
- Building a port rotation in a time charter estimate requires the prior entry of a vessel and existence of a ballast port.
Note: If no ballast port is automatically retrieved from operations upon vessel name entry or manually entered, the system will automatically recognise the very first entered port call (irrespective of port type) added to the full time charter calculation as ballast port also. The ballast port field will populate accordingly.
Example: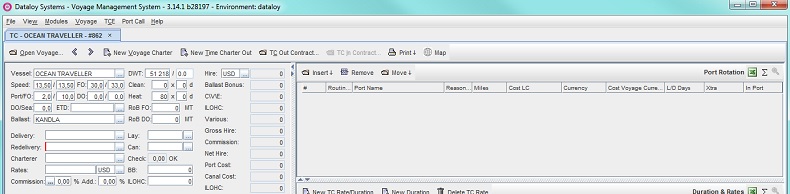
- Enter applicable delivery and redelivery ports to the calculation either by
- port entry in the Delivery and Redelivery fields of the Main Calculation field (Time Charter (TC) Contract panel):
Note: A minimum of one delivery and one redelivery port must be entered. ONLY delivery and redelivery ports can be entered in the Time Charter (TC) Contract panel. Manual entries are required for all other port call entries.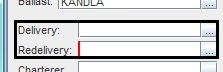
- Enter the delivery port under Delivery.
Note: Need only to enter the first few characters of the port name. Dataloy VMS will search available ports and display the first matching entered characters, for example enter "VISAK" and "VISAKHAPATNAM" displays. - Enter the redelivery port under Redelivery (RED marking = required field).
- Click Enter. The corresponding port rotation will display as rows in the Port Rotation field, including reason for call (RED, DEL) and the calculated distances between ballast, delivery and redelivery ports and the number of sea days needed for the voyage (Waiting panel, Main calculation field). If the delivery port and the ballast port are identical, the distance will list as zero.
Example: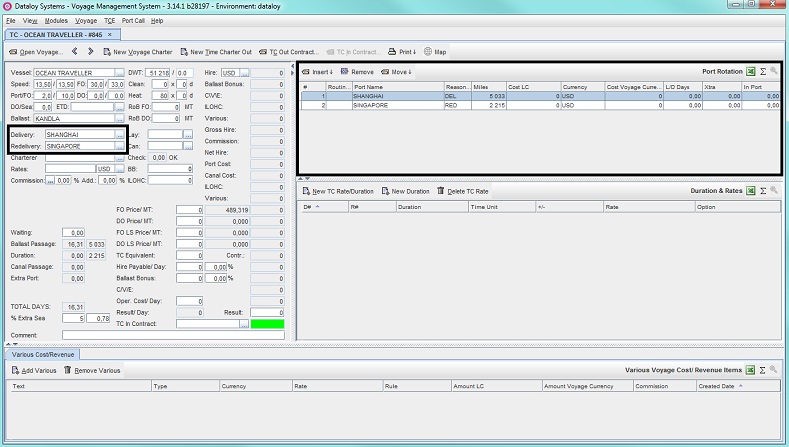
- Go to Step 3.
- Enter the delivery port under Delivery.
- or by manual entry into the Port Rotation field:
Note: Any type of port call can be entered manually to a rotation. Manually added delivery and redelivery port calls ONLY displays in the Port Rotation field and must be added manually in the Delivery and Redelivery fields of the Main Calculation field (Time Charter (TC) Contract panel).- In the Port Rotation field, select the port call to add a port call before or after in the rotation - it will highlight. If initial port call is to be entered - go to next step.
- Either
- click Insert and from the menu, depending on where in the new port is to be added, select Before or After
Note: If no previous entry to the Port Rotation field has been made - the Before option will be disabled. Activates after first port call entry. If so, select After.
- or go to the Port Call menu and from the drop-down select Insert and then either Before or After depending on where the new port is to be added.

- click Insert and from the menu, depending on where in the new port is to be added, select Before or After
- The Select Port to Insert pop-up opens.
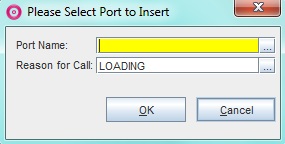
- Fill in the fields as follows:
- Enter either
- the port call name under Port Name
- or click the Triple Dot Selector next to the field. A pop-up with a list of input values will open. Select port call and click OK.
Example: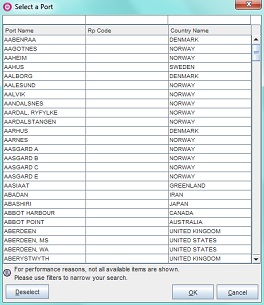
- Enter the reason for call under Reason for Call or.
Note: Reason for call will here be either Delivery or Redelivery depending on which is being entered.
- Enter either
- Click OK. The pop-up will close and the new port call will display as a row in it's designated place (i.e. before/after the selected port call) in the Port Rotation field, including reason for call (DEL, RED) and the distances between ballast, delivery and redelivery ports). If the initial port and the ballast port are identical, the distance between will list as zero.
- Repeat until both delivery and redelivery ports are entered and displayed.
- Go to Step 3.
- port entry in the Delivery and Redelivery fields of the Main Calculation field (Time Charter (TC) Contract panel):
The Ports Rotation field lists by default delivery port first and thereafter discharge port. Entered port calls will displays as individual rows, each row containing relevant port call data.Anchor ADVTC1 ADVTC1
Example: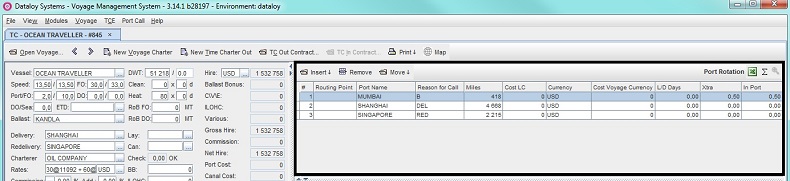
- The populated row fields can be manually overridden (except #, Cost Voyage Currency, L/D Days and In Port) - edit if applicable:
- List (#) field lists port call order according to reason for call type.
Note: Automatically lists delivery port before redelivery port, irrelevant of order of entry (if ports were entered manually). All other port calls can only be entered manually and will display, irrelevant of port call type, in the place they were entered in the port rotation. - Enter applicable routing point (if any) under Routing Point.
Note: Normally populated with elsewhere entered data. - Enter port call name under Port Name.
Note: Will be populated with elsewhere entered data. - Enter reason for call under Reason for Call.
Note: Port call row fields for delivery and redelivery ports normally populated with elsewhere entered data. - Miles automatically displays the distance in nautical miles between port calls (retrieved from the DDT).
Note: If the initial port call and the ballast port are identical, the distance will list as zero. All distances can be manually overridden. - Enter port cost in applicable currency under Cost LC (Cost Local Currency).
Note: Only required for ports prior and after the delivery and redelivery ports. Port costs for the delivery port, the redelivery port and the ports inbetween are to be paid by the Charterer. - Enter port cost currency under Currency.
Note: Defaults to USD. - Cost Voyage Currency displays the port cost in the voyage currency.
- L/D Days (Load/Discharge Days) displays the time allowed to load/discharge (in days).
Note: For TC this column is not applicable. - Enter the individual extra days estimated to spend in each port under Xtra.
Note: Defaults to 0.5 days. The total of all entered extra time spent in all port will display under Extra Port (Main Calculation field, Turnaround panel). Note: ONLY applicable to ports prior to delivery port and after the redlivery port. Defaults to 0.5 days. The total of all entered extra time spent in all port will display under Extra Port (Main Calculation field, Turnaround panel). - In Port displays the total number of days in port (i.e. the sum of L/D DAYS and Xtra days).
- List (#) field lists port call order according to reason for call type.
- The populated row fields can be manually overridden (except #, Cost Voyage Currency, L/D Days and In Port) - edit if applicable:
...
- Open the time charter calculation to add a port call/s to. Its fields will display.
Note: All port calls entered into a time charter calculation display in the Port Rotation field. Adding additional port calls requires the prior existence of a vessel and a ballast-, delivery- and redelivery port. All port calls can be added manually, but ONLY delivery and redelivery ports can be added through the Delivery and Redelivery fields of the Main Calculation field (Time Charter (TC) Contract panel). An unlimited number of load, discharge and extra ports may be added to an estimate (and to any estimate). Extra ports are any type of port call aside from load, discharge, delivery and redelivery ports, for example bunkering. - Enter applicable load, discharge and/or extra ports:
In the Port Rotation field, select the port call to add a port call before or after in the rotation - it will highlight. If initial port call is to be entered - go to next step.Anchor ADVTC3 ADVTC3 - Either
- click Insert and from the menu, depending on where in the new port is to be added, select Before or After.
Note: If no previous entry to the Ports field has been made - the Before option will be disabled. Activates after first port call entry. If so, select After.
- or go to the Port Call menu and from the drop-down select Insert either Before or After depending on where the extra port is to be added.
- click Insert and from the menu, depending on where in the new port is to be added, select Before or After.
- The Select Port to Insert pop-up opens.
- Fill in the fields as follows:
- Enter either
- the port call name under Port Name
- or click the Triple Dot Selector next to the field. A pop-up with a list of input values will open. Select port call and click OK.
Example:
- Enter the reason for call under Reason for Call or.
Note: Reason for call will here be either Delivery or Redelivery depending on which is being entered.
- Enter either
- Click OK. The pop-up will close and the new extra port will display as a row in it's designated place (i.e. before/after the selected port call) in the Port Rotation field, including selected reason for call. The estimate will automatically recalculate and update as a parameters changed.
Example:
Manually added extra port: Mumbai. Only displays in the Port Rotation field.
- Repeat Step 2a-e as applicable until all load, discharge and/or extra ports are entered with accurate reasons for call. For each entered port call the voyage route pattern will update.
- Complete the details for each port call as applicable in the Port (or Port Rotation) field (see To enter load and discharge ports, Step 3).
...
Adding an extra ballast port to a voyage rotation, for example the end of a voyage rotation, is possible by treating the intended extra ballast port as an extra port. To add an extra port - go to To add additional port calls (load, discharge, extra portsAdd Additional Port Calls (Load, Discharge, Extra Ports).
Anchor ADV3 ADV3
Routing Points
| ADV3 | |
| ADV3 |
- Routing points can be defined as specific locations that a vessel pass through when en route between port calls and are used in Dataloy VMS when scheduling voyage rotation. Prerequisites are the prior entry of a vessel and existence of a ballast, delivery- and a redelivery port. (View list of most common routing points, go to Routing Points, Canals, Piracy Routing Lists).
Note: ONLY use a routing point's individual code when entering a specific routing point, (for example GI=Gibraltar Strait), or it will not be recognised as a routing point. Routing points are only linked to the voyage and an unlimited number of routing points may be added to an estimate. - Routing points can be added as part of a voyage rotation and used to re-route a voyage by manual override.
- Add routing points either by
- automatic scheduling by Dataloy VMS:
- Enter applicable ballast, delivery and redelivery ports in the Main Calculation field (Vessel panel and Time Charter (TC) Contract panel).
- Dataloy VMS calculates and displays the shortest route for the entered rotation in the Port Rotation field, automatically inserting, where needed, available default routing points.
Note: The routing point code of each added routing point will display in the Ports Rotation field under the Routing Point column in the row of the port call it precedes. Can be manually overridden.
Example:
Port rotation: Rotterdam (DEL)/New York (RED), Ballast: Kandla
Displays in the Port Rotation field (including routing points) as: GH-Rotterdam/New York (NY) (GH=Cape Agulhas (Cape Good Hope))
- or by manual entry into the Ports Rotation field:
- Click the row field of the port call to be preceded by a routing point under the Routing Point column - it will highlight.
- Enter either
- new routing point code into the row field
- or click the Triple Dot Selector that will appear next to the field. A pop-up with a list of routing points will open. Select routing point and click OK.
Example:
- Repeat as applicable to the routing point row fields until all applicable routing points have been entered.
- automatic scheduling by Dataloy VMS:
Re-route a voyage rotation:Anchor ADVTC4 ADVTC4 - Open the time charter calculation with the port rotation to be re-routed.
- In the Port Rotation field, click the row field of the port call to be preceded by a routing point/have prior routing point/canal amended under the Routing Point column - it will highlight.
- Enter either
- new routing point code into the row field or
- click the Triple Dot Selector that will appear next to the field. A pop-up with a list of routing points will open. Select routing point and click OK.
- Selected routing point code will appear in the row field.
- Remove canal row if re-routing from canal - if not - go to Step viii:
- Click the canal row to be removed - it ill highlight.
- Either
- Click Remove

- or go to the Port Call menu and from the drop-down select Remove.

- Click Remove
- A pop-up opens asking to confirm removal.
- Click Yes. Selected row will delete.
The calculation will update and recalculate as parameters changed.Anchor ADVTC4 ADVTC4 - Repeat as applicable until re-routing is complete.
- Add routing points either by
...
- automatic scheduling by Dataloy VMS:
- Enter applicable port rotation string, i.e. delivery, redelivery, load, discharge, extra ports, etc. in the Port Rotation field.
- Dataloy VMS calculates and displays the shortest route for the entered rotation in the Ports (or Port Rotation) field, automatically inserting, where needed, available default routing points and canals.
Note: The canal will be inserted as a row before the port call it precedes. Can be manually overridden.
Example:
Port rotation: Rotterdam (DEL)/New York (RED), Ballast: Kandla
- or by manual entry - can only be entered as port call and will only display in the Port Rotation field.
- In the Port Rotation field click the port call to enter a canal before or after in the rotation - it will highlight.
- Either
- click Insert and from the menu, depending on where in the new port is to be added, select Before or After.
- or go to the Port Call menu and from the drop-down select either Before or After depending on where the extra port is to be added.
- click Insert and from the menu, depending on where in the new port is to be added, select Before or After.
- The Select Port to Insert pop-up opens.
- Fill in the fields as follows:
- Enter either
- the canal name under Port Name
- or click the Triple Dot Selector next to the field. A pop-up with a list of port calls will open. Select port call and click OK.
Example:
- Enter the Canal Passage under Reason for Call.
- Click OK. The pop-up will close and the newly entered canal display as a row in it's designated place (i.e. before/after the selected port call) in the Port Rotation field, including selected reason for call. The estimate will automatically recalculate and update as a parameters changed.
Removing a canal from a port rotation requires the removal of the port call after in the port rotation before the canal can be removed. As Dataloy VMS always schedules the shortest route, the system will automatically reinsert the canal if it is removed without first removing the following port call (unless voyage is re-routed using routing points go to Routing pointsPoints, Step 2b). Removing the port call enables the canal to thereafter be removed.
...
(View list of available piracy routing points and codes, go to Routing Points, Canals, Piracy Routing Lists).
...
Rotate Port Call Order
The Port Rotation field lists all entered port calls in the place where they were entered. Only the delivery port will by default automatically be inserted before redelivery port. Each entered port call display as individual rows, each row containing relevant port call data. Port call order can be changed (i.e. port call order rotation) in the Port Rotation field.
...