Appoint, Update, Cancel Port Call
Short Description
Appointing, updating and cancelling port calls are part of the Disbursement Account (DA) process and can only be performed in the Booking and Operations module of Dataloy VMS. Appointing a port call is the initial step of the process.
When a port call appointment is made information, such as the port calls’ unique ID, what voyage, vessel ID, agent information, etc., is sent from Dataloy VMS to applicable agency system. The purpose is to associate port costs to the correct port call. Each port call has a unique ID (linked to port) which tells which port call a cost belongs to.
If new or additional data needs to be sent regarding a port call, an update can be made. A port call appointment can also be cancelled.
If an appointment, update or cancellation fails, a messege will be sent from the agency system to Dataloy VMS and the status of the port call will in the Port Call Browser module change to Failed in the Agency Appointment Status column. If this occurs, please contact relevant agency system and Dataloy.
Chapters:
Long Description
Appoint Port Call
- Go to
Modules > Booking and Operations > Booking and Operations.The Booking and Operations window opens. - Select applicable vessel and voyage. The route with port calls opens in the lower section of the screen.
Example:
Ocean Carrier
In the Port Rotation - Cost tab enter applicable agent in applicable port call row field in the Agent column.
Note: An agent MUST be set BEFORE appointing a port call.
Example:
Ocean Carrier
- In the Port Rotation - Schedule tab click the port call to be appointed - it will highlight.
- Right-click and in the menu that opens go to Agency System > Appoint Port Call.
Example:
Ocean Carrier
Selecting Agent Type applies to S5 integrations ONLY. All other integrations: go to Step 7.
- S5 Integrations:
- The Agent Type pop-up opens and from the drop-down menu select applicable agent type.
Example:
- Click OK. The pop-up will close and another open requesting confirmation of appointment.
- Click Yes. The pop-up will close.
- The Agent Type pop-up opens and from the drop-down menu select applicable agent type.
- S5 Integrations:
- The port call information is sent to applicable agency system and in the Port Call Browser module the port call's status changes from Not Sent to Sent in the Agency Appointment Status column.
Example:
Ocean Carrier
- Once the appointment has been validated by the agency system an acknowledgement will be sent to Dataloy VMS. Once received, the port call's status changes to Appointed.
- To continue with the DA process - go to the Receive DA Data.
Update Port Call
- Go to
Modules > Booking and Operations > Booking and Operations.The Booking and Operations window opens. - Select applicable vessel and voyage. The route with port calls opens in the lower section of the screen.
- Specify Agent:
- Agent is already specified in the Port Rotation - Cost tab: go to Step 4.
- Agent is not specified:
- Go to the Port Rotation - Cost tab.
- Enter applicable agent in applicable port call row field in the Agent column.
Note: An agent MUST be set BEFORE appointing a port call.
- In the Port Rotation - Schedule tab click the port call to be updated - it will highlight.
- Right-click and in the menu that opens go to Agency System > Update Port Call.
Example:
Ocean Carrier
- Selecting Agent Type applies to S5 integrations ONLY. All other integrations: go to Step 7.
- S5 Integrations:
- The Agent Type pop-up opens and from the drop-down menu select applicable agent type.
Example: - Click OK. The pop-up will close and another open requesting confirmation of updated appointment.
- Click Yes. The pop-up will close.
- The Agent Type pop-up opens and from the drop-down menu select applicable agent type.
- S5 Integrations:
- Click Yes. The pop-up will close and the port call update is sent to applicable agency system and in the Port Call Browser module the port call's status changes from Appointed to Update Sent in the Agency Appointment Status column.
- Once the update has been validated by the agency system an acknowledgement will be sent to Dataloy VMS. Once received, the port call's status changes to Updated.
To continue with the DA process - go to the Receive DA Data.
Cancel Port Call
- Go to
Modules > Booking and Operations > Booking and Operations.The Booking and Operations window opens. - Select applicable vessel and voyage. The route with port calls opens in the lower section of the screen.
- In the Port Rotation tab click the port call to be cancelled - it will highlight.
- Right-click and in the menu that opens go to Agency System > Cancel Port Call.
Example:
Ocean Carrier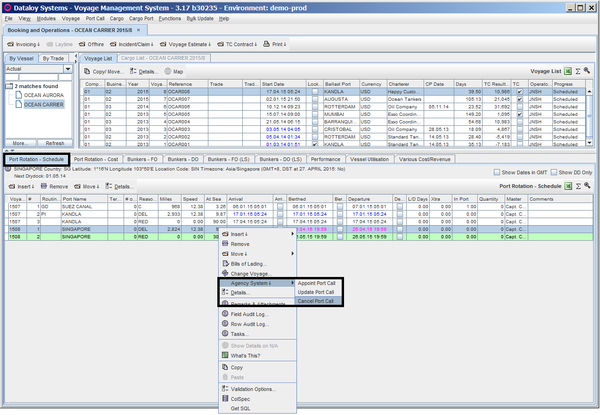
- Selecting Agent Type applies to S5 integrations ONLY. All other integrations: go to Step 7.
- S5 Integrations:
- The Agent Type pop-up opens and from the drop-down menu select applicable agent type.
Example:
- The Agent Type pop-up opens and from the drop-down menu select applicable agent type.
- S5 Integrations:
- Click OK. The pop-up will close and another open requesting confirmation of cancellation.
- Click Yes. The pop-up will close.
- The port call cancellation is sent to applicable agency system and in the Port Call Browser module the port call's status changes from Appointed to Cancellation Sent in the Agency Appointment Status column.
- Once the cancellation has been validated by the agency system an acknowledgement will be sent to Dataloy VMS. Once received, the port call's status changes to Cancelled.
- To continue with the DA process - go to the Receive DA Data.