Make-A-Booking
- Former user (Deleted)
Short Description
Dataloy VMS enables users to book cargo either via the the Voyage Estimate module or directly in the Booking and operations module. There are different options available when making a booking, either a new voyage can be created and the cargo to be booked added to it, or an existing voyage can be opened and a cargo can be added to an already existing one, (i.e. a cargo can be booked to be transported by a vessel during the same voyage as another booking).
There are four methods to book a cargo:
- Voyage Estimate:
- Creating a new voyage and cargo which, once the estimate is turned into a fixture, will automatically be transferred to operations for execution. Here, the cargo IS the booking.
- Adding a cargo (i.e. making a booking) to an already existing fixture. Once added to the fixture's adjusted estimate, it will automatically transfer to operations.
- Booking and Operations:
- Creating a new voyage and cargo directly in operations
- Adding a cargo (i.e. making a booking) to an already existing fixture.
The To-Make-A-Booking process page provides step-by-step instructions on how to perform a booking by creating an new voyage and adding a cargo and by booking a cargo to an already existing voyage both using the Voyage Estimate module and directly in the Booking and Operations module.
Chapters:
Long Description
Make a Booking by Creating a Voyage with Cargo Using Voyage Estimate
- Create a voyage and cargo by following the step-by-step instructions at Create a Voyage Charter Calculation/Estimate, Steps 1-8.
- Freeze the voyage as per the step-by-step instructions:
Note: BEFORE FREEZING A VOYAGE: Specify the broker commissions entered in the Cargo panel of the Main Calculation field (if applicable) by following the step-by-step instructions of the Create a Voyage Charter Calculation/Estimate, Step 3bi 13a.
This step is retrieved from Modules > Voyage Estimate > Advanced Port Rotation > Turn a Voyage Charter Calculation Into an Actual Voyage.You do not have a valid <a href="https://apps.appf.re/me/mp/cloud?hosting=cloud&tab=overview">MultiExcerpt</a> app license. Please sign up for a free trial or purchase a license through the <a href="https://apps.appf.re/me/mp/cloud?hosting=cloud&tab=overview">Atlassian Marketplace</a>.
- Go to the Voyage menu and from the drop-down select Booking and Operations.
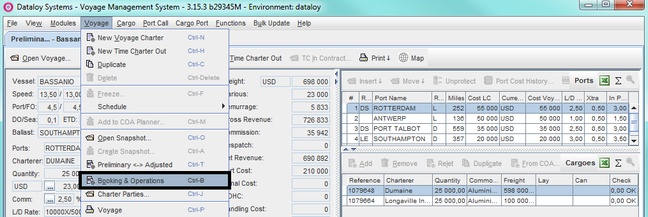
- The Booking and Operations module opens in a separate tab.
- Click the vessel the booking was made for in menu tree in the By Vessel tab (left-hand field) - it will highlight.
- All the vessel's voyages displays in the Voyage List (upper, right field) - the most recent at the top. The lower fields display schedule, port rotation and other voyage data/tab and in each listed per voyage (and port rotation/voyage).
Note: By default the VMS automatically generates a preliminary estimated voyage schedule, ROB estimation and bunker consumption schedule for the port rotation utilising data of the vessel's previous voyage into the new. By default will the most recent voyage always be listed at the top of the Voyage List.
Example: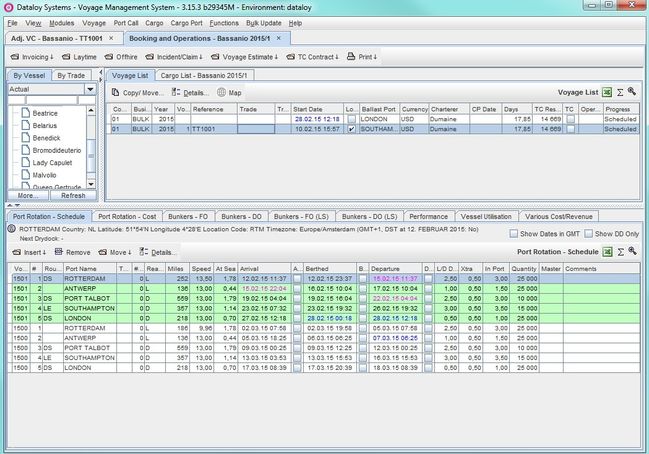
- In the Voyage List tab:
- Click applicable voyage in the Voyage List (upper right field) - it will highlight.
- Review and edit (if applicable) the voyage start date under Start Date.
Note: The VMS automatically generates a start date of the voyage, by default the departure date date of the last port of the previous voyage. Should normally only need to be modified when entering the first voyage of a vessel. Enter date and time as ddmmyytttt, for example: September 17 2014, 08:00, type: "1709140800". This will display as "17.09.14 08:00". - Review and edit (if applicable) the voyage ballast port under Ballast Port.
Note: Ballast port always defaults to the last port of the previous voyage, retrieved from the previous voyage's port rotation. Should normally only need to be modified when entering the first voyage of a vessel.
- In the Port Rotation - Schedule tab:
- Review and edit as applicable (duplicated voyages: edit as applicable) the automatically generated (estimated) voyage schedule up to the current point in time - it will be highlighted in green. Fields to review and/or edit:
Note: Populated fields can be manually overridden.The voyage schedule automatically recalculates based on any changes made. All changes are auto-saved.- Miles displays the default distance from the previous port calculated by the VMS.
Note: Change results in At Sea and Arrival fields recalculating as the speed remains constant. The Miles field can also be edited to display actual sailing distance. - Speed displays the default vessel speed.
Note: Change results in At Sea and Arrival fields recalculating. - At Sea displays the number of estimated days at sea between ports (i.e. number of days from previous port).
Note: Change results in Speed and Arrival fields recalculating. - Arrival displays the estimated time of arrival (ETA) at a port (or manually entered actual time of berthing).
Note: Arrival = Departure of previous port + At Sea days. Change of ETA results in the ETB, Speed and At Sea fields recalculating as well as changing preceding port's ETD results in the current port's ETA recalculating. Enter date and time as ddmmyytttt, for example: September 17 2014, 08:00, type: "1709140800". This will display as "17.09.14 08:00". - Berthed displays the estimated time of mooring at a port (or manually entered actual time of departure).
Note: Berthed = Arrival + Xtra days. Change of ETB results in the ETD and Xtra fields recalculating as well as changing the current port's ETA results in the ETB recalculating. Enter date and time as ddmmyytttt, for example: September 17 2014, 08:00, type: "1709140800". This will display as "17.09.14 08:00". - Departure displays the estimated time of departure (ETD) at a port (or manually entered actual time of arrival).
Note: Departure = Berthed + L/D Days. Change of ETD results in the L/D Days field recalculating (load and discharge ports ONLY). Enter date and time as ddmmyytttt, for example: September 17 2014, 08:00, type: "1709140800". This will display as "17.09.14 08:00". - L/D Days displays the number of days spent loading and discharging at a port.
Note: Change results in the ETD field recalculating. L/D Days can ONLY be modified for load- and discharge ports. - Xtra displays the number of extra days in port, i. e. not loading/discharging.
Note: Change results in the ETB and ETD fields recalculating. - In Port displays the total time spent at port, i.e. from arrival to departure.
- Miles displays the default distance from the previous port calculated by the VMS.
- Review and edit as applicable (duplicated voyages: edit as applicable) the automatically generated (estimated) voyage schedule up to the current point in time - it will be highlighted in green. Fields to review and/or edit:
- In the Bunkers tabs (Bunkers - FO, Bunkers - DO, Bunkers - FO (LS), Bunkers - DO (LS)):
Note: By default the VMS automatically estimates ROB for each fuel type and per port utilising data of the vessel's previous voyage into the new. Populated fields can be manually overridden. The bunker consumption schedule/s will automatically recalculate based on changes made. All changes are auto-saved.- Review and edit (as applicable ) ROB amount of fuel in metric tonnes (MT) in the first field and enter the fuel price/MT in the second field under ROB/Price Voyage Start per bunker type in each bunker tab.
- Review and edit (as applicable ) the generated bunker consumption schedule up to the current point in time per bunker type in each bunker tab - it will be highlighted in green.
Note: Enter date and time as ddmmyytttt, for example: September 17 2014, 08:00, type: "1709140800". This will display as "17.09.14 08:00".
- Review and edit (as applicable ) ROB amount of fuel in metric tonnes (MT) in the first field and enter the fuel price/MT in the second field under ROB/Price Voyage Start per bunker type in each bunker tab.
- Click the Cargo List tab - all cargoes of the selected voyage displays.
Note: The top cargo will by default be selected with its details displayed in the lower fields.
Example: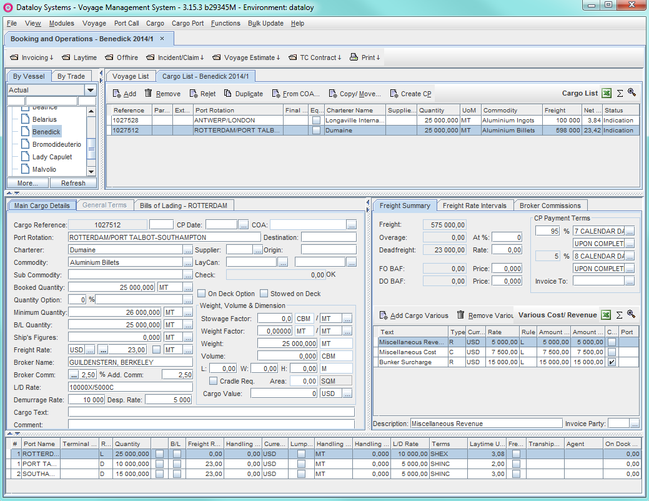
- Click the newly entered cargo (via the Voyage Estimate module) - it will highlight and its details display in the lower fields.
Note: I.e. the newly made booking (the cargo being the booking). - Review (and edit if applicable) the the displayed cargo details. The fields will be populated with data from the Voyage Estimate and elsewhere in the VMS. Edit if applicable as per To make a booking by creating a voyage with a cargo using Booking and Operations, Steps 11-12.
- The booking is complete.
Note: All entered dates are estimated dates of planned future events - not to be changed actual dates and times are available, i.e. enter time and dates of events as they occur as the voyage proceeds. All changes are auto-saved.
Make a Booking by Creating a Voyage with a Cargo Using Booking and Operations
- Go to
Modules > Booking and Operations > Booking and Operations.The Booking and Operations window opens. - Click the vessel to make a booking for in menu tree in the By Vessel tab (left-hand field) - it will highlight.
- Create a voyage for the booking by either
- entering a new voyage:
- Go to the Voyage menu and from the drop-down select New > Actual Voyage.

- The New Actual Voyage dialogue box opens.
Note: Trade templates and patterns for trade are entered, stored and maintained in the Trade Administration module. - Select applicable vessel from the drop-down menu under Vessel.
- The vessel's port templates (or trade patterns) displays in the right-hand field.
- Locate and click the trade pattern to create a voyage for - it will highlight and its ports display in the left field.
Example:
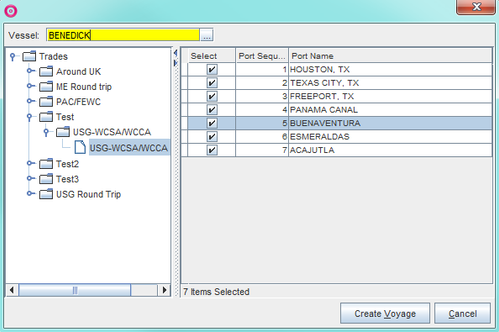
- Click Create Voyage.
- The dialogue box will close. Go to Step 4.
- Go to the Voyage menu and from the drop-down select New > Actual Voyage.
- or by copying an existing one:
- Click the voyage to be duplicated in the Voyage List - it will highlight.
- Either
- click Copy/Move...

- or go to the Voyage menu and from the drop-down select Copy/Move...
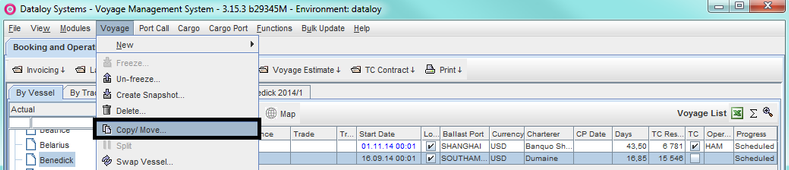
- click Copy/Move...
- The Copy/Move Voyage pop-up opens.
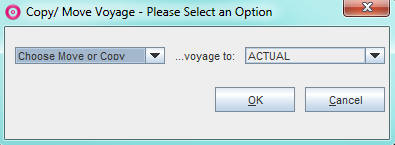
- Select Copy from the first drop-down menu (left) and ACTUAL from the second (right) under ...voyage to:
- Click OK.
- The pop-up will close. Go to Step 4.
- entering a new voyage:
- A new voyage will display at the top of the Voyage List tab and it's port rotation and estimated schedule in the Port Rotation - Schedule tab (lower field). The new voyage's start date and ballast port (Voyage List field), port rotation and preliminary schedule will be automatically generated by the VMS. The estimated port rotation and schedule will display in green in the Port Rotation - Schedule tab. A preliminary estimation for bunker consumptions will also automatically have been generated, available in the Bunkers tabs per bunker type.
Note: By default the VMS automatically generates a preliminary estimated voyage schedule, ROB estimation and bunker consumption schedule for the port rotation utilising data of the vessel's previous voyage into the new.Also, by default will the most recent voyage always be listed at the top of the Voyage List.
Example: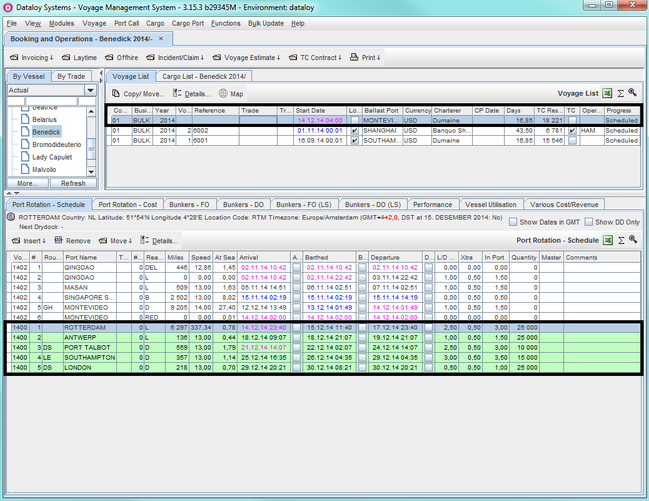
- In the Voyage List tab:
- Review and edit (if applicable) the voyage start date under Start Date.
Note: The VMS automatically generates a start date of the voyage, by default the departure date date of the last port of the previous voyage. Should normally only need to be modified when entering the first voyage of a vessel. Enter date and time as ddmmyytttt, for example: September 17 2014, 08:00, type: "1709140800". This will display as "17.09.14 08:00". - Review and edit (if applicable) the voyage ballast port under Ballast Port.
Note: Ballast port always defaults to the last port of the previous voyage, retrieved from the previous voyage's port rotation. Should normally only need to be modified when entering the first voyage of a vessel.
- Review and edit (if applicable) the voyage start date under Start Date.
- In the Port Rotation - Schedule tab:
- Review and edit as applicable (duplicated voyages: edit as applicable) the automatically generated (estimated) voyage schedule up to the current point in time - it will be highlighted in green. The fields to review and/or edit:
Note: Populated fields can be manually overridden.The voyage schedule automatically recalculates based on any changes made. All changes are auto-saved.- Miles displays the default distance from the previous port calculated by the VMS.
Note: Change results in At Sea and Arrival fields recalculating as the speed remains constant. The Miles field can be edited to display actual sailing distance. - Speed displays the default vessel speed.
Note: Change results in At Sea and Arrival fields recalculating. - At Sea displays the number of estimated days at sea between ports (i.e. number of days from previous port).
Note: Change results in Speed and Arrival fields recalculating. - Arrival displays the estimated time of arrival (ETA) at a port (or manually entered actual time of arrival).
Note: Arrival = Departure of previous port + At Sea days. Change of ETA results in the ETB, Speed and At Sea fields recalculating as well as changing preceding port's ETD results in the current port's ETA recalculating. Enter date and time as ddmmyytttt, for example: September 17 2014, 08:00, type: "1709140800". This will display as "17.09.14 08:00". - Berthed displays the estimated time of mooring at a port (or manually entered actual time of berthing).
Note: Berthed = Arrival + Xtra days. Change of ETB results in the ETD and Xtra fields recalculating as well as changing the current port's ETA results in the ETB recalculating. Enter date and time as ddmmyytttt, for example: September 17 2014, 08:00, type: "1709140800". This will display as "17.09.14 08:00". - Departure displays the estimated time of departure (ETD) at a port (or manually entered actual time of departure).
Note: Departure = Berthed + L/D Days. Change of ETD results in the L/D Days field recalculating (load and discharge ports ONLY). Enter date and time as ddmmyytttt, for example: September 17 2014, 08:00, type: "1709140800". This will display as "17.09.14 08:00". - L/D Days displays the number of days spent loading and discharging at a port.
Note: Change results in the ETD field recalculating. L/D Days can ONLY be modified for load- and discharge ports. - Xtra displays the number of extra days in port, i. e. not loading/discharging.
Note: Change results in the ETB and ETD fields recalculating. - In Port displays the total time spent at port, i.e. from arrival to departure.
- Miles displays the default distance from the previous port calculated by the VMS.
- Review and edit as applicable (duplicated voyages: edit as applicable) the automatically generated (estimated) voyage schedule up to the current point in time - it will be highlighted in green. The fields to review and/or edit:
- In the Bunkers - FO tab:
Note: By default the VMS automatically estimates ROB for each voyage for each fuel type (and price) and per port utilising data of the vessel's previous voyage into the new. Populated fields can be manually overridden. The bunker consumption schedule/s will automatically recalculate based on changes made. All changes are auto-saved.- Review and edit (as applicable ) ROB amount of Fuel Oil in metric tonnes (MT) in the first field and enter the fuel price/MT in the second field under ROB/Price Voyage Start.
- Review and edit (as applicable ) the generated bunker consumption schedule of the voyage up to the current point in time - it will be highlighted in green.
Note: Enter date and time as ddmmyytttt, for example: September 17 2014, 08:00, type: "1709140800". This will display as "17.09.14 08:00".
- Repeat Step 7 for the bunker tabs: Bunkers - DO, Bunkers - FO (LS) and Bunkers DO (LS).
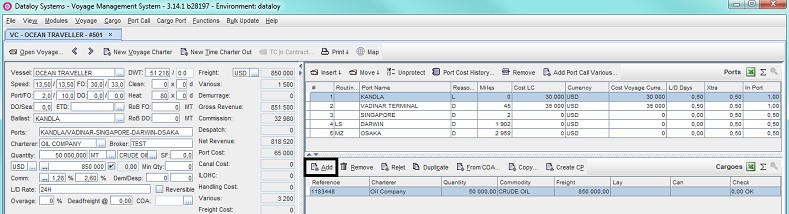
- In the Cargo List tab:
Note: Lists all cargoes of the selected voyage. The most recently added at the top. - Create a cargo for the voyage either by.
- entering a new cargo.
- Either
- click Add

- or go to the Cargo menu and from the drop-down select Add.
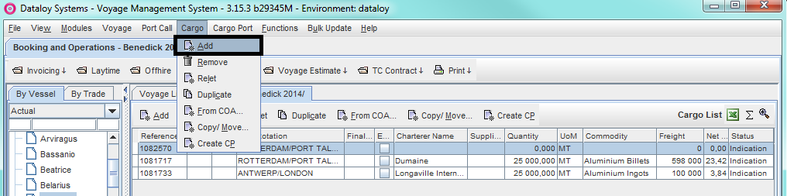
- click Add
- A blank cargo row displays in the Cargo List tab and the lower field tabs go blank and the Cargo Ports field will empty, (i.e. showing the empty fields of the newly entered cargo, ready to be filled in - except for the automatically generated cargo reference number (unique for each cargo) under Cargo Reference (Main Cargo Details tab)).
- Go to Step 11.
- Either
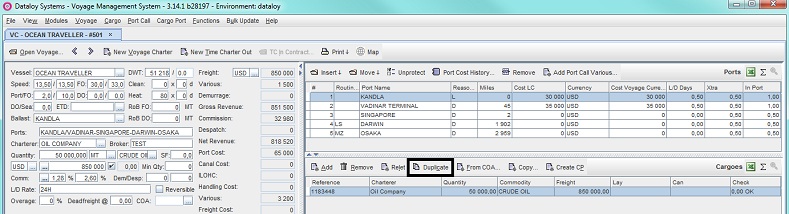
- or by duplicating a cargo in the Cargo List tab:
- Click the cargo to be duplicated - it will highlight.
- Either
- click Duplicate

- or go to the Cargo menu and from the drop-down select Duplicate.
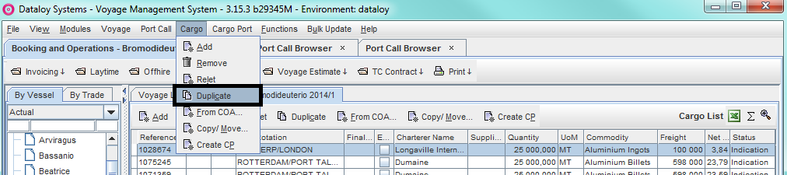
- click Duplicate
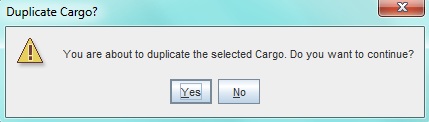
- A pop-up opens asking to confirm duplication.

- Click Yes. The pop-up will close. The duplicated cargo displays and hold the same data as the voyage it was duplicated from - except for the cargo reference number (unique for each cargo) located under Cargo Reference (Main Cargo Details tab).
- Go to Step 11.
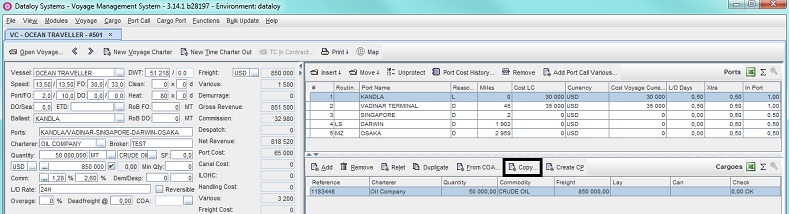
- or copy a an existing cargo from the Copy/Move... dialogue box:
- Either
- click Copy/Move...

- or go to the Cargo menu and from the drop-down select Copy/Move....
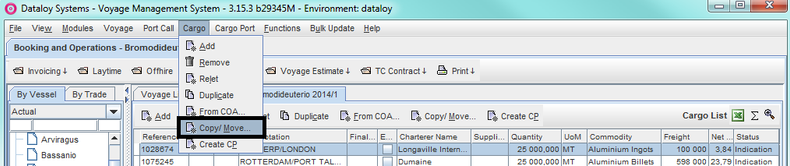
- click Copy/Move...
The Copy/Move dialogue box with a list of previously entered cargoes opens.
Example: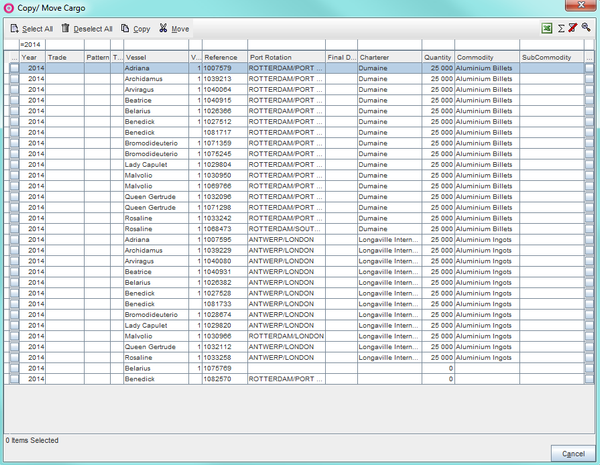
- Either
- check the cargo or cargoes to be copied under the Select column
Note: Uncheck to deselect. - or click Select All to check all cargoes under the Select column to be copied.
Note: Click Deselect to uncheck all selected cargoes.
- check the cargo or cargoes to be copied under the Select column
- Click Copy once applicable cargo/es selection is complete.
Note: The Move function enables the move of a cargo/es from one actual voyage to another. Cargoes CANNOT be moved to estimates, only copied. - The dialogue box will close and the copied cargo/es displays holding the same data as the cargo/es it/they was/were copied from - except the cargo reference number (unique for each cargo) located under Cargo Reference (Main Cargo Details tab).
- Go to Step 11.
- Either
- entering a new cargo.
- Enter relevant cargo details to make the initial booking for the new cargo (duplicated and copied cargoes: edit as applicable) in the following tabs and field:
- In the Main Cargo Details tab:

- Enter the load and discharge port/s for the cargo under Port Rotation.
Note: Enter all load (L) ports, thereafter discharge (D) ports - separated by a slash ("/"). A minimum of one load and one discharge port must be entered. Multiple load and discharge ports are separated by a dash ("-"). Example: load/discharge-discharge. Entered port rotation will automatically display in the Cargo Ports field. - Enter the charterer (customer) under Charterer.
- Enter a commodity (i.e. type of cargo) under Commodity.
- Enter a sub-commodity (if applicable) under Sub Commodity.
- Enter the estimated (booked) cargo quantity (right field) and quantity unit measurement (left field) under Booked Quantity.
Note: Measurement defaults to metric tonnes (MT). - Enter the charterer's/owner's flexibility in diverting from agreed shipment size (in per cent) (first field) and a deciding term for applying the Quantity % under Quantity Option.
- Enter (if applicable) agreed minimum shipment size (cargo quantity) upon delivery under Minimum Quantity.
- Enter freight rate currency (first field), then either the estimated freight rate, lumpsum or world scale rate (second field) under Freight Rate.
Note: Freight rate currency defaults to voyage currency. To calculate World Scale and flat rates: enter WS (World Scale) in the rate currency field. - If entered freight rate and/or lumpsum are to apply in intervals, specify the intervals. If not, go to Step 11ax.
Note: Freight rates and lumpsums can be entered as intervals, either as rate or lumpsum or a combination of both.- To specify an interval/s:
- Click the Triple Dot Selector next to Freight Rate field. The Freight Rate Intervals dialogue box opens.
- Click Create New. An empty freight rate row displays.
Example:

- Fill in the row fields as follows:
- Enter the interval start level under From Quantity.
- Enter the freight rate (if applicable) under Freight Rate.
- Enter lumpsum (if applicable) under Lumpsum.
- Check Apply to Total Quantity to indicate that only one of the entered freight rates/lumpsums is to be used for the total quantity.
Note: Depends on cargo size, i.e. applicable rate would be the rate of the interval in which the total quantity falls.
- Repeat Steps 11aix 1a-c until all intervals have been entered.
- Click Close. The dialogue box will close and entered data apply. The Freight Rate Intervals tab automatically updates (holds the same data as the dialogue box). The rate displayed in the freight rate field will be the sum of each interval multiplied with its rate/lumpsum, unless Apply to Total Quantity is checked.
- To specify an interval/s:
- Check the Lumpsum box - if applicable - next to the freight rate field to indicate lumpsum instead of rate under Freight Rate.
Note: Will check automatically if a rate of 10,000 or above is entered - unchecking the box results in entered amount being treated as rate. Layout reverts to default. - Enter the the agreed freight rate measurement (third field) under Freight Rate.
Note: Defaults to metric tonnes (MT). Not applicable if Lumpsum is checked - field will vanish. - Enter the broker under Broker Name.
- Enter the total of all broker commissions in per cent under Broker Comm (Broker Commissions).
- If applicable, specify the all broker commissions. If not, go to Step 11axv.
To specify broker commissions:
- Click the Triple Dot Selector next to Broker Commissions field. The Broker Commissions dialogue box will open.
- Click Create New. An empty broker specification row displays.
Example:
Fill in the row fields as follows:
- Enter the broker under Broker.
- Enter the commission percentage under Percent.
- Enter the commission rate (if applicable) under Rate.
Note: Rate is multiplied with cargo quantity. - Enter lumpsum (if applicable) under Lumpsum.
- Enter the commission under Commission.
- Check Credit Charterer to indicate that the Charterer will pay the commission to the broker (deducted when invoicing).
- Check C/O (care/of) to indicate that invoices should be sent through the broker (i.e. the broker is invoice addressee).
- Check Basefreight Only to indicate that commission is ONLY calculated on freight, i.e. demurrage and miscellaneous revenue are excluded.
- Enter the commission type under Commission Type.
- Repeat Steps 11axiv 1a-c until the total broker commission has been split and specified amongst all involved brokers.
- Click Close. The dialogue box will close and entered data apply. The Broker Commissions tab automatically updates (holds the same data as the dialogue box).
- Enter the address commission (in per cent) under Add. Comm. (Address Commission).
- Enter agreed laytime rate and terms for load/discharge of cargo under L/D Rate (Load/Discharge Rate).
Note: Can differ between port calls, but defaults to SHINC unless otherwise stated. - Enter coating requirements under Coating Req (Coating Requirements).
Note: Field hidden if vessel is categorised as Bulk. Appears if vessel is categorised as Tanker or Chemical. - Enter applicable FOSFA list under FOSFA List (Federation of Oils, Seeds and Fats Associations Ltd. List).
Note: Field hidden if vessel is categorised as Bulk. Appears if vessel is categorised as Tanker or Chemical. - Check N2 Padding (Nitrogen Padding) to indicate nitrogen is used as padding.
Note: Field hidden if vessel is categorised as Bulk. Appears if vessel is categorised as Tanker or Chemical. - Enter agreed demurrage rate under Demurrage Rate.
- Enter agreed despatch rate Desp. Rate (Despatch Rate).
Note: Defaults to half the demurrage rate when applicable. - Enter applicable cargo text (if any) under Cargo Text.
- Enter additional comments (if any) under Comment.
- Enter final destination of the cargo under Destination.
- Enter cargo supplier under Supplier.
- Enter where from the cargo originates under Origin.
- Enter the start date for lay/can spread (first field) and the end date for lay/can spread (second field) under LayCan.
- Check On Deck Option to indicate if cargo is allowed to be stored on deck.
- In the Weight, Volume & Dimension panel:
- Enter the stowage factor (if known) and under Stowage Factor.
Note: Measurement defaults to CBM/MT. - Enter the weight factor (if known) (first field) under Weight Factor.
Note: Measurement defaults to MT/MT. - Enter the cargo's weight (if known) under Weight.
- Enter the cargo's volume (if known) under Volume.
- Enter the cargo's length, width and height in metres (if known) under L, W and H (Length, Width and Height).
Note: Dimension fields are hidden if vessel is categorised as Tanker or Chemical. - Check Cradle Req. (Cradle Requirement) to indicate that the cargo requires to be placed in a cradle.
Note: Field hidden if vessel is categorised as Tanker or Chemical. - Enter the estimated value of the cargo in selected currency (first field) and the currency to measure cargo value in (second field) under Cargo Value.
Note: Field hidden if vessel is categorised as Tanker or Chemical. Currency defaults to USD. - Enter specific gravity under Specific Gravity.
Note: Field hidden if vessel is categorised as Bulk. Appears if vessel is ctegorised as Tanker or Chemical. - Enter temperature (if applicable) under Temp. (Temperature).
Note: Field hidden if vessel is categorised as Bulk. Appears if vessel is ctegorised as Tanker or Chemical.
- Enter the stowage factor (if known) and under Stowage Factor.
- Enter the load and discharge port/s for the cargo under Port Rotation.
- In the Freight Summary tab (read-only fields: Freight, Overage, Deadfreight, FO BAF, DO BAF, second CP Payment Terms % field) - edit if applicable:
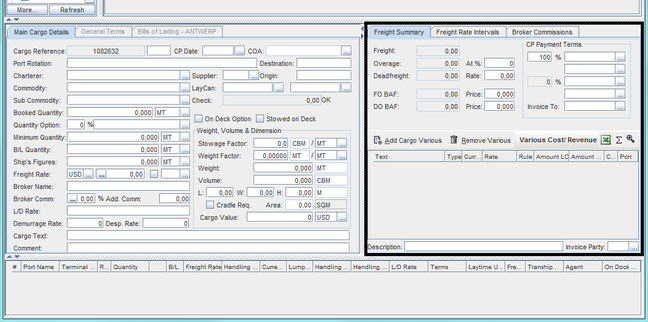
- Freight displays the total freight.
Note: Self-populates with elsewhere retrieved data. - Overage displays the amount of freight carried that surpasses the minimum quantity (if any).
Note: Self-populates with elsewhere retrieved data. - Enter the overage percentage (if applicable) under At %.
- Deadfreight displays the amount of freight carried that is less than the minimum quantity (if any).
Note: Will populate with elsewhere retrieved data. - Enter the deadfreight rate (if applicable) under Rate.
- FO BAF (Diesel Oil Bunker Adjustment Factor) displays the set bunker adjustment factor for fuel oil (FO).
Note: Will populate with elsewhere retrieved data. ONLY relevant if based on contract with BAF clause. - Enter the price/MT of the FO BAF under Price (next to the FO BAF field).
Note: ONLY applicable if booking is based on contract with BAF clause. - DO BAF (Fuel Oil Bunker Adjustment Factor) displays the set bunker adjustment factor for diesel oil (DO).
Note: Will populate with elsewhere retrieved data. ONLY relevant if based on contract with BAF clause. - Enter the price/MT of the DO BAF under Price (next to the DO BAF field).
Note: ONLY applicable if booking is based on contract with BAF clause. - In the CP Payment Terms (Charter Party) panel:
- Enter the payment percentage number in the % terms field (if other than the default: 100%).
Note: If other than default payment percentage number is entered, the lower payment and baseline terms filed and menus will activate. - Enter the length of the payment term in the Payment Terms field next to the % field.
- Enter the baseline term (i.e. from whence the payment term begins) in the field below the Payment terms field.
- The lower payment and baseline terms fields are ONLY used in case of partial payment.
- If there is no partial payment - the lower % terms field will by default be 0% and the drop-down menus deactivated.
- In case of a partial payment:
- % field will self-populate with a payment percentage number which totaled with the upper payment percentage number equals 100%.
- Enter the length of the payment term in the Payment Terms field next to the % field.
- Enter the baseline term (i.e. from whence the payment term begins) in the field below the Payment terms field.
- Enter the invoice party if invoice party is other than the charterer under Invoice To.
Note: Charterer is by default the invoice party unless otherwise indicated.
- Enter the payment percentage number in the % terms field (if other than the default: 100%).
- In the Various/Cost Revenue panel:
Enter all various revenue/cost items related to the cargo (applies to a specific cargo, all ports):
- Click Add Cargo Various.
- A pop-up with a list of input values opens. Select applicable cost/revenue and click OK.
- The pop-up will close and selected item displays as a populated row in the Various Cost/Revenue field.
- The populated row fields can be manually overridden (except Amount LC, Amount Voyage Currency and Port) - edit if/as applicable:
- Enter the name of the various cost/revenue under Text.
- Enter the monetary transaction type under Type.
- Enter applicable currency under Currency.
- Enter cost/revenue depending on rule under Rate.
Enter the appropriate default calculation rule under Rule.
- Amount LC (Amount Local Currency) displays the total cost/revenue in applicable currency.
- Amount Voyage Currency displays the total cost/revenue in the voyage currency.
- Check Commission to indicate if Address Commission applies to the cost/revenue.
- Port displays applicable port if cost/revenue has been entered under Port Call Various or Cargo Port Various in the Voyage Estimate module. Otherwise - will be blank.
- Enter cost/revenue's name on invoice under Description.
Note: ONLY if differs from item text (under Text) in Dataloy VMS. By default displays the last highlighted row of the Various Cost/Revenue field, will update each time another cost/revenue row is highlighted. Enter invoice addressee under Invoice Party.
- Repeat Steps 11bxi 1a-f as applicable until all various costs/revenues have been entered.
- Freight displays the total freight.
- In the Cargo Ports field:

- Populated row fields can be manually overridden (except the read-only initial # (list) field, Reason for Call and Handling Cost fields) - Review and edit (as applicable):
- Enter terminal name (if any) under Terminal Name.
- Enter cargo quantity under Quantity.
Note: Quantity will by default display in the first load and discharge ports, but can be split when working with multiple ports. - Untitled checkbox next to Quantity is for user informative purposes only - checked indicates a manual change of the Quantity column row field.
- Enter applicable handling cost rate under Handling Cost Rate.
Note: Can vary between port calls. If no handling cost, leave blank. - Enter handling cost rate currency under Currency.
- Check Lumpsum to indicate that lumpsum applies instead of handling cost rate.
- Enter applicable handling cost rate measurement under Handling Cost UoM (Unit of Measurement).
- Handling Cost displays applicable handling cost/port (if any), i.e. the estimated rate/measurement amount multiplied with entered quantity/port.
- Check Free Despatch to indicate that the the port does not allow despatch.
- Enter transshipment vessel (if any) under Transshipment Vessel.
- Populated row fields can be manually overridden (except the read-only initial # (list) field, Reason for Call and Handling Cost fields) - Review and edit (as applicable):
- In the Main Cargo Details tab:
- In the Cargo List tab, in the new cargo row:
- Enter the external customer reference number (if any) under External Reference.
- Check Equalization to indicate that equalization should apply (if applicable).
- Click the cargo's row field under Status and from the drop-down menu select current status of the booking.
- The booking is complete.
Note: All entered dates are estimated dates of planned future events - not to be changed actual dates and times are available, i.e. enter time and dates of events as they occur as the voyage proceeds. All changes are auto-saved.
Make a Booking to an Existing Voyage Using Voyage Estimate
- Go to
Modules > Voyage Estimate.The Voyage Estimate window opens. - Open the adjusted estimate of voyage charter calculation to add cargo/es to. Its fields display.
- Make a booking by adding a cargo to the adjusted estimate either by
- entering a new cargo
- Either
- click Add
- or go to the Cargo menu and from the drop-down select Add.

- click Add
- A blank cargo row displays in the Cargo field and the Cargo panel of the Main Calculation field will go blank and the Cargo Ports field empty (i.e. showing the empty fields of the newly entered cargo, ready to be filled in).
- Go to Step 4.
- Either
- or by duplicating a cargo in the Cargo field:
- Click the cargo row to be duplicated - it will highlight.
- Either
- click Duplicate
- or go to the Cargo menu and from the drop-down select Duplicate.

- click Duplicate
- Either
- A pop-up opens asking to confirm duplication.
- Click Yes. The duplicated cargo displays and hold the same data (in the Cargo field row, Cargo panel and Cargo Ports field) as the voyage it was duplicated from - except the cargo reference number (unique for each cargo) located under the Reference column of the Cargo field.
- Go to Step 4.
- Click the cargo row to be duplicated - it will highlight.
- or copy a an existing cargo from the Copy/Move Cargo dialogue box:
- Either
- click Copy
- or go to the Cargo menu and from the drop-down select Copy.

- click Copy
A pop-up with a list of previously entered cargoes opens.
Example: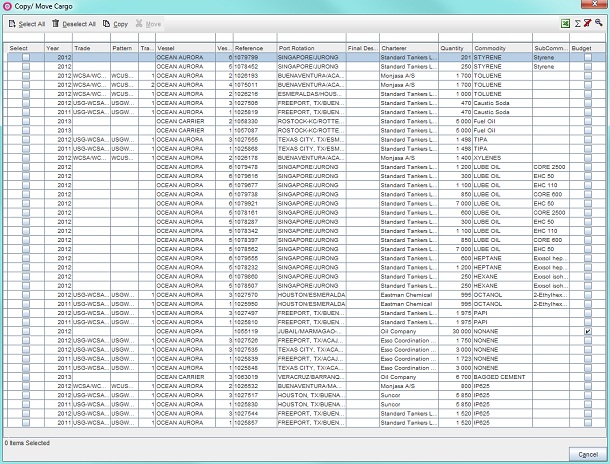
- Either
- check the cargo or cargoes to be copied under the Select column
Note: Uncheck to deselect. - or click Select All to check all cargoes under the Select column to be copied.
Note: Click Deselect to uncheck all selected cargoes.
- check the cargo or cargoes to be copied under the Select column
- Click Copy once applicable cargo/es selection is complete.
Note: Move is ALWAYS deactivated for estimates and ONLY activates for scheduled voyages. The function enables the move of a cargo/es from one actual voyage to another. Cargoes CANNOT be moved to estimates, only copied. - The pop-up will close and the copied cargo/es displays holding the same data (in the Cargo field row/s, Cargo panel and Cargo Ports field) as the cargo/es it/they was/were copied from - except the cargo reference number (unique for each cargo) located under the Reference column of the Cargo field.
- Go to Step 4.
- Either
- entering a new cargo
- Enter relevant cargo details for the new cargo in the Cargo panel (Main Calculation field) by following the step-by-step instructions of Create a Voyage Charter calculation/estimate, Step 3b (also Step 4 if cargo port data modification is needed). Added port calls will be added as applicable to the Ports (or Port Rotation) and Cargo Ports fields. Duplicated and copied cargoes: edit as applicable.
- Cargoes are listed in the Cargoes field in the order they are entered (except relets, transshipment and preshipment). Entered cargoes will display as individual rows, each row containing relevant cargo data.
Example: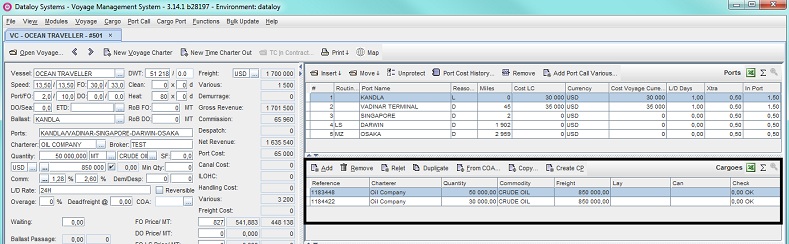
- Complete the booking by following the step-by-step instructions as per Make a Booking by Creating a Voyage with Cargo Using Voyage Estimate, Steps 3-12 above.
- The booking is complete.
Note: All entered dates are estimated dates of planned future events - not to be changed actual dates and times are available, i.e. enter time and dates of events as they occur as the voyage proceeds. All changes are auto-saved.
Make a Booking to an Existing Voyage Using Booking and Operations
- Go to
Modules > Booking and Operations > Booking and Operations.The Booking and Operations window opens. Click the vessel to make a booking for in menu tree in the By Vessel tab (left-hand field) - it will highlight. Its voyage details displays in the right-hand and lower fields.
- Click the Cargo List tab.
- A list of all cargoes of the voyage displays and in the lower fields, displayed per selected cargo, each cargoes individual details.
- Make a booking by adding a cargo to the voyage either by
- entering a new cargo.
- Either
- click Add
- or go to the Cargo menu and from the drop-down select Add.
- click Add
- A blank cargo row displays in the Cargo List tab and the lower field tabs will go blank and the Cargo Ports field will empty, (i.e. showing the empty fields of the newly entered cargo, ready to be filled in - except for the automatically generated cargo reference number (unique for each cargo) under Cargo Reference (Main Cargo Details tab)).
- Go to Step 6.
- Either
- or by duplicating a cargo in the Cargo List tab:
- Click the cargo to be duplicated - it will highlight.
- Either
- click Duplicate
- or go to the Cargo menu and from the drop-down select Duplicate.
- click Duplicate
- Either
- A pop-up opens asking to confirm duplication.
- Click Yes. The pop-up will close. The duplicated cargo displays and hold the same data as the voyage it was duplicated from - except for the cargo reference number (unique for each cargo) located under Cargo Reference (Main Cargo Details tab).
- Go to Step 6.
- Click the cargo to be duplicated - it will highlight.
- or copy a an existing cargo from the Copy/Move... dialogue box:
- Either
- click Copy/Move...
- or go to the Cargo menu and from the drop-down select Copy/Move....
- click Copy/Move...
The Copy/Move dialogue box with a list of previously entered cargoes opens.
Example:- Either
- check the cargo or cargoes to be copied under the Select column
Note: Uncheck to deselect. - or click Select All to check all cargoes under the Select column to be copied.
Note: Click Deselect to uncheck all selected cargoes.
- check the cargo or cargoes to be copied under the Select column
- Click Copy once applicable cargo/es selection is complete.
Note: The Move function enables the move of a cargo/es from one actual voyage to another. Cargoes CANNOT be moved to estimates, only copied. - The dialogue box will close and the copied cargo/es displays holding the same data as the cargo/es it/they was/were copied from - except the cargo reference number (unique for each cargo) located under Cargo Reference (Main Cargo Details tab).
- Go to Step 6.
- Either
- entering a new cargo.
- Enter relevant cargo details for the new cargo in lower cargo details tabs by following the step-by-step instructions of Make a Booking by Creating a Voyage with a Cargo Using Booking and Operations, Steps 11-12. (Duplicated and copied cargoes: edit as applicable.)
- The booking is complete.
Note: All entered dates are estimated dates of planned future events - not to be changed actual dates and times are available, i.e. enter time and dates of events as they occur as the voyage proceeds. All changes are auto-saved.