Contracts of Affreightment (COA)
Short Description
The Contracts of Affreightment (COA) module is where all agreed in detail and finalised contracts of affreightments (COAs) are registered, maintained and archived. The existence of a COA in Dataloy VMS is a pre-requisite to for example tracking shipments, accumulate reports and to enable usage of the COA Planner and for producing bunker hedge requirements and position.
A Contract of Affreightment (COA) can be defined as a contract between a Vessel Owner and a Charterer where the Owner agrees to transport a set quantity of cargo between named ports and/or regions on agreed terms and conditions on a specified voyage or voyages over a specified period of time. The charterer will pay a specified price for the transportation of the cargo (freight). Also, any company of a cargo created from a COA will default to the COA company, thereby enabling the cargo to be correctly invoiced.
All main terms and details of each COA are registered in the module, allowing the module to serve as a reference base and/or as a template for generating fixtures/voyage estimates. Further, the COA module is used as a means of tagging cargoes against a COA, (the Shipment History tab will populate enabling reporting with a COA as dimension). Various Cargo Port Cost/Revenue items are available to be allocated to correct port also when copied from the COA. The COA is also used as a starting point in the COA Planner module to make forecasts and for planning. Data retrieved from the Contracts of Affreightment module will also display in the Positions Dashboard.
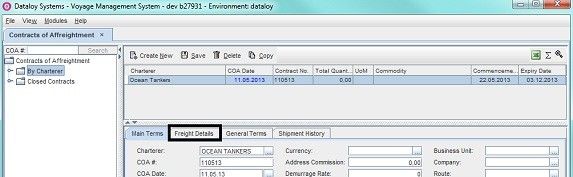
The contracts are divided into groups, the active COA's are located in the By Charterer folder in the left-hand menu tree and the closed COA's in the Closed Contracts folder for storage. Each COA entry will consist of four tabs: Main Terms, Freight Details, General Terms and Shipment History. The Main Terms tab holds general COA terms information and important bunker consumption details, which directly impacts voyage calculation accuracy. The Freight Details tab holds information necessary for enabling forecasting and planning, i.e. trade routes, legs, port of call, loading/discharge ports, freight rates, etc.
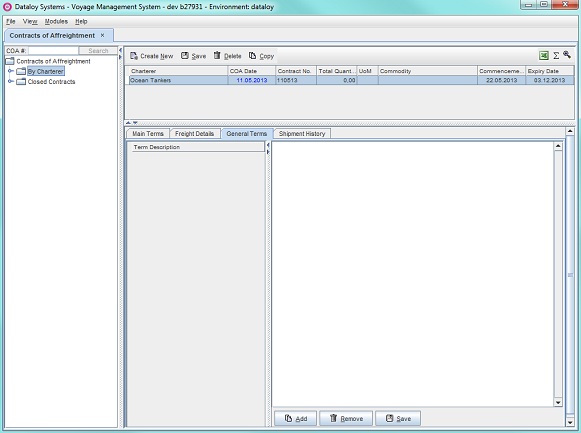
Detailed, text-based terms and conditions for each COA are added in the General Terms tab. The terms are added as defined in the Terms module. The Shipment History tab displays all vessels and voyages that actually carried cargo under a selected COA - the details are automatically retrieved from across Dataloy VMS.
Expiry Date v.s. Termination Date:
- Expiry Date:
- indicates the date the Contract of Affreightment (COA) expires – i.e. the full contract.
- Enter under Expiry Date in the Main Terms tab.
- Termination Date:
- indicates the end of a COA period (i.e. a specific sub-period under the COA). A COA can consist of several sub-periods, each with different terms and each will have a Termination Date, i.e. the date each end respectively.
- If there is only one period in a Contract of Affreightment (COA) , i.e. no sub-period/s, then the Termination Date is always the same as the Expiry Date.
- Enter in the Lines field in the Freight Details tab.
- The Termination Date is MANDATORY to enable the COA to be visible amongst options when for example, linking the COA to other modules such as the Voyage Estimate and COA Planner.
Location: Modules > Contract Management > Contracts of Affreightment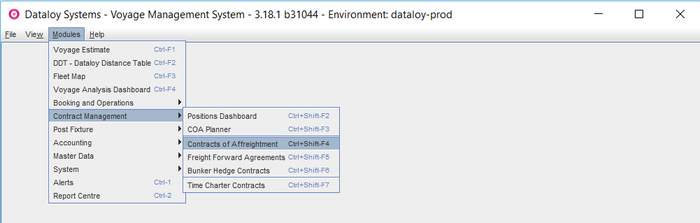
Chapters:
Long Description
Enter a Contract of Affreightment (COA)
- Go to
Modules > Contract Management > Contracts of Affreightment.The Contracts of Affreightment window opens.
- A contract of affreightment can be entered either by creating a new or by copying an already existing one. Add either by
- entering a new COA
- Click Create New. The following display (including a new empty row in the upper right-hand field):
- Go to Step 3.
- Click Create New. The following display (including a new empty row in the upper right-hand field):
- or by copying an existing COA
- Click the COA to be copied in the upper right-hand field.
- Click Copy. A new COA display holding the same data as the COA it was copied from.
- If any changes needs to be made to the data - go to Step 3.
- entering a new COA
- In the Main Terms tab, fill in the fields as follows:
- Enter either
- the charterer under Charterer
- or click the Triple Dot Selector next to the field. A pop-up with a list of input values opens. Select field and click OK.
Example: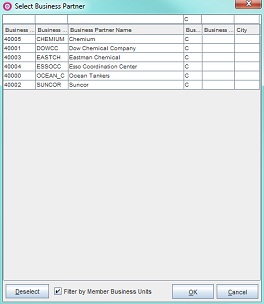
- Enter the COA number or the COA date (if there is no numbering) under COA #.
Note: The COA number will appear on all calculations, reports, etc.- Enter either
- the date the COA was entered into (i.e. signed) under COA Date
Note: NOT the start date of the COA. or click the Triple Dot Selector next to the field. A pop-up with a calendar opens. Select date and click OK.
Example: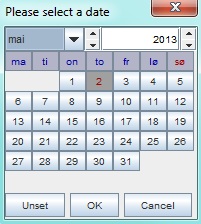
- the date the COA was entered into (i.e. signed) under COA Date
- Enter either
- Enter the COA start date under Commencement Date.
Note: Typically the date the first shipment will commence. - Enter the COA expiry date under Expiry Date.
Note: Typically the date the final shipment will end. - Select the COA's status (open/closed) from the drop-down menu under Status.
Note: By default Open is selected - to close and archive a COA, change manually to Close. - Enter a rough budget for the total cargo to be carried during COA under Total Quantity and enter a measurement under UoM (Unit Of Measurement).
Note: For information purposes only. Enter a typical size/per shipment under Shipment Size.
Note: Only enter if shipment size is clear, otherwise leave blank, for example if shipment sizes vary.Enter the charterer's/owner's flexibility in diverting from agreed shipment size (in per cent) under Total Quantity and a deciding term for applying the Quantity % under the second Quantity Option field.
Deciding Terms: LCOPT Less Charterer's Option - Example: 10% LCOPT - Charterer may show up will 10 % less than agreed shipment size. MCOPT More Charterer's Option - Example: 10% MCOPT - Charterer may show up with 10% more than agreed shipment size and the extra cargo must be carried. MIN/MAX The percentage entered under Total Quantity is 0 - i.e. shipment size cannot vary. MOLCO More or Less Charterer's Option - Example: +/-10% - Charterer may show up with +/-10% of agreed shipment size - i.e. Charterer's decision. MOLOO More or Less Owner's Option - Example: +/-10% - Owner may decide that Charterer is to show up with +/-10% of agreed shipment size - i.e. Owner's decision. - Enter a commodity under Commodity.
Note: Recommended to either enter the "main cargo" or leave blank if COA has more than one commodity. Detail then the commodity for each combination (Freight Details tab). - Enter a sub-commodity (if applicable) under Sub Commodity.
- Check Transshipment Option to indicate that the cargo is allowed to be transshipped.
- In the top middle fields:
- Enter the applicable currency under Currency.
Note: The currency is that of the rates and income of the contract. Normally defaults to USD. - Enter the address commission under Address Commission.
- Enter the demurrage rate under Demurrage Rate.
- Enter the despatch rate under Despatch Rate.
- Enter the number of days a laytime calculation/demurrage claim must be raised within to be valid under Demurrage Timebar.
- Demurrage Bank checkbox: LEAVE UNCHECKED.
Note: ONLY used under very special circumstances. Please contact Dataloy for further information. - Enter the payment term under Payment Term.
- Enter the baseline term under Baseline Term.
- Enter a short comment to the COA (if applicable) under Comment.
- Enter the applicable currency under Currency.
- In the top right fields:
- Enter the name of the business unit entering into the COA (i.e. "owns" it internally) under Business Unit.
- Enter the name of the legal entity entering into the COA (i.e. signs the contract) under Company.
- Enter a trade route under Route.
- Enter a leg (or routing/segment) under Trade.
- Enter the name of the person responsible for the COA in the Chartering department under Charterer.
- Enter the name of the person responsible for operating the vessels under the COA under Vessel Operator.
Note: Can be left blank. - Enter the name of the person responsible for cargo operations related to the COA (i.e. what happens in port) under Cargo Operator.
- Enter the business partner/s that sets a guarantee for the COA under Guarantor.
- In the FO Bunker Adjustment panel:
- Enter the fuel oil (FO) price range under FO Price Range.
- Enter the fuel oil (FO) base price under Base Price.
Note: Either a price range (for example 600-800) a single price can be entered (for example 600). It would be the equivalent to entering e.g. 600-600 as the range. - Enter the adjustment factor under Adjustment Factor.
- In the DO Bunker Adjustment panel:
- Enter the fuel oil (FO) price range under FO Price Range.
- Enter the fuel oil (FO) base price under Base Price.
Note: Either a price range (for example 600-800) a single price can be entered (for example 600). It would be the equivalent to entering e.g. 600-600 as the range. - Enter the adjustment factor under Adjustment Factor.
- In the Commissions panel enter the broker/s and commission/s (if applicable).
- Add a Broker with Commission:
- Move the cursor to the Commissions field.
- Right-click. A menu opens.
- Select New. The menu will close and a row display in the Commissions field.
Example:
- Click each respective row and if applicable:
- Enter the broker under Broker.
- Enter the commission percentage under Percent.
- Enter the commission rate under Rate.
Note: The Rate is per metric tonne (MT) - it is rarely used. - Enter applicable lumpsum under Lumpsum (if any).
- Enter the commission under Commission.
- Check Credit Charterer to indicate that the Charterer will pay the commission to the broker.
- Check C/O (care/of) to indicate that invoices should be sent through the broker.
- Check Basefreight Only to indicate that commission will only be calculated based on freight i.e. not including demurrage or miscellaneous revenue.
- Enter the commission type under Commission Type.
- Remove a Broker with Commission:
- Click the broker commission row to be deleted - it will highlight.
- Right-click and from the menu select Remove.
- The menu will close and the selected row delete.
- Add a Broker with Commission:
- Quantity Fulfilment: Provides the quantity carried to date (Shipment History) measured against the Total Quantity. For information purposes ONLY.
- Time Fulfilment: Provides the time elapsed (from the Commencement Date) measured against the Expiry Date. For information purposes ONLY.
Example:
- Enter either
- Click Save. The empty row in the right-hand top field populates and the COA will display in the left-hand menu tree under By Charterer.
Example: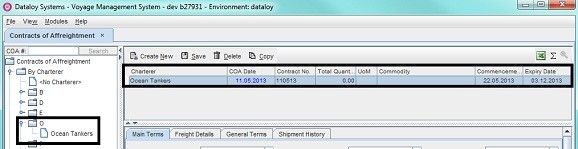
- Click the Freight Details tab.
- The Freight Details tab automatically displays the newly entered COA period in the Lines field.
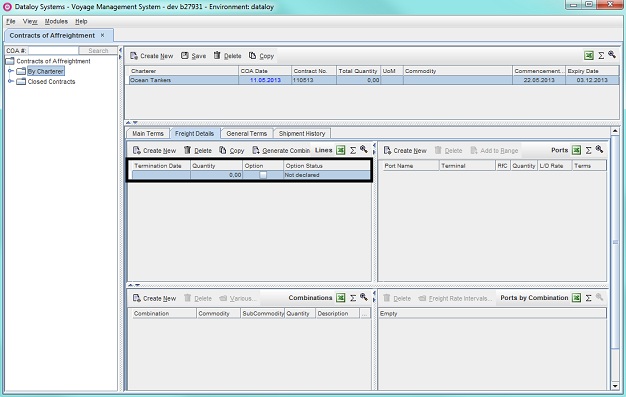
- Click each field of the COA row and fill in as follows:
- Enter the termination date under Termination Date.
Note: This entry is required to enable the COA to be visible amongst options when for example, linking the COA to other modules such as the Voyage Estimate and COA Planner. - Enter quantity under Quantity.
Note: Can be left blank. For information purposes, but also possible to use in certain reports. - Check Option to indicate if the COA period is optional.
Note: CANNOT be used for the initial period or if the COA only consists of one COA period. Should be left blank. - Select the COA period's option status (Not declared/Forfeited/Declared) from the drop-down menu under Option Status.
Note: For information purposes only to indicate the COA's implementation status. By default Not declared is selected. Must be manually changed.
- Enter the termination date under Termination Date.
- If a new period under the same COA is needed (if not, go to Step 9):
- Add either by
- entering a new COA period
- or by copying an existing one
- entering a new COA period
- Add either by
- In the Ports field, enter all load and discharge ports.
- Click Create New. A row displays:
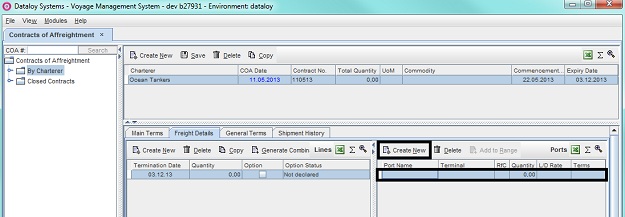
- Click each row field of the following columns and enter the following data:
- Enter either
- the name of the port under Port Name
- or click the Triple Dot Selector next to the field. A pop-up with a list of input values opens. Select field and click OK.
- Enter the reason for call under RfC (Reason for Call).
Example:
L=Loading, D=Discharging
- Enter a rough budget for the particular port under Quantity.
Note: This entry is for information purposes only. - Enter the loading/discharging rate under L/D Rate.
Note: For terms. Numbers ONLY. - Enter the laytime terms under Terms.
- Repeat Steps 7a-b as applicable until all load and discharge ports have been entered.
- In the Combinations field, enter all combinations of load and discharge ports. Either
- click Create New and enter a combination manually. Repeat as applicable until all combinations are entered (for example: Nueva Palmira/Santos)
Note: Combinations with more than a load and discharge port CAN ONLY be entered manually. Load and discharge ports are separated by a slash ("/"), they same type of port call by a dash ("-"), for example: Load/Discharge-Discharge. - or click Generate Combinations (in the Lines field). Dataloy VMS automatically generates and display all load/discharge port combinations of the COA.
Example: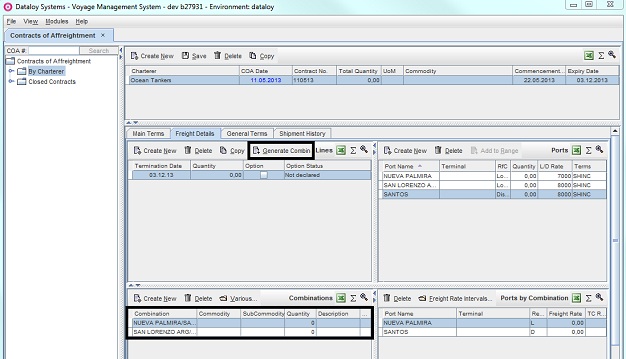
- If applicable, various cost/revenue to a combination can be added, (if not, go to Step 11):
- Add Various Cost/Revenue to a Combination:
- Click the combination to add various cost/revenue to - it will highlight.
- Click Various... The Various Cost/Revenue pop-up opens.

- Click Add Various. A Various Text pop-up opens.
- Select applicable various text and click OK.
Example: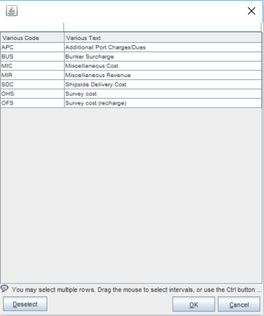
- The pop-up will close and the added various cost/revenue displays as a row in the Various Cost/Revenue pop-up.
Example: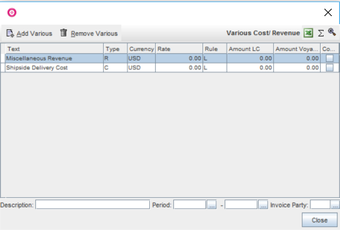
- Enter a description of the various cost/revenue under Description.
Note: Can be left blank. - Enter the time period is to be applicable for the combination under Period.
Note: Can be left blank. - Enter the invoice party of the various cost/revenue if other than the Charterer under Invoice Party.
Note: Can be left blank. - Click Close. The pop-up will close.
- To indicate that there is a various cost/revenue added to the port combination, enter a note in the port combination row Description field.
Example: Enter "See Various..."
- Remove a Various Cost/Revenue:
- Click Various... The Various Cost/Revenue pop-up opens.
- Click the various cost/revenue row to be deleted - it will highlight.
- Click Remove Various. The selected row will delete.
- Click Close. The pop-up will close.
- Remove (if applicable) any notes from the port combination Description field.
- Add Various Cost/Revenue to a Combination:
- click Create New and enter a combination manually. Repeat as applicable until all combinations are entered (for example: Nueva Palmira/Santos)
- If a port combination was
- entered manually:
- Enter the combination’s load and discharge ports in the Ports by Combination field.
Example: NUEVA PALMIRA/SANTOS - Select a combination by clicking the combination’s row in the Combinations field.
- In the Ports field click the loading port – it will highlight.
- Click Add to Range. The selected port appears in the Ports by Combination field.
- Repeat Steps 11a i-iv, but select discharge port instead of loading port.
Example: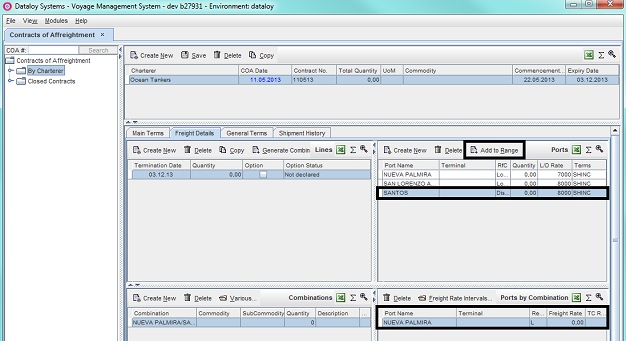
- Enter the combination’s load and discharge ports in the Ports by Combination field.
- generated: the combination’s load and discharge ports will automatically generate and display in the Ports by Combination field.
Example: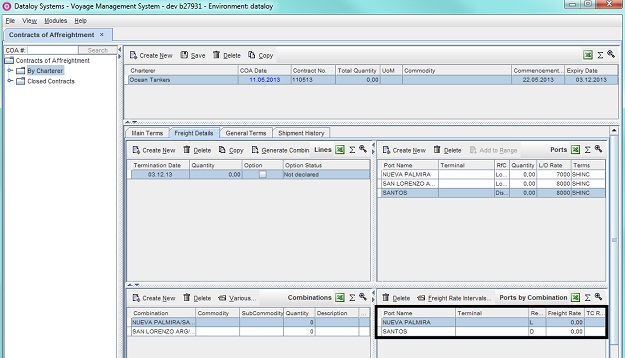
- entered manually:
- In the Combinations field click a port combination to enter the freight rate for the combination. The combination's ports will display in the Ports by Combination window.
- Under Freight Rate enter the freight rate for the port combination.
Note: Recommendation – enter the freight rate in the discharge port row.- Either click the row field and enter applicable rate
Example:
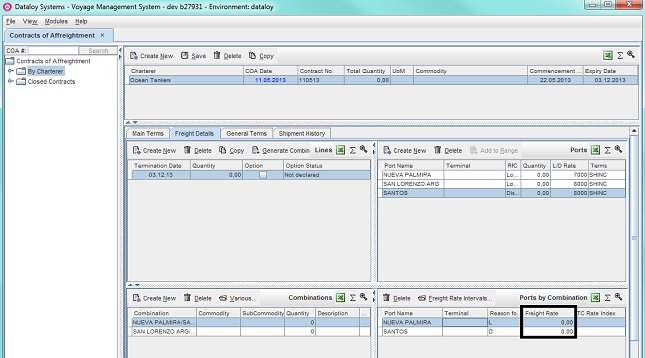
- or enter the freight rate intervals for the port combination
- Click applicable port row field - it will highlight.
- Click Freight Rate Invervals. The Freight Rate Intervals pop-up opens.
- Enter applicable rates.
Example: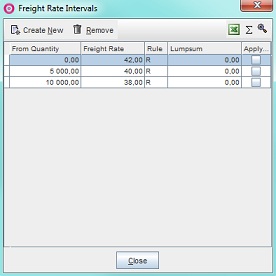
- Enter the TC rate index (if applicable) under TC Rate Index.
- Click Close. The pop-up will close and appropriate rate displays in the port row column.
- Either click the row field and enter applicable rate
- Repeat Steps 12-13 as applicable until all combinations’ freight rates have been entered.
- Click the General Terms tab. The following displays:
- Click Add to enter detailed, text based clauses (terms & conditions) of the COA as defined in the Terms module.
Note: Often the terms (or text summary of the contract) are not broken down into several sections, but clustered together under a single term: Recap - A pop-up opens. Select term type - it will highlight.
- Click Copy selected. The pop-up will close and the selected term and contents (i.e. pasted in) displays in the General tab fields.
Note: Recommendation - to attach a hardcopy of the COA, (for example in PDF-format), use the Remarks & Attachment functionality.
Example: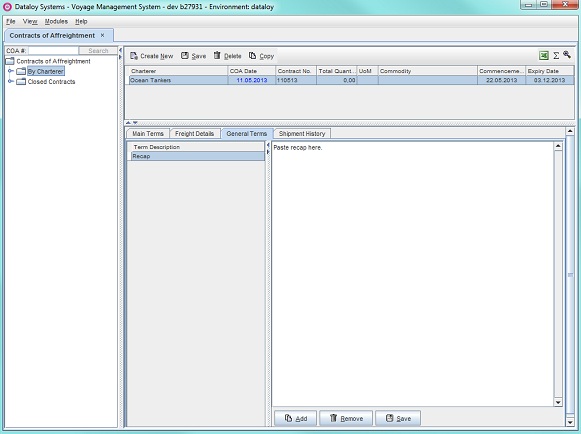
- Click Save.
- The Shipment History tab displays all vessels and voyages that actually carried cargo under a selected COA - the details are automatically retrieved from across Dataloy VMS. No data is manually entered here. For information purposes only.
Example:
Chemical Company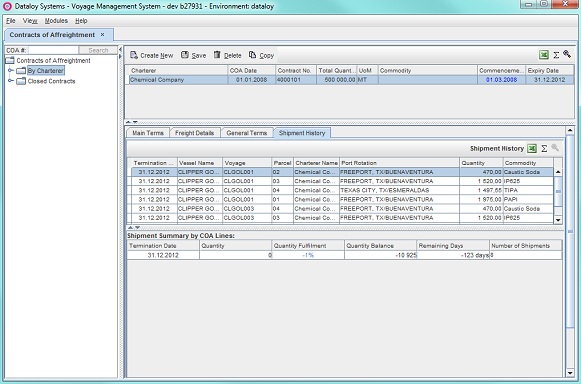
Edit/Delete a Contract of Affreightment (COA)
- Edit a Contract of Affreightment (COA):
- Go to
Modules > Contracts Management > Contracts of Affreightment.The Contracts of Affreightment window opens. - Click the COA to be edited in the left-hand menu tree. Its fields displays to the right.
- Edit as appropriate the fields displayed in the respective tabs in the lower right-hand field.
- Click Save.
- Go to
- Delete a Contract of Affreightment (COA):
- Go to
Modules > Contracts Management > Contracts of Affreightment.The Contracts of Affreightment window opens. - Click the COA to be deleted in the left-hand menu tree. Its fields displays to the right.
- Click Delete. A pop-up opens asking to confirm deletion.
- Click Yes. The pop-up will close and the selected COA is deleted.
Edit/Delete Contents in the Freight Details Tab
- Edit contents in the Freight Details Tab:
- Go to
Modules > Contracts Management > Contracts of Affreightment.The Contracts of Affreightment window opens. - Click the COA to be edited in the left-hand menu tree. Its fields displays to the right.
- Click the Freight Details tab. Its fields displays.
- In the Lines field, click the COA period row to be edited (or contains data belonging to it in the other fields that needs editing). The rows belonging to the selected row displays in the Ports, Combinations and Ports by Combination fields.
- Edit as appropriate the fields displayed in the respective fields in the Freight Details tab.
- Go to
- Delete Freight Details:
- Go to
Modules > Contracts Management > Contracts of Affreightment.The Contracts of Affreightment window opens. - Click the COA to be edited in the left-hand menu tree. Its fields displays to the right.
- Click the Freight Details atb. Its' fields displays.
- In the Lines field, click the COA period row to be deleted (or contains data belonging to it in the other fields that needs editing). The rows belonging to the selected row will display in the Ports, Combinations and Ports by Combination fields.
- Select the row to de deleted in either the Lines, the Lines, Ports, Combinations and Ports by Combination fields - it will highlight.
- Click Delete in the field of the row to be deleted. A pop-up opens asking to confirm deletion.
Note: If deleting a COA period row in the Lines field - this will also remove all rows belonging to it in the other three fields. - Click Yes. The pop-up will close and the row is deleted.
- Go to
Edit/Remove Terms in the General Terms tab
- Edit Terms in the General Terms Tab:
- Go to
Modules > Contracts Management > Contracts of Affreightment.The Contracts of Affreightment window opens. - Click the COA to be edited in the left-hand menu tree. Its fields displays to the right.
- Click the General Terms tab. Its fields display´s.
- Click the Terms row to be edited in the lower left-hand menu tree - it will highlight.
- Edit as appropriate in the lower right-hand field (text-box).
- Click Save.
- Go to
- Remove Terms in the General Terms Tab:
- Go to
Modules > Contracts Management > Contracts of Affreightment.The Contracts of Affreightment window opens. - Click the COA to be edited in the left-hand menu tree. Its fields displays to the right.
- In the lower left-hand field click the Terms row to be removed - it will highlight.
- Click Remove. A pop-up opens asking to confirm removal.
- Click Yes. The pop-up will close and the selected term is removed.