Create Voyage Charter Calculations
- Former user (Deleted)
- Erik Fritz Loy
Short Description
The Voyage Estimate (VE) module allows for an unlimited number of voyage charter calculations, both simple and complex, in order to calculate profitability of potential voyages in comparison with the cost of a vessel. Each calculation is identified by a unique number, are auto-saved and can be shared, copied and if needed, retrieved at a later date.
The voyage charter calculation interface consists of five main sections.
- Main Calculation Field:
- The full calculation panel - used to calculate and estimate the need of a voyage. Enables quick calculations and will at any time display the most important vessel details, cargo details, duration breakdown, fuel consumption and price and a result panel, which at any time displays the contribution, TC equivalent and the profit and loss of a voyage, including a breakdown for all cost and revenue.
- Ports:
- Displays all port calls and routing points of an estimated voyage, including port cost, load/discharge days, etc.
- Cargoes:
- Displays all cargoes of an estimated voyage, including quantity, freight, laycan, etc.
- Various Cost/Revenue:
- Displays all cost/revenue items related to either cargo, voyage or port call.
- Cargo Ports:
Displays all load and discharge ports per selected cargo, including reason for call, quantity, laytime details, demurrage/despatch, etc.
Voyage estimates are mainly entered either as new, based on the copy of an already existing one or created based on and existing Contract of Affreightment (COA). Note: Voyage calculations can also be created in the Booking and Operations module and will be covered through this module. For quick calculations all details need not be entered, but calculations to become fixtures should be as detailed as possible before freezing. As data is entered different sections of the estimate panels will automatically update and self-populate with data based on elsewhere entered parameters (by user or retrieved from other modules), as will related areas and in the Ports, Cargoes, Various Cost/Revenue and Cargo Ports fields. At any time the panel will display the voyage calculation breakdown of various subtotals and will automatically recalculate and update data whenever parameters change.
An estimate can be simple, for example a load and a discharge port with a single cargo, or consist of a combination of multiple port calls, routing points and cargoes (Advanced Port Rotation (Routing) (VC), Multiple Parcels). The Time Charter Equivalent (TCE) is calculated by dividing the contribution by the total voyage duration in days.
All estimates can be frozen and transferred to the Bookings and Operations module for execution, thereby becoming Actual Voyages (or fixtures). Once frozen, Dataloy VMS also automatically generates a voyage number, a schedule and a live copy of a calculation. The original calculation is saved as the Preliminary Calculation displaying all initial estimates - cannot and will not change. A live copy of the calculation form the basis of the Adjusted Calculation. See the Post Voyage Analysis page on how to generate a detailed analysis of the Adjusted Calculation including a comparison with the Preliminary Calculation.
Navigation Tips and Additional Features
Automatic Quick Search of Vessel and Port Names
Only the first few characters of a vessel name or port need to be entered under Vessel and Port respectively in the Main Calculation field. Dataloy VMS will search available vessels and ports and display the first matching entered characters, for example enter "VISAK" and "VISAKHAPATNAM" displays.
Moving Between Fields
- Use <Tab> or <Enter> for quick navigation between fields.
- Use <Shift-Tab> to move backwards between fields.
- Use <Tab> to move from column to column in a table/list.
- Use <Enter> to move from row to row in a table/list.
Information Dialogue Boxes
Certain fields have hidden information boxes attached. Hover the cursor over such a field and and information sign will display indicating availability of further data about the field contents retrieved from other modules. Click the sign to open available information dialogue box. Note: The contents of the dialogue box can only be altered in the module it is retrieved from.
Various Cost/Revenue Category Quickfilters - used for searches and listing of cost/revenues into four different categories:
Voyage: Lists Voyage Various entries related to voyage only.
Cargo: Lists Cargo- and Cargo Port Various entries per selected cargo.
Port Call: Lists Port Call Various entries per selected port call.
All: Lists all cost/revenue entries for all cargoes, cargo ports, voyage entries and port calls.
Each entered cost/revenue is automatically grouped and displayed according to type (i.e. add a cost/revenue using for example Add Cargo Various... - it will automatically sort under the Cargo filter).
Chapters:
Long Description
Create a Voyage Charter Calculation/Estimate
Go to
Modules > Voyage Estimate.The Voyage Estimate window opens.
Note: The most recent calculation displays by default. If no previous calculation has been made - the view is empty.
Example:
- A new voyage calculation can be made either by creating a new one or by duplicating an existing one. Each option requires the prior existence of minimum one vessel in Dataloy VMS.
- Create a voyage calculation by
- entering a new voyage calculation
- Either
- click New Voyage Charter

- or go to the Voyage menu and from the drop-down select New Voyage Charter.

- click New Voyage Charter
A blank voyage charter calculation window displays.
Note: When opening a new voyage estimate tab, a blank cargo is automatically created in the Cargoes field and added to the estimate. (Adding multiple cargoes - see Multiple Parcels).Example:

- Go to Step 3.
- Either
or by duplicating an existing voyage calculation.
Either
search and duplicate an open voyage
Open the voyage to be duplicated.
- Click Open Voyage. The Select a Voyage pop-up with a list of previously entered voyage calculations opens.
- Double-click the voyage row to be opened. The calculation will open.
Go to the Voyage menu at the top of the screen and from the drop-down menu select Duplicate.

The duplicated voyage calculation displays and will hold the same data as the voyage it was duplicated from - except the voyage calculation number (unique for each calculation) at the top of the tab.
or copy a voyage from the Select a Voyage pop-up
Click Open Voyage. The Select a Voyage pop-up with a list of previously entered voyage calculations opens.
Note: Displays by default only a user's own calculations. Can be filtered to display all previous calculations.Example:

Filter (if applicable) to locate the voyage to be duplicated.
Select the row of the voyage to be duplicated.
Click Copy. The pop-up will close and a copy of the selected voyage calculation display.
Note: The copied voyage will show different voyage results depending on the voyage type copied. Estimates and budget voyages that have cargoes with bunker adjustment (BAF) amounts does not have the BAF prices copied rendering the calculated amount zero. Actual Voyages inherits the bunker ROB, the previous voyage's prices in the schedule and the bunker prices.
Go to Step 3.
- entering a new voyage calculation
- Create a voyage calculation by
- In the left-hand Main Calculation field, fill in the fields as follows (as applicable - duplicated voyage calculations: edit as applicable):
Note: As data is entered different sections of the main calculation field panels will automatically update and populate as will related areas and in the Ports, Cargoes and Cargo Ports fields.- In the Vessel panel:
- Enter either
the name of the vessel a calculation is to be made for under Vessel
Note: Recommended: Need only to enter the first few characters of the vessel name. Dataloy VMS will search amongst available vessels and display the first matching entered characters.or click the Triple Dot Selector next to the field. A pop-up with a list of input values opens. Select field and click OK.
Example:
- Once a vessel has been entered the panel's remaining fields will automatically populate with data retrieved from the Vessel Administration module except for the ETD, Ballast, RoB FO and DO fields (retrieved from the Booking and Operation module). Vessel open date (ETD), ballast port, RoB FO and RoB DO are based on existing operational data and will ONLY populate if the vessel is operational.
Example:
- The populated fields can be manually overridden - edit if applicable:
Enter the ballast speed/day and speed when loaded/day under Speed.
Enter the fuel oil (FO) consumption/day while idle in port and while working in port under Port/FO.
Enter the diesel oil (DO) consumption at sea/day under DO/Sea.
Enter the ballast fuel consumption (FO)/day and when loaded under FO.
Enter diesel oil (DO) consumption/day while idle in port and while working in port under DO.
- Enter either
the estimated voyage start date under ETD (Estimated Time of Departure, i.e. vessel availability date)
or click the Triple Dot Selector next to the field. A pop-up with a calendar opens. Select date and click OK.

- Enter the ballast port (i.e. vessel starting point) under Ballast.
Note: Dataloy VMS automatically verifies port availability in the system. If not verified - contact Dataloy to add port to system. Enter the deadweight/metric tonne (MT) under DWT.
The Draft field next to the DWT will activate upon vessel entry and populate with draft data retrieved from the Vessel Administration module.
Note: Field is always disabled from editing. It can ONLY be edited from the Vessel Administration module.Enter the fuel consumption in metric tonnes (MT)/day and number of days for cleaning under Clean.
Enter the fuel consumption in metric tonnes (MT)/day and number of days for heating/cooling of cargo under Heat.
Note: Indicates fuel consumption for heating/cooling cargo, for example gas cooling. Calculated by multiplying the number of tonnes with the number of days.Enter the fuel oil (FO) remaining on board at voyage start date (leaving ballast port) under RoB FO (Remain on Board Fuel Oil).
Enter the diesel oil (DO) remaining on board at voyage start date (leaving ballast port) under RoB DO (Remain on Board Diesel Oil).
- Enter either
In the Cargo panel:

Fill in the fields as follows:
Enter the load and discharge port/s for the cargo under Ports.
Note: Need only to enter the first few characters of the port name. Dataloy VMS will search available ports and display the first matching entered characters, for example enter "VISAK" and "VISAKHAPATNAM" displays. Enter all load (L) ports, thereafter discharge (D) ports - separated by a slash ("/"). A minimum of one load and one discharge port must be entered. Multiple load and discharge ports are separated by a dash ("-"). Example: load/discharge-discharge. Once all ports have been entered the port rotation will automatically display in the Ports field, (including reason for call (L, D, etc.) and the distances between ballast, load and discharge ports), and in the Cargo Ports field (bottom field) per selected cargo. To enter multiple L/D port calls, extra ports and/or additional routing points, go to Advanced Port Rotation (Routing) (VC).Example:

- Enter the charterer (customer) under Charterer.
Note: Selected cargo in the Cargoes field will also update.
- Enter the broker under Broker.
- Enter the estimated (booked) cargo quantity under Quantity.
Note: Displays with three decimals. Entered quantity amount will reflect the Bill of Lading quantity at voyage end. The Quantity sections of selected cargo in the Cargoes and Cargo Ports fields will update. Entered Quantity will in the Cargo Ports field by default display in the first load and discharge ports, but can be split when working with multiple ports. - Enter quantity unit measurement and commodity (i.e. type of cargo) in the fields next to Quantity.
Note: Measurement defaults to metric tonnes (MT). The Commodity field of selected cargo in the Cargoes field will update.
Example:
- Enter the stowage factor (if known) under SF (Stowage Factor).
Note: When calculating World Scale the Stowage Factor field will change from SF to WS and display the year of the World Scale rate used is from.
Example:
- Enter the freight rate currency in the rate currency field below Quantity.
Note: Defaults to voyage currency. To calculate World Scale and flat rates: Enter WS (World Scale) in the rate currency field. - Enter either estimated freight rate, lumpsum or world scale in the freight rate field next to the rate currency field.
Note: Displays by default with three decimals. Rate and lumpsum can be entered as intervals. World Scale calculation: enter world scale rate.- Freight rate: applies to the entire cargo quantity.
Note: If rate is 10,000 or above the Lumpsum box must be unchecked to be recognised as rate. - Lumpsum: applies to the entire cargo quantity.
Note: Requires Lumpsum box to be checked for lumpsum to be recognised unless 10,000 or above. A freight rate of 10,000 or above is automatically recognised as lumpsum. The layout will change - the measurement field will vanish and the lumpsum box will will automatically check.
Example:
Freight Rate Layout (default):
Lumpsum Layout:
- World Scale (WS): applies to the entire cargo quantity and is calculated using World Scale and flat rates:
- Enter WS (World Scale) in the rate currency field.
Note: The Stowage Factor field will change from SF to WS and display the year of the World Scale rate used is from. The Flat Rate field next to Min Qty (Minimum Quantity) will activate.Example:

Enter applicable World Scale rate in the fright rate field next to the rate currency field.
- Enter applicable World Scale flat rate in the activated flat rate field next to Min Qty.
- Enter WS (World Scale) in the rate currency field.
- Rates and/or Lumpsums as Intervals. Freight rate and lumpsum can be entered as intervals, either as rate or lumpsum intervals or a combination of both.
- To specify an interval/s:
- Click the Triple Dot Selector next to Freight Rate field. The Freight Rate Intervals dialogue box opens.
- Click Create New. An empty freight rate row displays.
Example:
Fill in the row fields as follows:
- Enter the interval start level under From Quantity.
- Enter the freight rate (if applicable) under Freight Rate.
Enter lumpsum (if applicable) under Lumpsum.
- Check Apply to Total Quantity to indicate that only one of the entered freight rates/lumpsums is to be used for the total quantity.
Note: Depends on cargo size, i.e. applicable rate would be the rate of the interval in which the total quantity falls.
- Repeat as applicable until all intervals have been entered.
- Click Close. The dialogue box will close and entered data apply. The rate displayed in the freight rate field will be the sum of each interval multiplied with its rate/lumpsum, unless Apply to Total Quantity is checked.
- To delete an interval:
- Click the interval row to be deleted - it will highlight.
- Click Remove. A pop-up opens asking to confirm removal.
- Click Yes. Selected row will delete.
- To specify an interval/s:
- Freight rate: applies to the entire cargo quantity.
- Check the Lumpsum box - if applicable - next to the freight rate field to indicate lumpsum instead of rate.
Note: Will check automatically if a rate of 10,000 or above is entered - unchecking the box results in entered amount being treated as rate. Layout reverts to default. - Enter the the agreed freight rate measurement in the freight rate measurement field below Quantity.
Note: Defaults to metric tonnes (MT). Not applicable if Lumpsum is checked - field will vanish. The freight rate measurement can differ from quantity measurement, for example, quantity can be measured in metric tonnes (MT) while the rate can be in cubic metres (CBM). The Flat Rate field next to the freight rate measurement only activates for World Scale (WS) calculations. If activated: enter World Scale flat rate.
Enter (if applicable) agreed minimum shipment size (cargo quantity) upon delivery under Min Qty (Minimum Quantity).
Note: If charterer is unable to load agreed minimum quantity deadfreight will be calculated. If charterer loads more than agreed minimum quantity overage will be calculated (ONLY if the overage percentage is entered).Enter the total of all broker commissions (first field) and the address commission (second field) in per cent under Comm (Commissions).
Note: Broker commissions should be specified if an estimate is to be made into an Actual Voyage (fixture). Usually performed after calculation completion, prior to freezing.To specify broker commissions (if applicable):
- Click the Triple Dot Selector next to Broker Commissions field. The Broker Commissions dialogue box opens.
- Click Create New. An empty broker specification row displays.
Example:
Fill in the row fields as follows:
- Enter the broker under Broker.
- Enter the commission percentage under Percent.
- Enter the commission rate (if applicable) under Rate.
Note: Rate is multiplied with cargo quantity. - Enter applicable lumpsum (if applicable) under Lumpsum.
- Enter the commission under Commission.
- Check Credit Charterer to indicate that the Charterer will pay the commission to the broker (deducted when invoicing).
- Check Charterer's Cost to indicate those cases when the Charterer, not the Owner (as per normal), will bear the cost of the commission to brokers when the ability to toggle the commission is to be used.
- Check C/O (care/of) to indicate that invoices should be sent through the broker (i.e. the broker is invoice addressee).
- Check Basefreight Only to indicate that commission is ONLY calculated on freight, i.e. demurrage and miscellaneous revenue are excluded.
- Enter the commission type under Commission Type.
- Repeat as applicable until the total broker commission has been split and specified amongst all involved brokers.
- Click Close. The dialogue box will close and entered data apply. The total commission percentage according to the display in the Broker Commissions field.
To delete a broker commission specification:
- Click the broker commission row to be deleted - it will highlight.
- Click Remove. A pop-up opens asking to confirm removal.
- Click Yes. The selected broker commission will delete.
- Enter agreed demurrage rate (first field) and agreed despatch rate (second field) in under Dem/Des (Demurrage/Despatch).
Note: For vessel types where despatch is applicable despatch defaults to half of the demurrage rate. Enter agreed laytime rate and terms for load/discharge of cargo under L/D Rate (Load/Discharge Rate).
Note: Enter load port rate and terms first, discharge port second - cohesively without spaces but separated by a slash ("/"). Rates and terms can differ between ports. Example: 12000SHINC/10000SHEX, 12H/10H, etc. If only a rate and a term is entered, for example 12000SHINC (or SHEX), Dataloy VMS equates this with an entry of 12000SHINC/12000SHINC (or 12000SHEX/12000SHEX). All is displayed accordingly in the Cargo Ports field (L/D Rate and Terms columns, by default). Days and Hours display differently - for an entry of time and term, for example 24H, Dataloy VMS equates this with an entry of 12H/12H. Laytime terms and rates in the Cargo Ports field are by default displayed in the initial load and discharge ports - terms and rates for additional ports must be manually entered in the Cargo Ports field. Laytime terms are maintained and updated through Master Data - for example, if one or more laytime terms has a zero correction factor then the theterms has either been updated with an incorrect value or not maintained in Master Data > General Master Data Administraion > Laytime Terms.Laytime is expressed either as rate/day or rate/hour (time/rate based) or as a total days or hours (total based). If rate based, laytime will follow the (user entered) configuration of the Vessel Type module. There are four predefined laytime terms, all others are entered by user in the Laytime Terms module. Laytime terms defaults to SHINC unless otherwise stated, i.e. a rate entry without term, for example "100" equates to 100SHINC/100SHINC.
Default Laytime Terms: SHEX (X) Sundays and Holidays Excepted - Example: 12000X or 12000SHEX SHINC (C) Sundays and Holidays Included - Example: 12000C or 12000SHINC DAYS (D) Days - Example: 2D or 2DAYS HOURS (H, HRS) Total Hours - Example: 24H, 24HRS or 24HOURS Check Reversible to indicate if laytime in ports is reversible.
- Enter agreed cargo overage (in per cent) (if applicable) under Overage.
Note: World Scale calculations: automatically populates as 50%. - Enter the deadfreight rate under Deadfreight @.
Note: ONLY enter this if deadfreight and freight rates differ. Link (if applicable) relevant COA to the voyage calculation under COA (Contract of Affreightment).
- Link a COA:
Click the Triple Dot Selector next to the field. A pop-up with a list of COAs opens.
Select a COA and click OK
- The pop-up will close and the COA field populate. The COA number that displays is identical to that entered under COA# in the Contracts of Affreightment module (Main Terms tab) – i.e. the COA and the voyage calculation have been linked.
Remove a linked COA:
Click the Triple Dot Selector next to the field. A pop-up with a list of COAs opens.
Select the linked COA and click Deselect.
Click OK. The pop-up will close and the COA field will be blank, i.e. link removed between COA and voyage calculation.
- Link a COA:
- In the Vessel panel:
- In the Cargo Ports field:
Note: The Cargo Ports field displays as rows entered load and discharge ports per selected cargo and enables modification of cargo port data per port of, for example, freight rate (or lumpsum), laytime rate and terms, laytime used, demurrage/despatch, division of cargo quantity between ports, etc. and the entering of handling cost details. If no changes are required – go to Step 5.
Example:
- Populated row fields can be manually overridden (except the read-only initial # (list) field) - edit if applicable:
- List (#) field lists port call order according to reason for call type.
Note: Lists load ports first, thereafter discharge ports irrelevant of actual voyage pattern order. Each port call is numbered according to reason for call type with numbering restarting for each type, for example load (L)/discharge (D)-discharge (D) equates 1/1-2. - Enter the port call name under Port Name.
Note: Will be populated with elsewhere entered data. - Enter terminal name (if any) under Terminal Name.
- Enter reason for call under Reason for Call.
Note: Will by default display as load (L) or discharge (D). - Enter cargo quantity under Quantity.
Note: Displays by default total quantity in the initial load and discharge port rows. Can be manually overridden. Quantity can be split between ports (if they are of identical type, i.e. both are either load or discharge port, and the sum of each part equals the total quantity) but must be manually entered.Example:
Loaded quantity: 50 000. Two discharge ports: 30 000 discharged in Vadinar, 20 000 in Singapore.
- Untitled checkbox next to Quantity is for user informative purposes only - checked indicates a manual change of the Quantity column row field.
- Enter freight rate (if applicable) under Freight Rate,
Note: Can vary between port calls. Will be blank if Lumpsum box is checked. - Enter time charter (TC) rate index (if any) under TC Rate Index.
- Enter applicable handling cost rate under Handling Cost Rate.
Note: Can vary between port calls. Can ONLY be entered here in a calculation. If no handling cost, leave blank. - Enter handling cost rate currency under Currency.
- Enter applicable handling cost rate measurement under UoM (Unit of Measurement).
- Check Lumpsum to indicate that lumpsum applies instead of handling cost rate.
- Enter laytime rate or time (days or hours) under L/D Rate (Load/Discharge Rate).
Note: Displays rate or time, if entered, as in the L/D Rate field (Main Calculation field, Cargo panel) in the initial load and discharge port rows ONLY. Can be manually overridden. If only a rate is entered, for example 1200, both initial load and discharge port will populate with 1200. Time displays different, if L/D Rate entry is 24 hours, Dataloy VMS equates this with an entry of 12 in both initial load and discharge ports respectively. Rates and/or time for additional port calls defaults to zero - any change must be performed manually.
Example:
- Enter laytime terms under Terms.
Note: Displays terms, if entered, as in the L/D Rate field (Main Calculation field, Cargo panel) in the initial load and discharge port rows ONLY. Can differ between port calls, but defaults to SHINC unless otherwise stated, for example a rate entry without term, for example "100" equates to 100SHINC/100SHINC. Terms for additional port calls will always default to SHINC - also when initial load/discharge ports display different - any change must performed manually.
Example:
- Enter the estimated time used to load/discharge cargo under Laytime Used.
Note: By default, Dataloy VMS equates Laytime Used with Laytime Allowed (i.e. allowed timeframe to load/discharge cargo). Laytime Used can be manually overridden, especially in order to estimate a demurrage and/or despatch. As Dataloy VMS equates Laytime Allowed with Laytime Used, the Laytime Allowed column is hidden. To view both columns side by side, insert column by using the Add Columns feature. - Enter demurrage rate under Demurrage Rate.
Note: Only if rate differ between ports. - Enter despatch rate under Despatch Rate.
Note: Only if rate differ between ports. - Check Working to indicate that the vessel will be working whilst in port - will impact on the estimated fuel consumption. Tankers: discharge ports will automatically be calculated as Working and load ports as Idle.
- Check Free Despatch to indicate that there is a "free despatch" clause in the contract for the port.
- Enter applicable reversible match calculation number under Reversible Match.
- List (#) field lists port call order according to reason for call type.
- Populated row fields can be manually overridden (except the read-only initial # (list) field) - edit if applicable:
- In the left-hand Main Calculation field, fill in the fields as follows (as applicable - duplicated voyage calculations: edit as applicable):
- In the Turnaround Days (or Duration of Voyage) panel:
Note: Only the Waiting and % Extra Sea fields can be edited. All other fields are read-only and will (if applicable) self-populate with data based on elsewhere entered parameters (by user or retrieved from other modules). At any time the panel will display the total length of a voyage (in days with a voyage breakdown) and will automatically recalculate and update data whenever parameters change.
- Fill in applicable fields, all other fields self-populate:
- Enter extra time spent waiting before entering the first port (in days) under Waiting (if applicable).
- The Ballast Passage fields displays the time (in days) and distance (nautical miles) between ballast and first load port as well as any time after last discharge port.
- The Loaded Passage fields displays the time (in days) and distance (nautical miles) between load and discharge ports.
- Canal Passage displays the total time of canal passage (if any).
- Loading displays the total time spent loading cargo.
- Discharging displays the total time spent discharging cargo.
- Extra Port displays the total extra time spent entering/leaving ports.
Note: Displays the total number of entered days in all ports under the Xtra column in the Ports field. - TOTAL DAYS displays the total duration of the voyage (in days).
- Enter the number of extra days at sea as per cent (first field) or in days (second field) under % Extra Sea.
Note: Normally defaults to 5% - the second field automatically displays the entered percentage in days (and vice versa). - Enter additional comments (if any) under Comment.
- Fill in applicable fields, all other fields self-populate:
- In the Fuel panel:
Note: Calculates the total cost of each bunkers type (FO, DO, FO LS and DO LS) for a voyage. Each bunker type row is divided into three fields, one for fuel price/MT, the next states consumption of the bunker type in metric tonnes needed to complete a voyage and the third displays the total bunker type cost for the estimated voyage. Only the first field, "fuel price/MT" , can be edited, all other fields are read-only and will self-populate. The panel will automatically recalculate and update upon parameter change.
- Fill in the fields as follows (as applicable):
- Enter the estimated fuel oil (FO) price/MT under FO Price/MT.
- Enter the estimated diesel oil (DO) price/MT under DO Price/MT.
- Enter the estimated fuel oil low sulphur (FO LS) price/MT under FO LS Price/MT.
- Enter the diesel oil low sulphur (DO LS) price/MT under DO LS Price/MT
- Each entered bunkers cost/MT will automatically multiply by the bunker consumption of its respective row. The product of each displays as the cost of the required fuel consumption for an estimated voyage.
Example:
827 x 12,812 = 10596 (i.e. bunker type price/MT multiplied by required bunker consumption equals total cost of required bunker type consumption to complete voyage).
- Fill in the fields as follows (as applicable):
- In the Turnaround Days (or Duration of Voyage) panel:
- In the Ports field:
Enter the individual port costs for all ports in the Cost LC column of the upper right-hand Ports (or Port Rotation) field.
Note: The sum of all port costs will automatically display under Port Cost in the Upper Result Panel of the Main Calculation field.Example:

Enter either
a new port cost estimate: Click each row field and enter each port cost under the Cost LC column respectively. System will automatically update.
- or select an in the system already existing port cost:
- Either
- click Port Cost History

- or go to the Port Call menu in the menu bar and from the drop-down menu select Port Call History.

- click Port Cost History
- Click Use Preliminary or Use Adjusted to select which port cost figures to be used. The dialogue box will close and selected port cost display in selected ports row field of the Cost LC column.
Note: Click Close to close dialogue box without selecting a port cost estimate.
Example:
- Select port call to be used - it will highlight.
- Click Use Preliminary or Use Adjusted to select which port cost figures to be used. The dialogue box will close and selected port cost display in selected ports row field of the Cost LC column.
Note: Click Close to close dialogue box without selecting a port cost estimate.
- Click Use Preliminary or Use Adjusted to select which port cost figures to be used. The dialogue box will close and selected port cost display in selected ports row field of the Cost LC column.
- Either
- Repeat until all applicable port costs have been entered.
- Enter the individual extra days estimated to spend in each port in the Xtra column of the upper right-hand Ports (or Port Rotation) field.
Note: Defaults to 0.5 days. The total of all entered extra time spent in all ports will display under Extra Port in the Turnaround panel of the Main Calculation field.
Example:
- In the Various Cost/Revenue field:
- Enter all individual various cost and/or revenues for the voyage, all cargoes, port calls and cargo ports (as applicable) in the Various Cost/Revenue field:
- Add a cost/revenu
Select cost/revenue category for cost/revenue entry.
Various Cost/Revenue Categories: Voyage Various Applies to the overall voyage, not related to a specific cargo or port. Cargo Various Applies to a specific cargo, all ports. Port Call Various Applies to a specific port call, all cargoes. Cargo Port Various Applies to a specific cargo at a specific port. - Click Add Voyage Various.../Add Cargo Various.../Add Port Call Various.../Add Cargo Port Various... depending on selected category.
Note: Port call various can also be added by selecting Port Call Various... in the Port Call menu.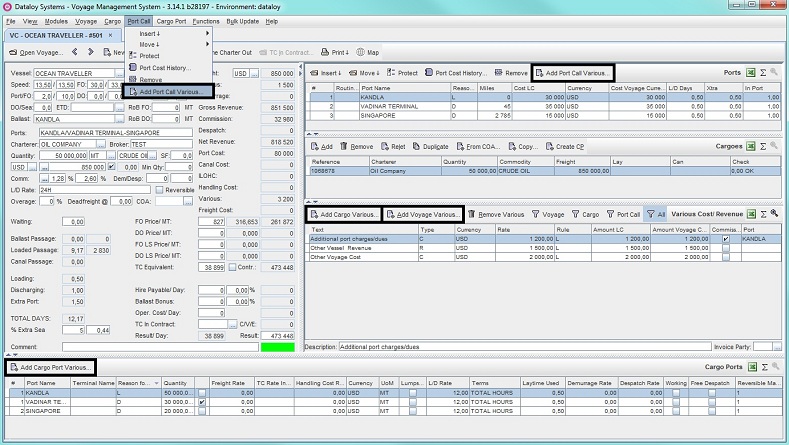
- The Select a Various Text pop-up with a list of input values opens. Select applicable cost/revenue and click OK.
Example:
- The pop-up will close and selected item display as a populated row in the Various Cost/Revenue field, automatically sorted under appropriate category filter.
Note: Item row contents will follow configuration as (user) entered in the Various Text module. Port Call Various and Cargo Port Various entries both sort under the Port Call filter.
Example:
- The populated row fields can be manually overridden (except Amount LC, Amount Voyage Currency and Port) - edit if/as applicable.
- Enter the name of the various cost/revenue under Text.
Enter the monetary transaction type under Type.
Transaction Types: Cost (C) An item's value will be accumulated to the total Various Cost item of a voyage. Revenue (R) An item's value will be accumulated to the total Various Revenue item of a voyage. Both (B) An item's value will be accumulated to the total Various Cost and Revenue item of a voyage. - Enter applicable currency under Currency.
- Enter cost/revenue depending on rule under Rate.
Note: Relevant fields will automatically update, including the Amount LC and Amount Voyage Currency fields. Enter the appropriate default calculation rule under Rule.
Calculation Rule Types: Lumpsum (L) The amount entered against the item will be treated as a lumpsum (no calculation takes place).
Per Day (D) Entered value will be multiplied with the total number voyage days.
Percentage (P) Entered value will be multiplied with the freight of for example a cargo and then divided by 100.
Rate Based (R) Entered value will be multiplied with the quantity of for example a cargo against which the item is added.
- Amount LC (Amount Local Currency) displays the total cost/revenue in applicable currency.
- Amount Voyage Currency displays the total cost/revenue in the voyage currency.
- Check Commission to indicate if Address Commission applies to the cost/revenue.
- Port displays applicable port if cost/revenue has been entered under Port Call Various or Cargo Port Various. Otherwise - will be blank.
- Repeat Step 7ai5 as applicable until all various costs/revenues have been entered.
- To delete a various cost/revenue:
- Select the cost/revenue to be deleted - it will highlight.
- Click Remove Various. A pop-up opens asking to confirm removal.
Note: Disabled by default. Activates once a cost/revenue is entered. Click Yes. The selected item will delete.
- Add a cost/revenu
- Enter cost/revenue's name on invoice under Description.
Note: ONLY if differs from item text in Dataloy VMS. By default displays the last highlighted row of the Various Cost/Revenue field, will update each time another cost/revenue row is highlighted. Enter invoice addressee under Invoice Party.

- Enter all individual various cost and/or revenues for the voyage, all cargoes, port calls and cargo ports (as applicable) in the Various Cost/Revenue field:
- In the left-hand Main Calculation field, fill in the fields as follows (as applicable - duplicated voyage calculations: edit as applicable):
- In the Upper Result panel:
Note: Only the voyage currency field next to Freight can be edited. All other fields are read-only and will (if applicable) self-populate with data based on elsewhere entered parameters (by user or retrieved from other modules). At any time the panel will display the voyage calculation breakdown of cost/revenue subtotals (exception: any cost/revenue handled in the Fuel and Lower Result panels respectively) and will automatically recalculate and update data whenever parameters change.
- Fill in applicable field, all other fields self-populate:
- Enter voyage currency in the voyage currency field next to Freight.
Note: If a voyage currency other than the default is entered the module will automatically recalculate as per the new currency. - The Freight field (second field under Freight) displays the total freight (i.e. the sum of all cargo freights).
Note: Includes individual cargoes handled in other currencies - their freight will be recalculated to voyage currency and added to the overall freight field. - Upper Various field displays the total of all various revenues.
- Demurrage displays the total voyage demurrage (if any).
- Gross Revenue displays the sum of the Freight, Demurrage and upper Various fields.
- Commission displays the total of broker and address commissions.
- Despatch displays the total voyage despatch (if any).
- Net Revenue displays the difference of Gross Revenue total minus Commission and Despatch totals.
- Port Cost displays the total of all voyage port costs.
- Canal Cost displays the total of all canal costs (if any).
- ILOHC (In Lieu Of Hold Cleaning) displays in advance agreed lumpsum cost for not cleaning vessel prior to re-delivery. (Retrieved from applicable TC In contract. Otherwise - will be blank).
Note: Will only populate if voyage is frozen and if Final Voyage box is checked in the Freeze Voyage - Check These Values Before Proceeding pop-up during the final voyage before vessel re-delivery. ILOHC can be added to a calculation for other voyages if added via the Various Cost/Revenue field. - Handling Cost displays the total cost of loading/discharging cargo.
- Lower Various field displays the total of all various costs.
- Freight Cost displays the total relet, transshipment or preshipment costs (if any).
- Enter voyage currency in the voyage currency field next to Freight.
- Fill in applicable field, all other fields self-populate:
- In the Lower Result panel:

- Fill in the fields as follows (where applicable), read-only fields self-populate:
- The TC Equivalent (Time Charter Equivalent) displays Contribution divided by total days.
Note: Can be manually overridden. If changed, the entered freight rate will recalculate and display the rate needed to achieve the new TC Equivalent. - Check Reverse Calculation to lock the TC Equivalent figure.
Note: Leave UNCHECKED if estimate is to be made a fixture. Used when performing reverse calculations - otherwise leave unchecked. Reverse calculation: A locked TC Equivalent causes changes made in a calculation (other than the rate) to impact on the freight rate/lumpsum, not the result. - Contr. (Contribution) displays Net Revenue total minus the total of all costs prior to deducting vessel costs.
- Enter vessel hire/day (first field) and applicable address commission (in per cent) (second field) under Hire Payable/Day.
Note: Both fields automatically populates if vessel is under Time Charter In contract. If so, fields CANNOT be edited. - The Total Hire Payable field next to the Hire Payable/Day fields displays the total net hire payable (i.e. hire payable multiplied with the number of voyage days minus the address commission).
- Enter ballast bonus (first field) and address commission (in per cent) (second field) under Ballast Bonus.
Note: Always a lumpsum. Will automatically populate if vessel is under TC In contract. If so, CANNOT be edited. - The Total Ballast Bonus field next to the Ballast Bonus fields displays the net ballast bonus (i.e. ballast bonus minus address commission).
- Enter the vessel's operational cost/day under Oper. Cost/Day (Operational Cost/Day).
Note: Also displays to the left. - Enter applicable TC In Contract (if any) under TC In Contract.
Note: Automatically populates if vessel is under TC In contract upon vessel name entry (Vessel Panel) stating the charter date. Retrieved from the Time Charter Contracts module. Can be manually overridden. If populated, the TC In Contract button in the top toolbar will activate - click to open pop-up with main details of contract. - C/V/E (Cables/Victuals/Entertainment or Meals & Cables) displays the total of all C/V/E costs.
Note: Retrieved from the Time Charter Contracts module. - Result/Day displays the voyage estimate's net result/day.
- Result displays Contribution minus vessel costs.
Note: Cannot be locked, but can be manually overridden. Can perform Breakeven calculations: Enter 0 and the freight rate will recalculate and display required rate for a voyage to end plus/minus zero.
- The TC Equivalent (Time Charter Equivalent) displays Contribution divided by total days.
- Fill in the fields as follows (where applicable), read-only fields self-populate:
- In the Upper Result panel:
- The Voyage Calculation is complete. To freeze a calculation and turn it into a fixture, go to Turn a Voyage Calculation Into an Actual Voyage.
Turn a Voyage Charter Calculation Into an Actual Voyage
BEFORE FREEZING A VOYAGE: Specify the broker commissions entered in the Cargo panel of the Main Calculation field (if applicable) by following the step-by-step instructions of the Create a Voyage Charter Calculation/Estimate, Step 3bi 13a above.
Note: A voyage calculation moved to the COA Planner becoming a model voyage is sometimes referred to as “TCalc” as once the move is made the voyage status indicator in Voyage Estimate changes from solid green to “T with purple background". However, voyages labled as Status T are voyages visible in the Booking and Operations under either Actual, Budget or Estimate and are NOT frozen (either because they are budget or estimate OR because they have not been frozen yet OR because they have been un-frozen). They need therefore not first be frozen and then un-frozen to be labled a Status T voyage in the Voyage Estimate module.
- Go to the Voyage menu and from the drop-down select Freeze.

- The Freeze Voyage - Check These Values Before Proceeding pop-up opens.

- Fill in the fields as follows:
- Enter either
- the name of the company responsible for the voyage under Company Name or
- click the Triple Dot Selector next to the field. A pop-up with a list of input values opens. Select field and click OK.

- The the business unit responsible for the voyage under Business Unit Name.
- Enter the the pool responsible for the voyage (if applicable) under Pool Name.
- Enter applicable trade route under Trade/Pattern.
- Enter the person responsible for the voyage under Responsible Charterer.
- Enter the person responsible for operating the voyage under Responsible Operator.
- Enter the responsible accountant under Accountant Responsible.
Note: Defaults to data in Vessel Administration > Internal Data - if entered. - Enter the number of days that compose the demurrage timebar (if any) under Demurrage Timebar.
- Enter the event the demurrage timebar to start from under Event.
- Enter either
- the charter party (CP) date under CP Date (MANDATORY).
- or click the Triple Dot Selector next to the field. A pop-up with a calendar will open. Select date and click OK.
.
- Check Last Voyage for current CP if vessel is under TC In contract and on its final voyage prior to re-delivery. Otherwise - leave unchecked.
- Enter the vessel earning point under Vessel Earning Point.
Note: ONLY used to override if the vessel used in the voyage calculation has a different vessel earning point than the intended vessel for the voyage. - The Vessel IMO No field displays a vessel's IMO number. By Default Always Disabled - i.e. freezeing a voyage without it is possible. To enable - please contact Dataloy.
Note: Depending on system configuration on mandatory IMO number, if a vessel does not have an IMO number an error message will display and an IMO should be set in the Vessel Administration module. The option for disabling freezing a voyage if a vessel does not have an IMO number has been added. This functionality can be enabled/disabled, but is by default disabled. To enable - contact Dataloy Support. - Internal Relet - leave blank.
Note: By default is disabled - ONLY activates if the voyage is performed by a Time Charter (TC) In vessel AND the selected business unit in the freeze picture is other than the business unit in the time charter (TC) contract. - Enter the index against which the voyage will be measured (or benchmarked) under TC Benchmark Index.
- Enter the percentage of the index a voyage is benchmarked against under Percent.
Note: Defaults to 100%. - Enter applicable Payment terms (if any).
Note: Any entered payment in a COA linked to the calculation or any default payment terms added via the Charterer (Business Partners module) will automatically display.- Enter a payment for each cargo:
- If multiple payment terms, enter in per cent the amount to be paid under the first payment term under %.
Note: If a single payment term - enter 100. - Enter applicable payment term under Payment Term.
- Enter applicable baseline term under Baseline Term.
- If multiple payment terms, shows in per cent the amount to be paid under the second payment term under %.
Note: If a single payment term - will show 0. - If a second payment term - enter the second payment term under Payment Term 2.
- If a second payment term - enter the second baseline term under Baseline Term 2.
- If multiple payment terms, enter in per cent the amount to be paid under the first payment term under %.
- Enter a payment for each cargo:
- Enter either
- Click Proceed. The pop-up will close and the voyage calculation automatically transfer to operations (Booking and Operations) for execution, thereby becoming an Actual Voyage (or fixture). The voyage status indicator of the voyage estimate changes from solid green to red with P (Preliminary Calculation). The live copy's status indicator is a solid blue (adjusted calculation). Once frozen, Dataloy VMS automatically generates a voyage number (in the calculation tab), a schedule and a live copy of a calculation enabling future tracking, scheduling and post voyage analysis (i.e. the running of both a Preliminary and an Adjusted report of the voyage), go to Post Voyage Analysis.
Example:
Preliminary:

Create a Voyage Charter Calculation Based on a Contract of Affreightment (COA)
- Go to
Modules > Voyage Estimate.The Voyage Estimate window opens.
- Open a blank voyage charter estimate.
- In the right-hand Main Calculation field, enter the applicable vessel name under Vessel. The vessel’s details will display, but the COA (Contracts of Affreightment (COA)) field will be empty.
- Click From COA.

- A pop-up opens. Select applicable COA combination and click OK.

- The pop-up will close. The main /wiki/spaces/DLOYPRODUCTS/pages/923506300details and selected combination details retrieved from the Contracts of Affreightment module automatically populates corresponding fields in Voyage Estimate, including the COA field - i.e. the COA and the voyage calculation have been linked.
- Complete the voyage calculation in the Voyage Estimate by entering all details not available in the COA, for example port cost, fuel cost, etc., i.e. follow applicable steps of Create a Voyage Charter Calculation/Estimate.
Edit/Delete a Voyage Charter Calculation
- Edit a Voyage Charter Calculation:
- Go to
Modules > Voyage Estimate.The Voyage Estimate window opens. - Open applicable voyage charter calculation to be edited - it will display.
- Edit as appropriate the fields displayed.
- All changes auto-save.
- Go to
- Delete a Voyage Charter Calculation:
- Go to
Modules > Voyage Estimate.The Voyage Estimate window opens. - Open applicable voyage charter calculation to be deleted - it will display.
- Go to the Voyage menu and from the drop-down select Delete.

- A pop-up opens asking to confirm deletion.
- Click Yes. The pop-up will close and selected scheduled voyage delete.