Hire Payable
- Former user (Deleted)
Short Description
The Hire Payable module automatically retrieves all payable items to an Owner on a detailed level from across Dataloy VMS for Time Charter Contracts (all other payables are handled in Accounts Payable). Once retrieved, the payable items can be reviewed, assembled into invoices and posted to an accounting system. The module provides information about each payable item, based on already available data in Dataloy VMS, for example type of invoice, who the invoice is from, the amount, etc.
Hire payables can, for most business organisations, be defined as accounting transactions handling the invoices due/owed to Owners of vessels under a time charter contract - but is yet to be paid. All invoices are required to be paid within an established timeframe (or payment terms). As time charter contracts are set for a specific timeperiod - not voyage or voyages, the charter hire payables can span multiple vessels and voyages.
The module consists of three sections:
- Pending:
- Displays all unprocessed invoices, grouped by business partner and currency, and the respective invoice items of each that are associated with an opened time charter contract.
- Assembled:
- Displays created and complete invoices of an opened time charter contract pending posting to an accounting system.
- Posted:
- Displays invoices of an opened time charter contract in queue to be posted to an accounting system and invoices already posted. Also holds the option to print invoices and Statement of Accounts.
Invoices (or payment advice) can only be generated and assembled for time charter contracts and are, even if they span multiple vessels and voyages, all grouped by default by time charter contract and then by business partner and currency. Each invoice consists of one or more invoice items, for example charter hire, bunkers consumption, broker commission, offhire, meals & cables, ballast bonus, various revenue, etc., defining for example what is being invoiced, to whom, the amount and currency. All invoice item types are entered through Master Data. Item data is retrieved from across the system, for example, various modules, estimates, operational data, etc. If data is missing or incorrect - revert to the source of the invoice item data and edit.
The business partner (or Owner) stated on an invoice (or payment advice, hire statement) is the business partner with whom a time charter contract was entered into and the owner of the vessels covered by the contract. The currency stated on the payment advice is the currency agreed to be used in the contract. All items of the invoice will default to the same source business partner and currency, for example using a hire rate in USD automatically generates an invoice in USD. Entering alternative business partners and/or currency in the Payer and/or Currency columns of invoice items will override the default and result in the original invoice being split into two new. Example: Two invoices – same business partner but different currencies, one for items invoiced in USD and one for items invoiced in EUR. Exchange Rates items can have the same currency but different exchange rates.
The bank account for payables used in the module can be set once a bank account is linked to a business partner (or Owner) (Business Partners, Bank Accounts tab). If another account appears when assembling an invoice or the incorrect business partner bank details appear on the payment advice/Statement of Account, then the proper defaults are not correctly set or the correct account is not linked to the business partner. If the incorrect bank style is stated on an invoice, the invoice has been posted with incorrect bank account. To rectify, first ensure relevant bank account is entered in the VMS (Bank Accounts module) and second, ensure the bank account is linked to correct business partner. Corresponding banks (where applicable) are stated on invoices/Statement of Accounts (unless not registered in the Bank Accounts module). VAT rates and codes will appear on invoice lines as added in the VAT Rates and VAT Codes modules respectively. Also, a owner's bank account to be used for a particular charter party (CP) can be entered through Time Charter Contracts. Note: If an expected invoice or invoice item does not appear in the Hire Payable module it has usually not been entered into the system or it has already been assembled and/or posted. Also - Various Cost items without an Invoice Party will no longer automatically register under Hire Payable with the Owner or Business Partner, but under Accounts Payable. To add a Various Cost to Hire Payable - set the Invoice Party item to the Owner.
Under Pending, where all unprocessed invoice proposals are displayed, it is possible to review and edit the Document Line Text, Currency, Exchange Rate Date, VAT Rate and Invoice Party fields of invoice items before - complete or in part – assembling the invoices. If an invoice is assembled only in part, the remainder of the unprocessed items will remain in the Pending section for later processing. Also, if an amount invoiced earlier is greater than the estimated/final amount, a credit note line will appear under Pending. If, however, the invoiced amount is less than the estimated/final amount, an additional invoice line with available data will be generated. Once assembled, i.e. details such as bank account, payment terms, etc. have been entered, an invoice is complete and ready for posting. When posting an invoice (or payment advice) to an accounting system Dataloy VMS automatically generates an invoice number (with sequential numbering depending on year and type of transaction (for set-up and control: Fiscal Years)).
When assembling an invoice, Dataloy VMS allows for two types of payment terms - either in full (100%) or partial (for example: 95% first, 5% later). The payment terms can be set up in two ways: the default mode where one document line is generated with the full amount (and posted to accounting where there is integeraton) with the amount to be paid later automatically deducted when the initial invoice is printed. A second document line or invoice for the remaining amount cannot be generated. Only in a printed Statement of Account (SoA) will the remaining amount be visible (and from there collect the remining amount). The second option will generate two document lines, one for each payment that will be posted to accounting (and printed) separately showing the respective percentage and amount to be paid. Note: To activate this option, please contact Dataloy. It is, however, not possible to alter the payment terms once the invoice has been assembled. If changes to payment terms are needed, the invoice must then be dissolved and then re-assembled once changes have been made.
Also, when assembling an invoice for a voyage on a TC contract, the voyage cannot be closed. If it is, the Assemble Invoice button will automatically be disabled. To assemble invoices for closed voyages on TC contract the voyage must be re-opened be able to assemble the invoices in Hire Payable. Also, assembling invoices is only possible for one company at a time. The VMS will automatically check if there are more than one company involved amongst the document lines being assembled. If there are more than a single company, the user cannot proceed assembling the invoice. A pop-up will open stating it is not possible to assemble multi-company invoices and that the user must ensure that the invoice to be created is a single-company invoice before an invoice can be assembled. It is also possible to have the same prefix and sequence number for advance payment requests as for the invoice numbering in order to avoid numbering conflicts. Invoice numbering is numberic and consists of eight characters. If the same time charter (TC) In has been invoiced with two or more different invoice parties (or Owners) all invoiced items will appear in the Hire Payable module, not in Accounts Payable.
Dataloy VMS allows for two methods of cancelling/deleting an invoice: dissolve and reverse. Assembled invoices can be dissolved and the items are returned as unprocessed to the Pending section. Once an invoice is posted it is not possible to dissolve and return an invoice to either the Assembled or Pending sections. The invoice must be reversed. Reversing an invoice will automatically generate a reversing document to be sent to relevant accounting system and to be displayed in the Posted section together with the original invoice (or payment advice). However, it is not possible to reverse invoices if they are payments, are linked to closed voyages (needs to be re-opened first) or the invoices have no document type (contact Dataloy so document type/s can be added). The module also allows for both partial and complete reversal of offhire invoices. Note: If accounting transactions including VAT lines are not properly posting to an accounting system then accounts for VAT Payable have not been mapped or mapped properly. Rectify in the Accounts module. Also, when reversing an invoice the original due date will be stated and be exactly the same as on the original document.
The Hire Payable module provides draft and final payment advice (or invoice) print options and the possibility to generate a Statement of Account. Once a printout is generated, a payment advice or Statement of Account will display as an electronic printout in PDF-format. The Statement of Account displays a generated overview of all posted invoices, credit notes, payments and receipts and outstanding amounts. Note: If a bank style is balanced the VMS automatically removes it from the Statement of Account. Also, Various Cost/Revenue commission is not always included with the hire commission on a Statement of Account (SoA), but with the Various Cost/Revenue itself. If a SoA is printed for a time charter (TC), the vessel redelivery time show under the delivery date - once the vessel is redelivered. Also, if the same time charter (TC) has been invoiced with two or more different invoice parties (or Owners) all invoiced items will show in the SoA with the present owner as business partner.
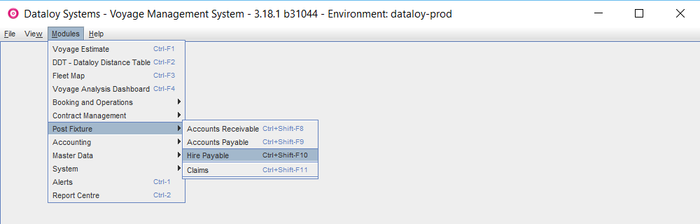
Location: Modules > Post Fixture > Hire Payable
Chapters:
Long Description
Generate, Assemble and Post an Invoice/s
- Open the time charter (TC) contract to create an invoice for. TC contracts can be opened either directly in the Hire Payable module or via the Booking and Operations module.
- Either open a TC contract
- directly in Hire Payable:
- Go to
Modules > Post Fixture > Hire Payable.The Hire Payable window opens.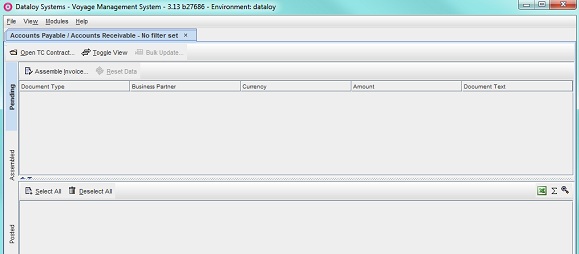
- Click Open TC Contract... A pop-up with a list of TC contracts opens.
- Click selected TC contract - it will highlight.
Example: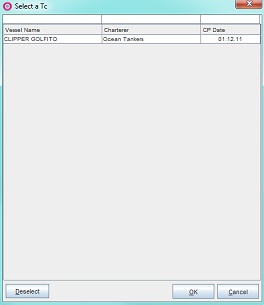
- Click OK. The pop-up will close and all pending invoice proposals associated to the opened TC contract will display - grouped by business partner and currency - in the upper field under Pending.. The bottom field displays the detailed invoice items of each pending invoice respectively.
- Go to Step 2.
- Go to
- or through Booking and Operations:
- Go to
Modules > Booking and Operations > Booking and Operations.The Booking and Operations window opens. - Select applicable vessel in the right-hand upper field - it will highlight. The vessel's details displays across the screen.
- In the Voyage List, select the voyage to be opened - it will highlight.
- Go to Invoicing and from the drop-down menu select Hire Payable.

- The Hire Payable module opens on a separate screen displaying all pending invoice proposals associated with the opened voyage/s will display - grouped by business partner and currency - in the upper field under Pending. The bottom field displays the detailed invoice items of each proposed invoice respectively.
- Go to Step 2.
- Go to
- directly in Hire Payable:
- Either open a TC contract
- In the Pending section's upper field, select the proposed invoice to assemble an invoice for - it will highlight. The bottom field will display the detailed invoice items of the proposed invoice.
Example:
- Review and edit (as appropriate) each invoice item, either in
- the default group view
Example:
- or click Toggle View to display the detailed invoice items in Flat View.
Note: Flat View will list all invoice items of the pending invoices listed, while the default group view will only list those belonging to one pending invoice at a time.
Example:
- To filter, click the magnifying glass icon at the top-right corner. A row will display above the columns. Filter as applicable, by for example port, booking number, etc.
- Review/edit/update displayed invoice items (as appropriate) by selective or by bulk update.
Note: Only the Document Line Text, Currency, Exchange Rate Date, VAT Rate and Invoice Party fields can be edited.- Selective:
- revert the source of the invoice item data, for example, estimates, operational data, etc.
- Edit data.
- Return to the Accounts Receivable module and click Reset Data to refresh the items list.
- or click the relevant field of the invoice item to be edited- it will highlight - and edit.
Note: ALL modifications using this method to override data generated by the system will be LOST if Reset Data is at any time used after editing.
- revert the source of the invoice item data, for example, estimates, operational data, etc.
- Bulk Update:
- Click Bulk Update... The Bulk Update - Document Lines dialogue box will open.
Note: Click Switch Layout to alter the dialogue box layout. Click again to revert to default layout.
Example: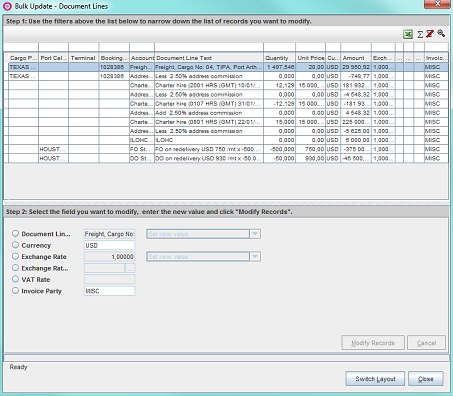
- In the upper field filter (as appropriate) so only the records to be edited display.
- In the lower field select the field to modify.
Note: The fields and drop-down menus are disabled by default until checked. The Modify Records button will activate once a field is checked.
Example:
- Click Modify Records. The changes will apply to all bulk edited records.
- Click Close. The dialogue box will close.
- Click Bulk Update... The Bulk Update - Document Lines dialogue box will open.
- Deselect the checkbox/es of invoice items not to be included in the invoice (if any) under the Select column either in the default grouped view or in Flat View.
Note: To deselect several - click Deselect All - then filter so only relevant rows display (items to be included) and click Select All.
- Selective:
- If reivew/edit/update if performed in Flat View - click Toggle View to return to the default grouped view. Any changes made will apply.
- the default group view
- Click Assemble Invoice... The Document Details dialogue box will open.
Note: The Assemble Invoice button will be disabled if the voyage is closed (on a TC Contract). To enable: re-open the voyage and assemble the invoice/s.
Example:
- In the dialogue box, fill in the fields as follows:
- Enter a short description of the invoice under Document Text.
- Enter either
- the document date (if other than the default: today's date) under Document Date
- or click the Triple Dot Selector next to the field. A pop-up with a calendar opens. Select date and click OK.
Example: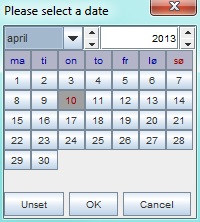
- Enter either
- the name of the payee under Issuing Company (if other than the automatically populated)
- or click the Triple Dot Selector next to the field. A pop-up with a list of input values opens. Select field and click OK.
Example: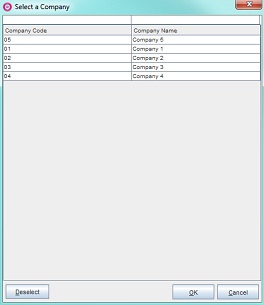
- Enter either
- the bank account number the invoice is to be paid in to under Bank Account (if other than the automatically populated) or
- or click the Triple Dot Selector next to the field. A pop-up with a list of input values opens. Select field and click OK.
- Enter the invoice number of the received invoice (if applicable) under External Doc. No.
- In the Payment Terms field:
- Enter the payment percentage number in the % terms field (if other than the default: 100%).
- Select length of the payment term in the first drop-down menu and select the baseline term (i.e. from whence the payment term begins) in the second .
Example: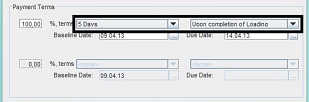
- Enter either
- the baseline date (if other than the default: today's date) under Baseline Date
- or click the Triple Dot Selector next to the field. A pop-up with a calendar opens. Select date and click OK.
- Ensure that the date appearing in the the Due Date field corresponds with "the baseline date plus the length of the payment term".
- The lower payment and baseline terms fields are ONLY used in case of partial payment. If there is no partial payment - the lower % terms field will by default be 0% and the drop-down menus deactivated.
- Click OK. The dialogue box will close and the assembled invoice moves from Pending to the Assembled section.
Note: Any deselected invoice items will remain in the Pending section for later processing.
- Click Assembled at left-hand side. The Assembled view opens displaying all assembled invoices (i.e complete and ready for posting).
Example:
- Click the invoice to be posted in the upper field - it will highlight.
- Click Details... to double-check the invoice details entered when assembling the invoice.

- The Document Details dialogue box will open. Review details and click Close.
- Click Print Draft to print a draft invoice.

- An Invoice Print Options pop-up will open. Enter details (as applicable) and click OK.
- The pop-up will close and a draft payment advice will display as an electronic printout in PDF-format.
Note: The draft payment advice will look identical to when printing a posted invoice, but WITHOUT the DataloyVMS generated invoice number. This is generated when an invoice is posted.
Example: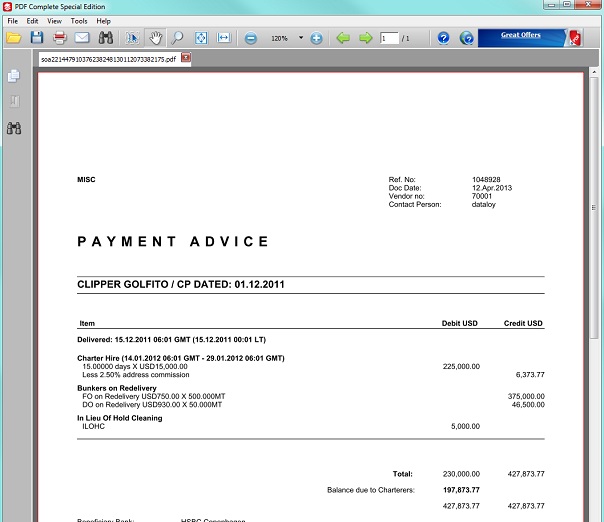
- Post an invoice/s either
- to an accounting system by selective - (selecting the invoices to be posted) or batch (posting all invoices) posting
- Selective:
- Click the invoice row to be posted - it will highlight.
- Click Post Invoice. A pop-up opens asking to confirm move.

- Click OK. The pop-up will close and the selected invoice move to the Posted section with status Ready for Posting until sent to an accounting system. A Dataloy VMS invoice number will automatically generate for the invoice. Once the invoice is confirmed posted in the accounting system, the status will change to Posted.
- Batch:
- Click Post All Invoices to post all listed invoices - they will highlight.

- A pop-up opens asking to confirm move. Click OK. The pop-up will close and all invoices move to the Posted section with status Ready For Posting until sent to an accounting system. Dataloy VMS invoice numbers will automatically generate for the invoices. Once the invoices are confirmed posted in the accounting system, their status will change to Posted.
- Click Post All Invoices to post all listed invoices - they will highlight.
- Selective:
- or directly to the Posted folder (without being sent to an accounting system)
- Click the invoice row to be posted - it will highlight.
- Click Post Invocie. A pop-up opens asking to confirm move.
- Click OK. The pop-up will close and the selected invoice move to the Posted section with the permanent status Ready for Posting.
Note: Posting invoices manually requires the manual entry of each invoice into an accounting system. Also: Skip to posted is ONLY used when setting up an new system and there is a need to convert old, already posted invoices into the VMS. Status will immediately be set to posted. If used for new invoices, the invoices will remain with status "draft" and no proper invoice numbers will not be generated. In the accounting system the invoices will show without an invoice number. Re-posting will post the invoice to the accounting system using the draft invoice number.
- Click Posted at left-hand side. The Posted view opens displaying all posted invoices (i.e. completed) with either status Ready for Posting or Posted. Invoices posted to an accounting system are identified by automatically genrated Dataloy VMS invoice numbers, each number unique per invoice.
Example: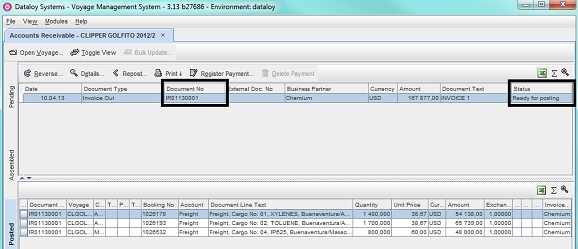
- Options available in the Posted section:
- Check invoice details:
- Click Details... to check the invoice details entered when assembling the invoice.
- The Document Details dialogue box opens. Review details and then click Close.
- Repost an invoice if transfer to an acounting system fails:
- Click Repost to post the invoice again.
Note: This option normally requires Administrator or Super-User access rights. - A pop-up appears asking to confirm posting. Click OK. The invoice will be reposted.
- Click Repost to post the invoice again.
- Manually register payments:
- Click Register Payment... The Register Payment pop-up opens.
Example: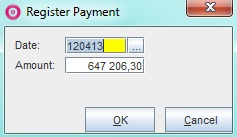
- Enter either
- the date (if other than the default: today's date) under Date
- or click the Triple Dot Selector next to the field. A pop-up with a calendar opens. Select date and click OK.
- Enter payment amount under Amount.
- Click OK. The pop-up will close and and the payment receipt opens as a row in the upper field in the Posted section.
Example:
- Click Register Payment... The Register Payment pop-up opens.
- Manually delete a registered payment:
- Click a payment receipt row in the upper field - it highlights and the Delete Payment button activate.
- Click Delete Payment. The payment receipt row till be deleted.
- Issue invoice printouts and/or Statement of Accounts - go to Invoice Printouts/Statement of Accounts.
Dissolve/Reverse an Invoice
- Dissolve an Invoice:
- Go to
Modules > Post Fixture > Hire Payable.The Hire Payable window open. - Click Assembled at left-hand side. The Assembed view opens displaying all assembeld invoices (i.e complete and ready for posting).
- Click the invoice to be dissolved in the upper field - it will highlight.
- Click Dissolve Invoice. A pop-up opens asking to confirm dissolvement.

- Click OK. The pop-up will close and the invoice revert to the Pending section.
- Go to
- Reverse an Invoice:
- Go to
Modules > Post Fixture > Hire Payable.The Hire Payable window opens. - Click Posted at left-hand side. The Posted view opens displaying all posted invoices.
- Click the invoice to be reversed in the upper field - it will highlight.
Note: It is NOT possible to reverse invoices that are payments, are linked to closed voyages (the voyages must first be re-opened) or have no document type (the Reverse... button will automatically deactivate). - Click Reverse. A pop-up opens asking to confirm reversal.

- Click Yes. The pop-up will close and an Input pop-up opens.
- Enter the reason for the reversal and click OK.
- The pop-up will close and a Credit In row displays in the upper field alongside the original invoice signifying that the invoice has been reversed.
Example:
- Go to
Partially Reverse an Offhire
Two methods are possible - changing the original entry (recommended) or reversing and posting a new.
- Partially Reverse Offhire by Changeing the Original Entry:
- Go to
Modules > Bookling and Operations > Offhire Browser.The Offhire Browser window opens. - Locate applicable vessel. Its details displays in the lower field.
- In the Offhire Details tab either change
- the entered offhire satrt and end dates under Offhire Start Date and Offhire End Date
- or the number of days under Offhire Days
or the percentage under % (percentage).
- Go to
Modules > Post Fixture > Hire Payable.The Hire Payable window opens. - Open applicable voyage. The change registers as a cost under Pending.
- Changing Offhire by Full Reversal and Posting a New:
- Go to
Modules > Post Fixture > Hire Payable.The Hire Payable window opens. - Click Posted at left-hand side. The Posted view opens displaying all posted invoices.
- Click the invoice to be reversed in the upper field - it will highlight.
- Click Reverse. A pop-up opens asking to confirm reversal.
- Click Yes. The pop-up will close and an Input pop-up open.
- Enter the reason for the reversal and click OK.
- Go to
Modules > Bookling and Operations > Offhire Browser.The Offhire Browser window opens. - Enter a new offhire where applicable in the Offhire Browser.
- Go to
Modules > Post Fixture > Hire Payable.The Hire Payable window opens. - Open applicable voyage. The reversed invoice show as a cost to the user whilst the new a cost to the Owner.
- Go to
Invoice Printouts/Statement of Accounts
- To Print an Invoice:
- Go to
Modules > Post Fixture > Accounts Receivable.The Accounts Receivable window open. - Click Posted at left-hand side. The Posted view opens displaying all posted invoices.
- Click the invoice to be printed in the upper field - it will highlight.
- Click Print and from the drop-dowm menu select Select Transaction...

- An Invoice Print Options pop-up opens. Enter details (as applicable) and click OK.
- The pop-up will close and an invoice display as an electronic printout in PDF-format including the automatically generated Dataloy VMS invoice number.
Example: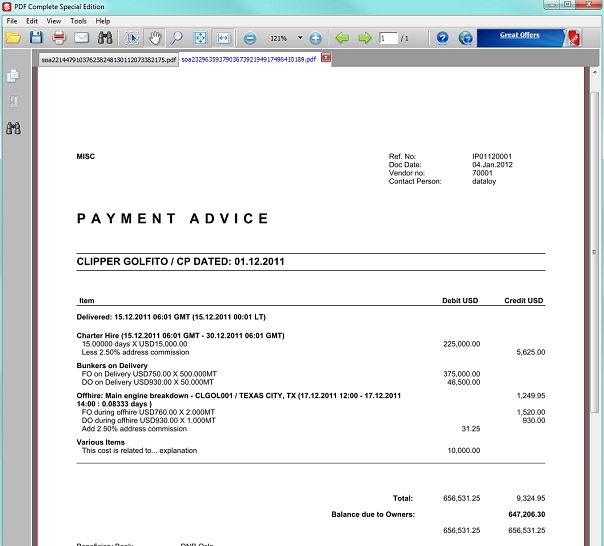
- Go to
- To Issue and Print a Statement of Account:
- Go to
Modules > Post Fixture > Accounts Receivable.The Accounts Receivable window opens. - Click Posted at left-hand side. The Posted view opens displaying all posted invoices.
- Click Print and from the drop-down menu select Statement of Account...

- A Print Options pop-up opens. Enter details (as applicable) and click OK.
- The pop-up will close and a statement of account display as an electronic printout in PDF-format.
Note: If a SoA is printed for a time charter (TC), the vessel redelivery time show under the delivery date - once the vessel is redelivered. Also, if the same time charter (TC) has been invoiced with two or more different invoice parties (or Owners) all invoiced items will show in the SoA with the present owner as business partner.
Example:
- Go to