Claims
- Former user (Deleted)
Short Description
The Claims module in Dataloy Voyage Management System (the VMS) is designed to capture incidents and claims of various types. An incident can be defined as an occurrence, something that happened, whereas a claim is something to be had, (or claimed). There are two types of incidents, claimed and unclaimed. An unclaimed incident has had no claim based on it whereas a claim has. Also, an incident can have an indefinite number of claims based in it, whereas a claim can ONLY have ONE incident. The Claims module allows a user to track the various stages of a claim to make sure all documents have been received, sent and that other important tasks related to a claim are duly performed.
The module consists of three sections:
- My Incidents:
- Stores and houses all claims and incidents of the user.
- View Incidents:
- All Incidents:
- Displays ALL INCIDENTS, claimed and unclaimed.
- Claimed Incidents:
- Displays all claimed incidents.
- Unclaimed Incidents:
- Displays all unclaimed incidents.
- All Incidents:
- Claims:
- View By Claim Nature:
- Displays both type of claims by claim nature.
- View By PC:
- Displays both type of claims by Person in Charge.
- View By Vessel:
- Displays both types of claims by vessel type, for example, bulk, chemical, etc.
- Guaranteed Claims - Displays both type of claims by guaranteeing sorting of a specific claim:
- Uninsured Claims:
- Displays all uninsured claims - claimed and unclaimed.
- Outgoing Claims:
- Displays all outgoing claims - claimed and unclaimed,
- All Claims:
- Displays ALL CLAIMS - claimed, unclaimed, settled and unsettled.
- Uninsured Claims:
- View By Claim Nature:
The Claims module also allows users to enter incidents via the Booking and Operations module, including general vessel and incident information, such as basic measures, ownership, capacity of cargo (both volume and weight - in case of cargo), etc., apart from being entered via the claims module. The module further provides a print screen option available to all types of incidents (claimed and unclaimed) and claims (settled and unsettled) and a customized report//letter standard option.
The Report/Letter option is not a standard and is only available and working if activated and customized either by Dataloy or the customer. Please contact your administrator for further information.
Location: Modules > Post Fixture > Claims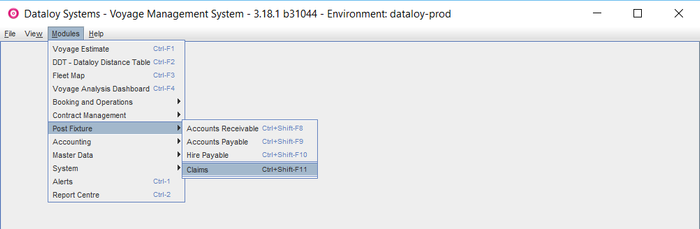
Chapters:
Long Description
Register an Incident
There are two options in Dataloy VMS when registering an incident, either through Booking and Operations or directly in the Claims module:
Registering an Incident via Booking and Operations
Go to
Modules > Booking and Operations> Booking and Operations.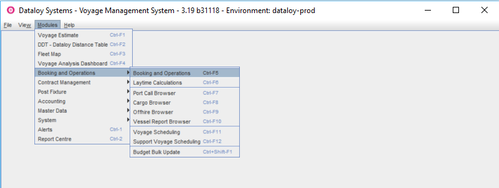
The Booking and Operations window opens.
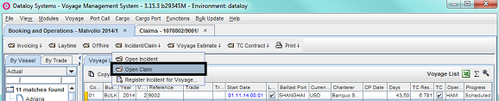
- Select applicable vessel and open the voyage to register an incident for. Its details will display.
- Go to the Voyage menu and from the drop-down select Register Incident for Voyage....

- An incident registration dialogue box opens.
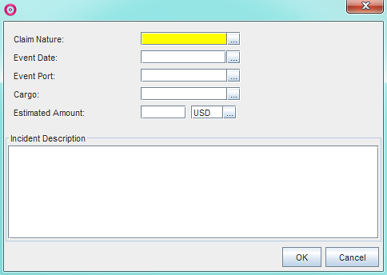
- Fill in the fields as follows:
- Enter either
- the type of incident under Claim Nature
- or click the Triple Dot Selector next to the field. A pop-up with a list of input values opens. Select field and click OK.
Example: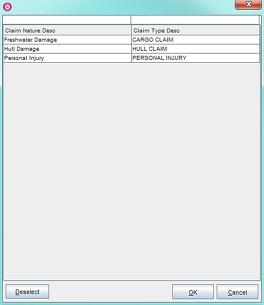
- Enter either
- the date the incident occurred under Event Date
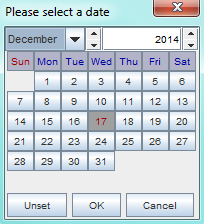
Note: Enter date and time as ddmmyy, for example: September 17 2014, type: "170914". This will display as "17.09.14". - or click the Triple Dot Selector next to the field. A pop-up with a calendar opens. Select date and click OK.
- the date the incident occurred under Event Date
- Enter the port where the incident occurred (as applicable) under Event Port.
- Enter the type of cargo (if applicable) under Cargo.
Note: ONLY if the incident involves a cargo - if not, leave blank. - Enter the estimated amount of the incident (i.e. estimated amount to be claimed) under Estimated Amount (first field) and applicable currency in the currency field (second field).
Note: Defaults to USD. - Enter a detailed description of the incident under Incident Description.
Note: IMPORTANT: Should include details such as location (where), context (why, how it came about), the sequence of events (what happened - in what order) and the extent of damage (people, vessel and cargo).
- Enter either
- Click OK. The incident registration dialogue box will close.
- A pop-up opens confirming that the incident has been saved. Click OK.
- The pop-up will close and the incident is automatically moved to the Claims module (sorted under View Incidents in the left-hand menu tree).
- In the Voyage Estimate module a remark registers to the voyage record and appear in the Remarks and Attachments... feature. The Remark and Attachment...-field will turn orange - advising a remark has been added.
Note: Remarks in Booking and Operations: For informative purposes only.
- Registering an Incident in the Claims Module
Go to
Modules > Post FixtureThe Claims window opens.> Claims.- Open the View Incidents > All Incidents folder in the left-menu tree. All incidents entered into the VMS displays.
- Go to the Create menu and from the drop-down select Create New.

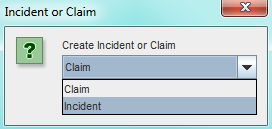
- The Incident or Claim pop-up opens.
Note: Default in drop-down to Claim.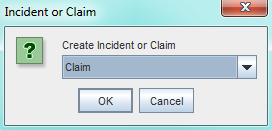
- Select Incident from the drop-down menu under Create Incident or Claim.
- Click OK. The pop-up will close and the Create New Claim pop-up opens:
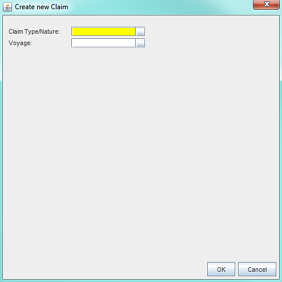
- Fill in the fields as follows:
- Enter either
- the type of incident under Claim Type/Nature
- or click the Triple Dot Selector next to the field. A pop-up with a list of input values opens. Select field and click OK.
Example:
- the type of incident under Claim Type/Nature
- If Cargo Claim is selected under Claim Type/Nature, the layout will display the Bill of Lading field, listing available bill of ladings.
Note: Change Claim Type/Nature to revert to default layout - The layout will ONLY alter in case of cargo claim.
Example: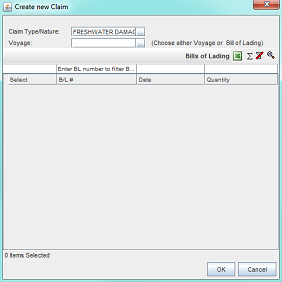
- Enter either the voyage or a Bill of Lading under Voyage by
entering the voyage reference number
or double-clicking on a bill of lading in the Bills of Lading field.
Click OK. The pop-up will close.
- Enter either
Go to View Incidents > All Incidents in the left-hand menu tree. Available incidents displays as a rows in the upper Claims field, the newly created incident at the top (highlighted - its details displaying in the lower field).
Example: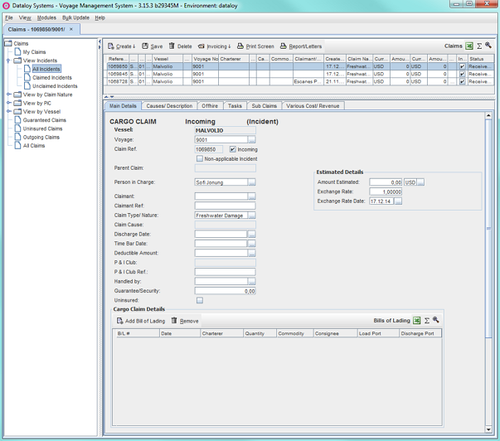
- In the Main Details tab, fill in the fields as follows (as applicable - some fields self-populate):
Note: Claim nature, voyage, vessel (and/or bill of ladings), event data, event port, cargo (if applicable), estimated amount and currency data should always be entered in an incident. Also - depending on type of incident - the layout and fields of the Main Terms tab can differ.- In the Vessel Details panel:
- The vessel name will always be automatically populated under Vessel.
Note: ALWAYS disables and populated with elsewhere retrieved data. Can be manually overridden - if the voyage is changed to a voyage belonging to another vessel, the vessel name will automatically change to the vessel the new voyage is registered to. - Enter the voyage reference number under Voyage.
Note: Populated with elsewhere retrieved data (Create a Claim-pop-up), but can be manually overridden. - The claim reference number is automatically generated and always displays under Claim Ref. (Claim Reference).
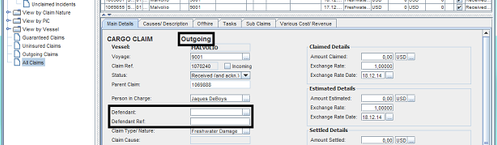
Note: The Claim Ref. field is always disabled and the claim reference number cannot be changed. - Incoming/Outgoing checkbox:
- Check Incoming to indicate that the incident is incoming - the layout remains unchanged.
Note: Checked by default and displays as Incoming. - Uncheck to indicate incident is outgoing:
- Incoming will automatically change to Outgoing at the top of the Main Details tab.
Click Save - Change of fields: Claimant to Defendant and Claimant Ref. to Defendant Ref.
Note: To reverse: check the Incoming box and click Save. NO changes will occur until Save is clicked.
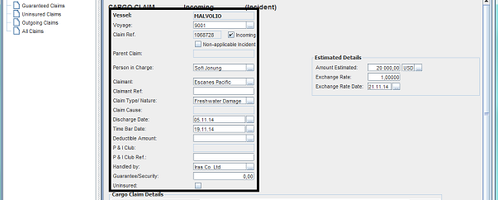
Example:Incoming:
Outgoing:
- Check Incoming to indicate that the incident is incoming - the layout remains unchanged.
- Check Non-Applicable Incident to indicate that the incident is not applicable.
- The Parent Claim field - always disabled for incidents. Only activates for claims.
- Enter the operator handling the incident's name under Person in Charge (PiC).
- Enter either
- the the claimant's name under Claimant (Incoming)
- or the defendant's name under Defendant (Outgoing).
- Enter either
- the claimant's reference number under Claimant Ref. (Claimant Reference)
- or the defendant's reference number under Defendant Ref. (Defendant Reference).
- Enter the type of incident under Claim Type/Nature.
Note: Populated with elsewhere retrieved data (Create a Claim pop-up), but can be manually overridden. - The Claim Cause field - disabled.
- Enter the date of the discharge under Discharge Date.
- Enter either
- the time bar date under Time Bar Date
Note: Enter date and time as ddmmyy, for example: September 17 2014, type: "170914". This will display as "17.09.14". Time bar date: Timebar baseline date + default timebar of claim nature - the end of the time period a claim can be made following an incident. - or click the Triple Dot Selector next to the field. A pop-up with a calendar opens. Select date and click OK.
- the time bar date under Time Bar Date
- Enter the insurance excess under Deductible Amount.
- The P & I Club is always disabled. N/A.
- Enter the applicable insurance company's reference number under P & I Club Ref. (P & I Club Reference).
- Enter the prior handler of the claim's name (before the current Person in Charge (PiC)) under Handled by.
- Enter the guaranteed amount under Guarantee/Security.
- Uninsured checkbox:
- Cargo Incoming Incident: Check Uninsured to indicate that the cargo is uninsured.
- Other Incident Type: Leave blank.
- The vessel name will always be automatically populated under Vessel.
- Depending of type of claim the Main Details tab includes panels for:
1. Cargo Claim
2. Personal Injury Claim
3. Other Claim Types- Cargo Claim: Cargo Claim Details panel:
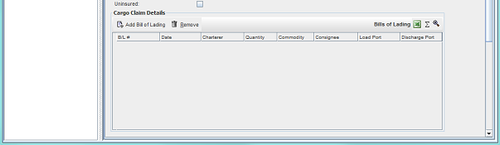
- Add a Bill of Lading:
- Click Add Claim Cause to add claim type/nature.
- A pop-up with a list of claim causes will opens. Select field and click OK.
- The pop-up will close and selected cause will appear as a row.
- Remove a Bill of Lading:
- Click the bill of lading row to be removed - it will highlight.
- Click Remove. A pop-up opens asking to confirm deletion.
- Click Yes. The pop-up will close and the selected row delete.
- Add a Bill of Lading:
- Personal Injury Claim: Personal Injury Claim Details panel:
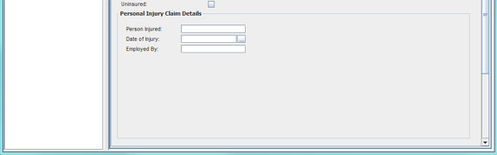
- Enter the name of the injured person under Person Injured.
- Enter the date of the injury under Date of Injury.
- Enter the injured person's employer under Employed By.
- Other Claim Types (Hull Claim, Non-Performance Claim, DP Dispute, Complaint Other and Other P & I): Main Details tab only consists of the Vessel Details- and Estimated Details panels.
- Cargo Claim: Cargo Claim Details panel:
- In the Estimated Details panel:

Enter the estimated amount of the incident (i.e. estimated amount to be claimed) under Amount Estimated (first field) and applicable currency in the currency field (second field).
Note: Defaults to USD.Enter applicable exchange rate under Exchange Rate.
Note: I.e. the exchange rate used at the time of the incident.Enter the exchange rate date (if other than the default: today's date) under Exchange Rate Date.
Note: Enter date and time as ddmmyy, for example: September 17 2014, type: "170914". This will display as "17.09.14".
- In the Vessel Details panel:
- Click Save.
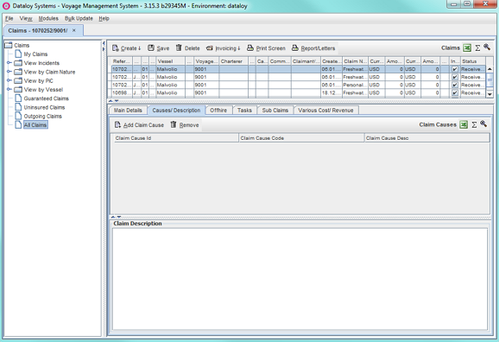
- In the Causes/Description tab:
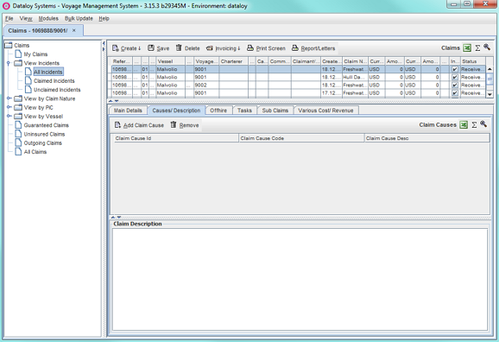
- Upper field:
- Add a Claim Cause:
- Click Add Claim Cause to add claim type/nature.
- A pop-up with a list of claim causes opens. Select field and click OK.
- The pop-up will close and selected cause appear as a row.
- Remove a Claim Cause:
- Click the claim cause to be deleted - it will highlight.
- Click Remove. A pop-up opens asking to confirm deletion.
- Click Yes. The pop-up will close and the selected row delete.
- Add a Claim Cause:
- Lower field:
- Enter a detailed description of the incident in the Claim Description textbox.
Note: IMPORTANT: Should include details such as location (where), context (why, how it came about), the sequence of events (what happened - in what order), the extent of damage (people, vessel and cargo) and, if cargo claim, type of cargo.
- Enter a detailed description of the incident in the Claim Description textbox.
- Upper field:
- Click Save. The incident is registered (sorted under View Incidents in the left-hand menu tree). To a claim based on an incident, go to Create a claim (incoming/outgoing) based on an incident .
Create a Claim
Creating a claim, irrelevant of type, is done in the Claims module of Dataloy VMS. There are four options open depending on the type of claim:
- Create a Claim (Incoming/Outgoing) Based on an Incident
- Create a Claim (Incoming/Outgoing) not Based an Incident
- Create an Outgoing Claim Based on an Incoming Claim/Incident
- Create a Claim (Incoming/Outgoing) Based on a Parent Claim
- Create a Claim (Incoming/Outgoing) Based on an Incident
- Go to
Modules > Post FixtureThe Claims window opens.> Claims. - Go to View Incidents > All Incidents in the left-hand menu tree. Available incidents will list in the upper Claims field.
- Click the incident to base a claim on in the upper right-hand field. It will highlight and the incident details will display in the lower Claims field.
Note: If a claim is incident based, all data entered when creating the incident is automatically transferred to the created claim. - Go to the Create menu and from the drop-down select Create from Incident.
- The Incident or Claim pop-up opens.
Note: Default in drop-down to Claim. - Click OK. The pop-up will close and a copy of the incident is created as a claim. The new claim is a sub-claim of the incident, and will appear in the incident's sub-claim tab. Also, the incident's claim reference number will appear in the Parent Claim field of the claim, indicating that the claim is based on an incident.
Note: The new claim will be sorted by claim nature, person in charge (PiC), vessel (alphabetically) and under All Claims. Also, as applicable under Guaranteed- , Uninsured- and Outgoing Claims and My Claims. The incident is moved form Unclaimed Incidents to Claimed Incidents in the left-hand menu tree. - Open applicable folder in the left-hand menu tree and open the new claim. Available claims will list in the upper Claims field, the newly created claim at the top (highlighted - its details displaying in the lower field).
Example:
Vessel Malvolio, Voyage 9001, Incoming Cargo Claim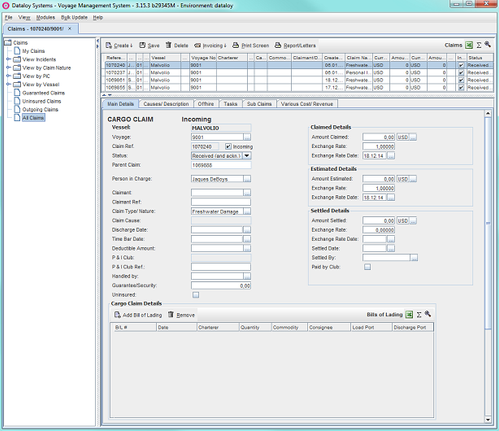
- In the Main Terms tab, fill in the fields as follows (as applicable - some fields self-populate):
Note: Some fields will be populated with data from when the incident the claim is based on was created. Also - depending on type of claim - the layout and details of the Main Terms tab can differ.- In the Vessel Details panel:
- The vessel name will always be automatically populated under Vessel.
Note: ALWAYS disables and populated with elsewhere retrieved data. Can be manually overridden - if the voyage is changed to a voyage belonging to another vessel, the vessel name will automatically change to the vessel the new voyage is registered to. - Enter either
- the voyage reference number under Voyage
Note: Populated with elsewhere retrieved data, but can be manually overridden. - or click the Triple Dot Selector next to the field. A pop-up with a list of input values opens. Select field and click OK.
Example: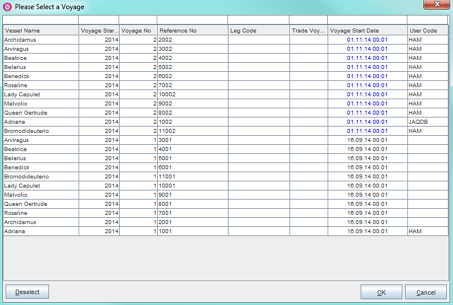
- the voyage reference number under Voyage
- The claim reference number is automatically generated and always displays under Claim Ref. (Claim Reference).
Note: The Claim Ref. field is always disabled and the claim reference number cannot be changed. - Incoming/Outgoing checkbox:
- Check Incoming to indicate that the claim is incoming - the layout remains unchanged.
Note: Checked by default and displays as Incoming. - Uncheck to indicate the claim is outgoing:
- Incoming will automatically change to Outgoing at the top of the Main Details tab.
Click Save - Change of fields: Claimant to Defendant and Claimant Ref. to Defendant Ref.
Note: To reverse: check the Incoming box and click Save. NO changes will occur until Save is clicked.
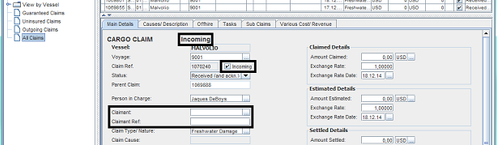
Example:Incoming:
Outgoing:
- Check Incoming to indicate that the claim is incoming - the layout remains unchanged.
- Select the claim status from the drop-down menu under Status.
Note: Can be changed as applicable during handling of claim. - The Parent Claim field - always disabled. If the claim is a sub-claim: will then automatically populate with the parent incident's (or parent claims) number.
- Enter the operator handling the claim's name under Person in Charge (PiC).
- Enter either
- the the claimant's name under Claimant (Incoming)
- or the defendant's name under Defendant (Outgoing).
- Enter either
- the claimant's reference number under Claimant Ref. (Claimant Reference)
- or the defendant's reference number under Defendant Ref. (Defendant Reference).
- Enter the type of incident under Claim Type/Nature.
Note: Populated with elsewhere retrieved data (Create a Claim pop-up), but can be manually overridden. - The Claim Cause field - disabled.
- Enter either
- the start date of the timebar under Time Bar Baseline Date
Note: Enter date and time as ddmmyy, for example: September 17 2014, type: "170914". - or click the Triple Dot Selector next to the field. A pop-up with a calendar opens. Select date and click OK.
- the start date of the timebar under Time Bar Baseline Date
- Enter the timebar date under Time Bar Date.
Note: Enter date and time as ddmmyy, for example: September 17 2014, type: "170914". This will display as "17.09.14". Time bar date: Timebar baseline date + default timebar of claim nature - the end of the time period a claim can be made following an incident. - Enter the insurance excess under Deductible Amount.
- The P & I Club is always disabled - N/A.
- Enter the applicable insurance company's reference number under P & I Club Ref. (P & I Club Reference).
- Enter the prior handler of the claim's name (before the current Person in Charge (PiC)) under Handled by.
- Enter the guaranteed amount under Guarantee/Security.
- Uninsured checkbox:
- Cargo Incoming Claim: Check Uninsured to indicate that the cargo is uninsured.
- Other Claim Type: Leave blank.
- The vessel name will always be automatically populated under Vessel.
- Depending of type of claim/claim nature the Main Details tab includes panels for:
1. Cargo Claim
2. Personal Injury Claim
3. Other Claim Types- Cargo Claim: Cargo Claim Details panel:
- Add a Bill of Lading:
- Click Add Claim Cause to add claim type/nature.
- A pop-up with a list of claim causes will opens. Select field and click OK.
- The pop-up will close and selected cause will appear as a row.
- Remove a Bill of Lading:
- Click the bill of lading row to be removed - it will highlight.
- Click Remove. A pop-up opens asking to confirm deletion.
- Click Yes. The pop-up will close and the selected row delete.
- Add a Bill of Lading:
- Personal Injury Claim: Personal Injury Claim Details panel:
- Enter the name of the injured person under Person Injured.
- Enter the date of the injury under Date of Injury.
- Enter the injured person's employer under Employed By.
- Other Claim Types (Hull Claim, Non-Performance Claim, DP Dispute, Complaint Other and Other P & I): Main Details tab only consists of the Vessel Details- and Estimated Details panels.
- Cargo Claim: Cargo Claim Details panel:
- In the Claimed Details panel :

- Enter the claimed amount under Amount Claimed and applicable currency in the currency field (second field).
Note: Defaults to USD. - Enter applicable exchange rate under Exchange Rate.
Note: I.e. the exchange rate used at the time of the incident. - Enter the exchange rate date (if other than the default: today's date) under Exchange Rate Date.
Note: Enter date and time as ddmmyy, for example: September 17 2014, type: "170914". This will display as "17.09.14".
- Enter the claimed amount under Amount Claimed and applicable currency in the currency field (second field).
- In the Estimated Details panel:

Enter the estimated amount of the incident (i.e. estimated amount to be claimed) under Amount Estimated (first field) and applicable currency in the currency field (second field).
Note: Defaults to USD.Enter applicable exchange rate under Exchange Rate.
Note: I.e. the exchange rate used at the time of the incident.Enter the exchange rate date (if other than the default: today's date) under Exchange Rate Date.
Note: Enter date and time as ddmmyy, for example: September 17 2014, type: "170914". This will display as "17.09.14".
- In the Vessel Details panel:
- Click Save.
- In the Causes/Description tab:
- Upper Field:
Add a Claim Cause:
Click Add Claim Cause to add claim type/nature.
A pop-up with a list of claim causes opens. Select field and click OK.
- The pop-up will close and selected cause appear as a row.
- Remove a Claim Cause:
- Click the claim cause to be deleted - it will highlight.
- Click Remove. A pop-up opens asking to confirm deletion.
- Click Yes. The pop-up will close and the selected row delete.
- Lower Field:
Enter a detailed description of the incident in the Claim Description textbox.
Note: IMPORTANT: Should include details such as location (where), context (why, how it came about), the sequence of events (what happened - in what order), the extent of damage (people, vessel and cargo) and, if cargo claim, type of cargo.
- Upper Field:
- Click Save.
- In the Offhire tab - Any offhire related to the vessel and the applicable voyage will display. All offhire of the entire voyage will display and will be automatically added as it occurs - nothing to be added manually.
Note: Will be continuously updated during the course of the claim, until settled.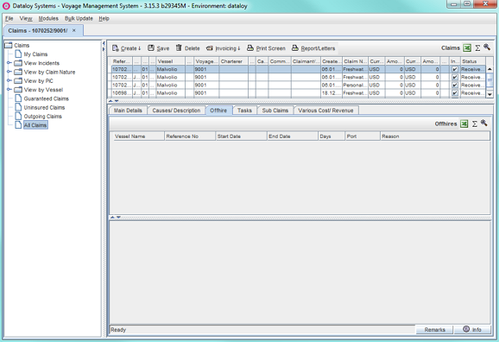
- In the Tasks tab - as applicable:
Note: To be continuously updated during the course of the claim, until settled.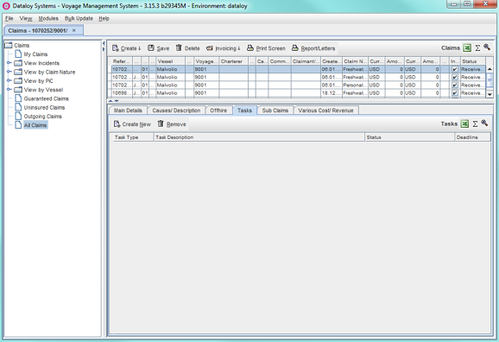
- Add a Task:
- Click Create New to add a task.
A pop-up with a list of tasks opens. Select field and click OK.
The pop-up will close and selected task appear as a row.
- Remove a Task:
- Click the task to be deleted - it will highlight.
- Click Remove. A pop-up opens asking to confirm deletion.
- Click Yes. The pop-up will close and the selected row delete.
- Add a Task:
- Click Save.
- In the Sub Claims tab - Not Applicable for the claim whilst being created.
Note: Lists all claims based on the current claim. If more sub-claims are created, they will automatically display.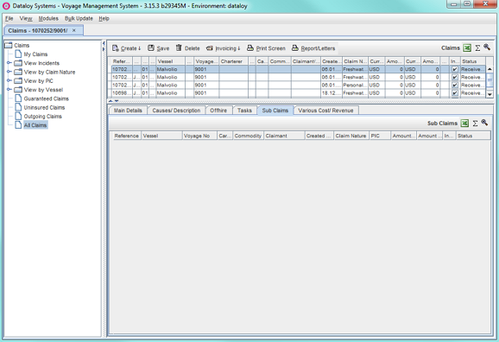
- Click Save.
- In the Various Cost Revenue tab - Lists all costs and revenues associated with the claim, for example lawyer's fees, etc.:
Note: To be continuously updated during the course of the claim, until settled.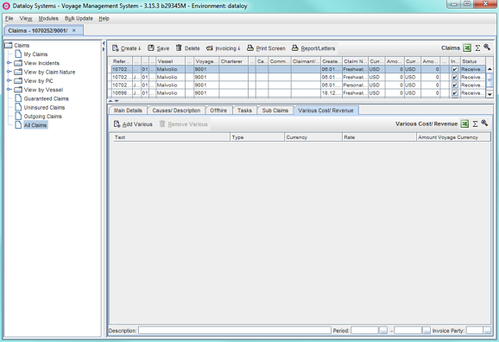
- Add a Various Cost/Revenue:
Click Add Various to add a various cost/revenue.
A pop-up with a list of various costs and revenues opens. Select a cost or revenue and click OK.
- The pop-up will close and selected task appear as a row.
- Remove a Task:
- Click the task to be deleted - it will highlight.
- Click Remove. A pop-up open asking to confirm deletion.
- Click Yes. The pop-up will close and the selected row delete.
- Add a Various Cost/Revenue:
- Click Save. The claim registration is complete. The process of settling a claim occurs outside of Dataloy VMS. During this process the claim details are to be maintained and continuously updated. Once the outcome of a claim is decided, go to To settle a claim.
Note: The new claim will be sorted by claim nature, person in charge (PiC), vessel (alphabetically) and under All Claims. Also, as applicable under Guaranteed- , Uninsured- and Outgoing Claims and My Claims. The incident the claim is based on will move from Unclaimed Incidents to Claimed Incidents.
- Go to
- Create a Claim (Incoming/Outgoing) not Based an Incident
- Go to
Modules > Post FixtureThe Claims window opens.> Claims. - Go to the Create menu and from the drop-down select Create New.
- The Incident or Claim pop-up opens.
Note: Default in drop-down to Claim. - Click OK. The pop-up will close and the Create New Claim pop-up opens.
- Fill in the fields as follows:
- Enter either
- the type of incident under Claim Type/Nature
- or click the Triple Dot Selector next to the field. A pop-up with a list of input values opens. Select field and click OK.
Example:
- If Cargo Claim is selected under Claim Type/Nature, the layout will display the Bill of Lading field, listing available bill of ladings - if not, it will be blank.
Note: Change Claim Type/Nature to revert layout - The layout will ONLY alter in case of cargo claim.
Example: - Enter either the voyage or a Bill of Lading under Voyage by
entering the voyage reference number
or double-clicking on a bill of lading in the Bills of Lading field.
- Enter either
- Click OK. The pop-up will close and a claim is created, automatically appearing as a row in upper Claims field (highlighted - its details displaying in the lower field).
Note: The new claim will be sorted by claim nature, person in charge (PiC), vessel (alphabetically) and under All Claims in the left-hand menu tree. Also, as applicable under Guaranteed- , Uninsured- and Outgoing Claims and My Claims.
Example:
Vessel Malvolio, Voyage 9001, Incoming Cargo Claim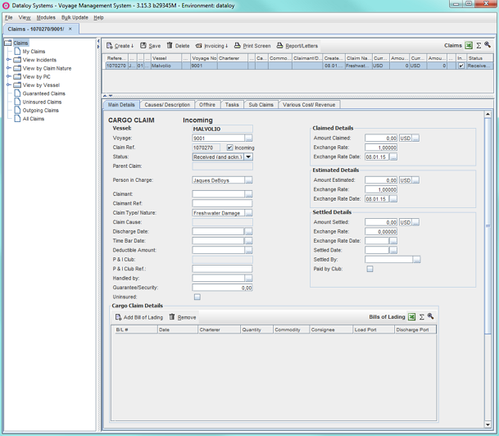
- In the Main Terms tab, fill in the fields as follows (as applicable - some fields self-populate):
Note: Some fields will be populated with elsewhere retrieved data (Create a Claim-pop-up), but can be manually overridden. Also - depending on type of claim - the layout and details of the Main Terms tab can differ.- In the Vessel Details panel:
- The vessel name always automatically populated under Vessel.
Note: ALWAYS disables and populated with elsewhere retrieved data. Can be manually overridden - if the voyage is changed to a voyage belonging to another vessel, the vessel name will automatically change to the vessel the new voyage is registered to. - Enter the voyage reference number under Voyage.
Note: Populated with elsewhere retrieved data (Create a Claim-pop-up), but can be manually overridden. - The claim reference number is automatically generated and always displays under Claim Ref. (Claim Reference).
Note: The Claim Ref. field is always disabled and the claim reference number cannot be changed. - Incoming/Outgoing checkbox:
- Check Incoming to indicate that the claim is incoming - the layout remains unchanged.
Note: Checked by default and displays as Incoming. - Uncheck to indicate the claim is outgoing:
- Incoming will automatically change to Outgoing at the top of the Main Details tab.
Click Save - Change of fields: Claimant to Defendant and Claimant Ref. to Defendant Ref.
Note: To reverse: check the Incoming box and click Save. NO changes will occur until Save is clicked.
Example:Incoming:
Outgoing:
- Check Incoming to indicate that the claim is incoming - the layout remains unchanged.
- Select the claim status from the drop-down menu under Status.
- The Parent Claim field - always disabled. If the claim is a sub-claim: will then automatically populate with the parent claim's (or parent incident's) number.
- Enter the operator handling the claim's name under Person in Charge (PiC).
- Enter either
- the the claimant's name under Claimant (Incoming)
- or the defendant's name under Defendant (Outgoing).
- Enter either
- the claimant's reference number under Claimant Ref. (Claimant Reference)
- or the defendant's reference number under Defendant Ref. (Defendant Reference).
- Enter the type of incident under Claim Type/Nature.
Note: Populated with elsewhere retrieved data (Create a Claim pop-up), but can be manually overridden. - The Claim Cause field - disabled.
- Enter either
- the start date of the timebar under Time Bar Baseline Date
Note: Enter date and time as ddmmyy, for example: September 17 2014, type: "170914". - or click the Triple Dot Selector next to the field. A pop-up with a calendar opens. Select date and click OK.
- the start date of the timebar under Time Bar Baseline Date
- Enter the timebar date under Time Bar Date.
Note: Enter date and time as ddmmyy, for example: September 17 2014, type: "170914". This will display as "17.09.14". Time bar date: Timebar baseline date + default timebar of claim nature - the end of the time period a claim can be made following an incident. - Enter the insurance excess under Deductible Amount.
- The P & I Club is always disabled - N/A.
- Enter the applicable insurance company's reference number under P & I Club Ref. (P & I Club Reference).
- Enter the prior handler of the claim's name (before the current Person in Charge (PiC)) under Handled by.
- Enter the guaranteed amount under Guarantee/Security.
- Uninsured checkbox:
- Cargo Incoming Claim: Check Uninsured to indicate that the cargo is uninsured.
- Other Claim Type: Leave blank.
- The vessel name always automatically populated under Vessel.
- Depending of type of claim/claim nature the Main Details tab includes panels for:
1. Cargo Claim
2. Personal Injury Claim
3. Other Claim Types- Cargo Claim: Cargo Claim Details panel:
- Add a Bill of Lading:
- Click Add Claim Cause to add claim type/nature.
- A pop-up with a list of claim causes opens. Select field and click OK.
- The pop-up will close and selected cause appear as a row.
- Remove a bill of lading:
- Click the bill of lading row to be removed - it will highlight.
- Click Remove. A pop-up opens asking to confirm deletion.
- Click Yes. The pop-up will close and the selected row delete.
- Add a Bill of Lading:
- Personal Injury Claim: Personal Injury Claim Details panel:
- Enter the name of the injured person under Person Injured.
- Enter the date of the injury under Date of Injury.
- Enter the injured person's employer under Employed By.
- Other Claim Types (Hull Claim, Non-Performance Claim, DP Dispute, Complaint Other and Other P & I): Main Details tab only consists of the Vessel Details- and Estimated Details panels.
- Cargo Claim: Cargo Claim Details panel:
- In the Claimed Details panel :
- Enter the claimed amount under Amount Claimed and applicable currency in the currency field (second field).
Note: Defaults to USD. - Enter applicable exchange rate under Exchange Rate.
Note: I.e. the exchange rate used at the time of the incident. - Enter the exchange rate date (if other than the default: today's date) under Exchange Rate Date.
Note: Enter date and time as ddmmyy, for example: September 17 2014, type: "170914". This will display as "17.09.14".
- Enter the claimed amount under Amount Claimed and applicable currency in the currency field (second field).
- In the Estimated Details panel:
Enter the estimated amount to be claimed under Amount Estimated (first field) and applicable currency in the currency field (second field).
Note: Defaults to USD.Enter applicable exchange rate under Exchange Rate.
Note: I.e. the exchange rate used at the time of the incident.Enter the exchange rate date (if other than the default: today's date) under Exchange Rate Date.
Note: Enter date and time as ddmmyy, for example: September 17 2014, type: "170914". This will display as "17.09.14".
- In the Vessel Details panel:
- Click Save.
- In the Causes/Description tab:
- Upper Field:
- Add a Claim Cause:
- Click Add Claim Cause to add claim type/nature.
- A pop-up with a list of claim causes opens. Select field and click OK.
- The pop-up will close and selected cause appear as a row.
- Remove a Claim Cause:
- Click the claim cause to be deleted - it will highlight.
- Click Remove. A pop-up opens asking to confirm deletion.
- Click Yes. The pop-up will close and the selected row delete.
- Add a Claim Cause:
- Lower Field:
Enter a detailed description of the incident in the Claim Description textbox.
Note: IMPORTANT: Should include details such as location (where), context (why, how it came about), the sequence of events (what happened - in what order), the extent of damage (people, vessel and cargo) and, if cargo claim, type of cargo.
- Upper Field:
- Click Save.
- In the Offhire tab - Any offhire related to the vessel and the applicable voyage will display. All offhire of the entire voyage will display and will be automatically added as it occurs - nothing to be added manually.
Note: Will be continuously updated during the course of the claim, until settled. - In the Tasks tab - as applicable:
Note: To be continuously updated during the course of the claim, until settled.- Add a Task:
- Click Create New to add a task.
A pop-up with a list of tasks opens. Select field and click OK.
The pop-up will close and selected task appear as a row.
- Remove a Task:
- Click the task to be deleted - it will highlight.
- Click Remove. A pop-up opens asking to confirm deletion.
- Click Yes. The pop-up will close and the selected row delete.
- Add a Task:
- Click Save.
- In the Sub Claims tab - Not Applicable for the claim whilst being created.
Note: Lists all claims based on the current claim. If more sub-claims are created, they automatically display. - Click Save.
- In the Various Cost Revenue tab - Lists all costs and revenues associated with the claim, for example lawyer's fees, etc.:
Note: To be continuously updated during the course of the claim, until settled.- Add a Various Cost/Revenue:
Click Add Various to add a various cost/revenue.
A pop-up with a list of various costs and revenues opens. Select a cost or revenue and click OK.
- The pop-up will close and selected task appear as a row.
- Remove a Task:
- Click the task to be deleted - it will highlight.
- Click Remove. A pop-up opens asking to confirm deletion.
- Click Yes. The pop-up will close and the selected row delete.
- Add a Various Cost/Revenue:
- Click Save. The claim registration is complete. The process of settling a claim occurs outside of Dataloy VMS. During this process the claim details are to be maintained and continuously updated. Once the outcome of a claim is decided, go to To settle a claim.
Note: The new claim will be sorted by claim nature, person in charge (PiC), vessel (alphabetically) and under All Claims. Also, as applicable under Guaranteed- , Uninsured- and Outgoing Claims and My Claims.
- Go to
- Create an Outgoing Claim Based on an Incoming Claim or Incident
- Go to
Modules > Post FixtureThe Claims window opens.> Claims. - Open the incoming claim/incident to base an outgoing claim on. It appears as a row in upper Claims field (highlighted) with its details displaying in the lower field.
- Go to the Create menu and from the drop-down select Create Outgoing Claim.
- The Incident or Claim pop-up opens.
Note: Default in drop-down to Claim. Also - DO NOT use the option Incident in the drop-down menu. The option has under Create Outgoing Claim been disabled and will be removed. - Click OK. The pop-up will close and a new outgoing claim created. The new claim is a duplicate of its incoming parent claim/incident with the exceptions that it is an outgoing claim and a sub-claim of the incoming claim/incident (the parent claim field will be populated with the parent claim’s/incident's claim reference number and the new claim will appear in the Sub-Claim tab of the parent claim/incident). The details of the new claim will mirror its parent, but can be manually overridden (except for the Vessel, Claim ref., Parent claim and P&I Club fields). It will be sorted claim nature, person in charge (PiC), vessel (alphabetically) and under All Claims. Also, as applicable under Guaranteed- , Uninsured- and Outgoing Claims and My Claims.
Example:
Vessel Malvolio, Voyage 9001, Outgoing Cargo Claim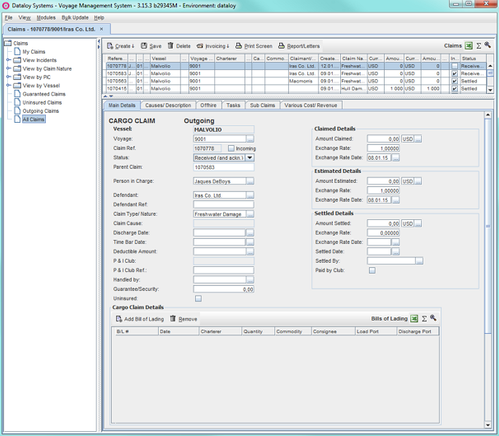
- In the Main Terms tab, fill in the fields as follows (as applicable - some fields self-populate):
Note: All fields populated in the parent claim/incident will populate, except Incoming check box. Also - depending on type of claim - the layout and details of the Main Terms tab can differ. - In the Vessel Details panel:
- The vessel name will always be automatically populated under Vessel.
Note: ALWAYS disables and populated with elsewhere retrieved data. Can be manually overridden - if the voyage is changed to a voyage belonging to another vessel, the vessel name will automatically change to the vessel the new voyage is registered to. - Enter either:
- the voyage reference number under Voyage
Note: Populated with elsewhere retrieved data, but can be manually overridden. - or click the Triple Dot Selector next to the field. A pop-up with a list of input values opens. Select field and click OK.
Example: - The claim reference number is automatically generated and always displays under Claim Ref. (Claim Reference).
Note: The Claim Ref. field is always disabled and the claim reference number cannot be changed. Incoming/Outgoing checkbox - will be unchecked. Leave unchecked.
Note: Claim can be manually changed to incoming: check Incoming box and click Save. - Change of fields: Defendant to Claimant and Defendant Ref. to Claimant Ref. Outgoing will automatically change to Incoming at the top of the Main Details tab.To reverse: uncheck the Incoming box and click Save. NO changes will occur until Save is clicked.
Example:Incoming:
Outgoing:
- Select the claim status from the drop-down menu under Status.
- The Parent Claim field will be automatically populated with the claims' parent claim's/incident's number.
Note: Always disabled and the parent claim number cannot be changed. - Enter the operator handling the claim's name under Person in Charge (PiC).
- Enter defendant's name under Defendant.
- Enter the defendant's reference number under Defendant Ref. (Defendant Reference).
- Enter the type of incident under Claim Type/Nature.
Note: Populated with elsewhere retrieved data, but can be manually overridden. - The Claim Cause field - disabled.
- Enter either
- the start date of the timebar under Time Bar Baseline Date
Note: Enter date and time as ddmmyy, for example: September 17 2014, type: "170914". - or click the Triple Dot Selector next to the field. A pop-up with a calendar opens. Select date and click OK.
- the start date of the timebar under Time Bar Baseline Date
- Enter the time bar date under Time Bar Date.
Note: Enter date and time as ddmmyy, for example: September 17 2014, type: "170914". This will display as "17.09.14". Time bar date: Timebar baseline date + default timebar of claim nature - the end of the time period a claim can be made following an incident. - Enter the insurance excess under Deductible Amount.
- The P & I Club is always disabled. N/A.
- Enter the applicable insurance company's reference number under P & I Club Ref. (P & I Club Reference).
- Enter the prior handler of the claim's name (before the current Person in Charge (PiC)) under Handled by.
- Enter the guaranteed amount under Guarantee/Security.
- Uninsured checkbox:
- Cargo Incoming Claim: Check Uninsured to indicate that the cargo is uninsured.
- Other Claim Type: Leave blank.
- the voyage reference number under Voyage
- Depending of type of claim/claim nature the Main Details tab includes panels for:
a. Cargo Claim
b. Personal Injury Claim
c. Other Claim Types - Cargo Claim: Cargo Claim Details panel:
- Add a Bill of Lading:
- Click Add Claim Cause to add claim type/nature.
- A pop-up with a list of claim causes opens. Select field and click OK.
- The pop-up will close and selected cause appear as a row.
- Remove a Bill of Lading:
- Click the bill of lading row to be removed - it will highlight.
- Click Remove. A pop-up opens asking to confirm deletion.
- Click Yes. The pop-up will close and the selected row delete.
- Personal Injury Claim: Personal Injury Claim Details panel:
- Enter the name of the injured person under Person Injured.
- Enter the date of the injury under Date of Injury.
- Enter the injured person's employer under Employed By.
- Other Claim Types (Hull Claim, Non-Performance Claim, DP Dispute, Complaint Other and Other P & I): Main Details tab only consists of the Vessel Details- and Estimated Details panels.
- In the Claimed Details panel :
- Enter the claimed amount under Amount Claimed and applicable currency in the currency field (second field).
Note: Defaults to USD. - Enter applicable exchange rate under Exchange Rate.
Note: I.e. the exchange rate used at the time of the incident. - Enter the exchange rate date (if other than the default: today's date) under Exchange Rate Date.
Note: Enter date and time as ddmmyy, for example: September 17 2014, type: "170914". This will display as "17.09.14".
- Enter the claimed amount under Amount Claimed and applicable currency in the currency field (second field).
- In the Estimated Details panel:
Enter the estimated amount of the incident (i.e. estimated amount to be claimed) under Amount Estimated (first field) and applicable currency in the currency field (second field).
Note: Defaults to USD.Enter applicable exchange rate under Exchange Rate.
Note: I.e. the exchange rate used at the time of the incident.Enter the exchange rate date (if other than the default: today's date) under Exchange Rate Date.
Note: Enter date and time as ddmmyy, for example: September 17 2014, type: "170914". This will display as "17.09.14".
- Click Save.
- In the Causes/Description tab:
- Upper Field:
Add a Claim Cause:
Click Add Claim Cause to add claim type/nature.
A pop-up with a list of claim causes opens. Select field and click OK.
- The pop-up will close and selected cause appear as a row.
- Remove a Claim Cause:
- Click the claim cause to be deleted - it will highlight.
- Click Remove. A pop-up opens asking to confirm deletion.
- Click Yes. The pop-up will close and the selected row delete.
- Lower Field:
Enter a detailed description of the incident in the Claim Description textbox.
Note: IMPORTANT: Should include details such as location (where), context (why, how it came about), the sequence of events (what happened - in what order), the extent of damage (people, vessel and cargo) and, if cargo claim, type of cargo.
- Upper Field:
- Click Save.
- In the Offhire tab - Any offhire related to the vessel and the applicable voyage will display. All offhire of the entire voyage will display and will be automatically added as it occurs - nothing to be added manually.
Note: Will be continuously updated during the course of the claim, until settled. - In the Tasks tab - as applicable:
Note: To be continuously updated during the course of the claim, until settled.- Add a Task:
- Click Create New to add a task.
A pop-up with a list of tasks opens. Select field and click OK.
The pop-up will close and selected task appear as a row.
- Remove a Task:
- Click the task to be deleted - it will highlight.
- Click Remove. A pop-up opens asking to confirm deletion.
- Click Yes. The pop-up will close and the selected row delete.
- Add a Task:
- Click Save.
- In the Sub Claims tab - Not Applicable for the claim whilst being created.
Note: Lists all claims based on the current claim. If more sub-claims are created, they will automatically display. - Click Save.
- In the Various Cost Revenue tab - Lists all costs and revenues associated with the claim, for example lawyer's fees, etc.:
Note: To be continuously updated during the course of the claim, until settled.- Add a Various Cost/Revenue:
Click Add Various to add a various cost/revenue.
A pop-up with a list of various costs and revenues opens. Select a cost or revenue and click OK.
- The pop-up will close and selected task appear as a row.
- Remove a Task:
- Click the task to be deleted - it will highlight.
- Click Remove. A pop-up opens asking to confirm deletion.
- Click Yes. The pop-up will close and the selected row delete.
- Add a Various Cost/Revenue:
- Click Save. The claim registration is complete. The process of settling a claim occurs outside of Dataloy VMS. During this process the claim details are to be maintained and continuously updated. Once the outcome of a claim is decided, go to To settle a claim.
Note: The new claim will be sorted by claim nature, person in charge (PiC), vessel (alphabetically) and under All Claims. Also, as applicable under Guaranteed- , Uninsured- and Outgoing Claims and My Claims.If based on an incident, the parent incident will move from Unclaimed Incidents to Claimed Incidents. - Create a Caim (Incoming/Outgoing) Based on a Parent Claim (or Create a sub-claim (incoming/outgoing) based on a parent claim)
- Go to
Modules > Post FixtureThe Claim window opens.> Claims. - Open the claim to base a claim on (or the parent claim to base a sub-claim on). It will appear as a row in upper Claims field (highlighted) with its details displaying in the lower field.
- Go to the Create menu and from the drop-down select Create From Incident.
- The Incident or Claim pop-up opens.
Note: Default in drop-down to Claim.
- Click OK. The pop-up will close and the Create New Claim pop-up opens.

- Fill in the fields as follows:
- Enter either
- the type of incident under Claim Type/Nature
- or click the Triple Dot Selector next to the field. A pop-up with a list of input values opens. Select field and click OK.
Example:
- If Cargo Claim is selected under Claim Type/Nature, the layout will display the Bill of Lading field, listing available bill of ladings - if not it will be blank.
Note: Change Claim Type/Nature to revert layout - The layout will ONLY alter in case of cargo claim.
Example:
- Enter either the voyage or a Bill of Lading under Voyage by
entering the voyage reference number
or double-clicking on a bill of lading in the Bills of Lading field.
Click OK. The pop-up will close. If based on an incident, a copy of the incident is created as a claim. The new claim is a sub-claim of the incident, and will appear in the incident's sub-claim tab. Also, the incidents claim reference number will appear in the Parent Claim field of the claim, indicating that the claim is based on an incident.
Note: The new claim will be sorted by claim nature, person in charge (PiC), vessel (alphabetically) and under All Claims. Also, as applicable under Guaranteed- , Uninsured- and Outgoing Claims and My Claims. The incident is moved form Unclaimed Incidents to Claimed Incidents in the left-hand menu tree.
- Enter either
- Open applicable folder in the left-hand menu tree and open the new claim. Available claims will list in the upper Claims field, the newly created claim at the top (highlighted - its details displaying in the lower field).
Example:
Vessel Malvolio, Voyage 9001, Incoming Cargo Claim
- In the Main Terms tab, fill in the fields as follows (as applicable - some fields self-populate):
Note: Some fields will be populated with data from when the incident the claim is based on was created. Also - depending on type of claim - the layout and details of the Main Terms tab can differ.- In the Vessel Details panel:
- The vessel name always be automatically populated under Vessel.
Note: ALWAYS disables and populated with elsewhere retrieved data. Can be manually overridden - if the voyage is changed to a voyage belonging to another vessel, the vessel name will automatically change to the vessel the new voyage is registered to. - Enter the voyage reference number under Voyage.
Note: Populated with elsewhere retrieved data (Create a Claim-pop-up), but can be manually overridden. - The claim reference number is automatically generated and always displays under Claim Ref. (Claim Reference).
Note: The Claim Ref. field is always disabled and the claim reference number cannot be changed. - Incoming/Outgoing checkbox:
- Check Incoming to indicate that the claim is incoming - the layout remains unchanged.
Note: Checked by default and displays as Incoming. - Uncheck to indicate the claim is outgoing:
- Incoming will automatically change to Outgoing at the top of the Main Details tab.
Click Save - Change of fields: Claimant to Defendant and Claimant Ref. to Defendant Ref.
Note: To reverse: check the Incoming box and click Save. NO changes will occur until Save is clicked.
Example:Incoming:
Outgoing:
- Check Incoming to indicate that the claim is incoming - the layout remains unchanged.
- Select the claim status from the drop-down menu under Status.
- The Parent Claim field will be automatically populated with the claims' parent claim's/incident's number.
Note: Always disabled and the parent claim number cannot be changed. - Enter the operator handling the claim's name under Person in Charge (PiC).
- Enter either
- the the claimant's name under Claimant (Incoming)
- or the defendant's name under Defendant (Outgoing).
- Enter either
- the claimant's reference number under Claimant Ref. (Claimant Reference)
- or the defendant's reference number under Defendant Ref. (Defendant Reference).
- Enter the type of incident under Claim Type/Nature.
Note: Populated with elsewhere retrieved data (Create a Claim pop-up), but can be manually overridden. - The Claim Cause field - disabled.
- Enter either
- the start date of the timebar under Time Bar Baseline Date
Note: Enter date and time as ddmmyy, for example: September 17 2014, type: "170914". - or click the Triple Dot Selector next to the field. A pop-up with a calendar opens. Select date and click OK.

- the start date of the timebar under Time Bar Baseline Date
- Enter the timebar date under Time Bar Date.
Note: Enter date and time as ddmmyy, for example: September 17 2014, type: "170914". This will display as "17.09.14". Time bar date: Timebar baseline date + default timebar of claim nature - the end of the time period a claim can be made following an incident. - Enter the insurance excess under Deductible Amount.
- The P & I Club is always disabled - N/A.
- Enter the applicable insurance company's reference number under P & I Club Ref. (P & I Club Reference).
- Enter the prior handler of the claim's name (before the current Person in Charge (PiC) under Handled by.
- Enter the guaranteed amount under Guarantee/Security.
- Uninsured checkbox:
- Cargo Incoming Claim: Check Uninsured to indicate that the cargo is uninsured.
- Other Claim Type: Leave blank.
- The vessel name always be automatically populated under Vessel.
- Depending of type of claim/claim nature the Main Details tab includes panels for:
1. Cargo Claim
2. Personal Injury Claim
3. Other Claim Types- Cargo Claim: Cargo Claim Details panel:

- Add a Bill of Lading:
- Click Add Claim Cause to add claim type/nature.
- A pop-up with a list of claim causes opens. Select field and click OK.
- The pop-up will close and selected cause appear as a row.
- Remove a Bill of Lading:
- Click the bill of lading row to be removed - it will highlight.
- Click Remove. A pop-up opens asking to confirm deletion.
- Click Yes. The pop-up will close and the selected row delete.
- Cargo Claim: Cargo Claim Details panel:
- Personal Injury Claim: Personal Injury Claim Details panel:

- Enter the name of the injured person under Person Injured.
- Enter the date of the injury under Date of Injury.
- Enter the injured person's employer under Employed By.
- Other Claim Types (Hull Claim, Non-Performance Claim, DP Dispute, Complaint Other and Other P & I): Main Details tab only consists of the Vessel Details- and Estimated Details panels.
- In the Vessel Details panel:
- In the Claimed Details panel :

- Enter the claimed amount under Amount Claimed and applicable currency in the currency field (second field).
Note: Defaults to USD. - Enter applicable exchange rate under Exchange Rate.
Note: I.e. the exchange rate used at the time of the incident. - Enter the exchange rate date (if other than the default: today's date) under Exchange Rate Date.
Note: Enter date and time as ddmmyy, for example: September 17 2014, type: "170914". This will display as "17.09.14".
- Enter the claimed amount under Amount Claimed and applicable currency in the currency field (second field).
- In the Estimated Details panel:

Enter the estimated amount of the incident (i.e. estimated amount to be claimed) under Amount Estimated (first field) and applicable currency in the currency field (second field).
Note: Defaults to USD.Enter applicable exchange rate under Exchange Rate.
Note: I.e. the exchange rate used at the time of the incident.Enter the exchange rate date (if other than the default: today's date) under Exchange Rate Date.
Note: Enter date and time as ddmmyy, for example: September 17 2014, type: "170914". This will display as "17.09.14".
- Click Save.
- In the Causes/Description tab:

- Upper Field:
Add a Claim Cause:
Click Add Claim Cause to add claim type/nature.
A pop-up with a list of claim causes opens. Select field and click OK.
- The pop-up will close and selected cause appear as a row.
- Remove a Claim Cause:
- Click the claim cause to be deleted - it will highlight.
- Click Remove. A pop-up opens asking to confirm deletion.
- Click Yes. The pop-up will close and the selected row delete.
- Lower Field:
Enter a detailed description of the incident in the Claim Description textbox.
Note: IMPORTANT: Should include details such as location (where), context (why, how it came about), the sequence of events (what happened - in what order), the extent of damage (people, vessel and cargo) and, if cargo claim, type of cargo.
- Upper Field:
- Click Save.
- In the Offhire tab - Any offhire related to the vessel and the applicable voyage will display. All offhire of the entire voyage will display and will be automatically added as it occurs - nothing to be added manually.
Note: Will be continuously updated during the course of the claim, until settled.
- In the Tasks tab - as applicable:
Note: To be continuously updated during the course of the claim, until settled.
- Add a Task:
- Click Create New to add a task.
A pop-up with a list of tasks opens. Select field and click OK.
The pop-up will close and selected task appear as a row.
- Remove a Task:
- Click the task to be deleted - it will highlight.
- Click Remove. A pop-up opens asking to confirm deletion.
- Click Yes. The pop-up will close and the selected row delete.
- Add a Task:
- Click Save.
- In the Sub Claims tab - Not Applicable for the claim whilst being created.
Note: Lists all claims based on the current claim. If more sub-claims are created, they will automatically display.
- Click Save.
- In the Various Cost Revenue tab - Lists all costs and revenues associated with the claim, for example lawyer's fees, etc.:
Note: To be continuously updated during the course of the claim, until settled.
- Add a Various Cost/Revenue:
Click Add Various to add a various cost/revenue.
A pop-up with a list of various costs and revenues opens. Select a cost or revenue and click OK.
- The pop-up will close and selected task appear as a row.
- Remove a Task:
- Click the task to be deleted - it will highlight.
- Click Remove. A pop-up opens asking to confirm deletion.
- Click Yes. The pop-up will close and the selected row delete.
- Add a Various Cost/Revenue:
- Go to
- Click Save. The claim registration is complete. The process of settling a claim occurs outside of Dataloy VMS. During this process the claim details are to be maintained and continuously updated. Once the outcome of a claim is decided, go to To settle a claim.
Note: The new claim will be sorted by claim nature, person in charge (PiC), vessel (alphabetically) and under All Claims. Also, as applicable under Guaranteed- , Uninsured- and Outgoing Claims and My Claims.
Settle a Claim
The process of settling a claim occurs outside of Dataloy VMS. During this process the claim details are to be continuously updated, for example adding new details, updating status. Once the outcome of a claim is decided (a settlement made), this should be added in the VMS and the claim settled (or closed).
To settle a claim follow the step-by-step instructions:
- Go to
Modules > Post FixtureThe Claims window will open.> Claims. - Open the claim to be settled. It will appear as a row in upper Claims field (highlighted) with its details displaying in the lower field.
- In the Main Details tab:
- In the Settled Details panel:

- Enter the settled amount (i.e. the agreed amount to be claimed) under Amount Settled (first field) and applicable currency in the currency field (second field).
Note: Defaults to USD. - The Update Status pop-up will opens asking to automatically update claim status to Settled.
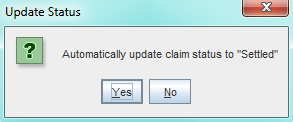
- Click Yes:
- The pop-up will close and:
- Exchange Rate populates with the currency exchange rate default.
- Exchange Rate Date populates with the default "today's date".
- Settled Date populates with the default "today's date".
- Settled By populates with the name of the operator settling the claim.
- CLAIM STATUS REMAINS UNCHANGED. The claim does not automatically change to Settled.
- Go to Step 3a vii.
- The pop-up will close and:
- Click No: The pop-up will close and no details self-populate. Go to 3a iii (next step).
- Click Yes:
- Enter applicable exchange rate under Exchange Rate.
Note: I.e. the exchange rate used at the time of the incident. - Enter the exchange rate date (if other than the default: today's date) under Exchange Rate Date.
Note: Enter date and time as ddmmyy, for example: September 17 2014, type: "170914". This will display as "17.09.14". - Enter the date the claim was settled under Settled Date.
Note: Enter date and time as ddmmyy, for example: September 17 2014, type: "170914". This will display as "17.09.14". - Enter the operator settling the claim's name Settled By.
- Check Paid by Club to indicate that the amount is to be paid by the P & I Club.
- Enter the settled amount (i.e. the agreed amount to be claimed) under Amount Settled (first field) and applicable currency in the currency field (second field).
- In the Vessel Details panel: Change the claim's status to Settled in the drop-down menu under Status.
Example: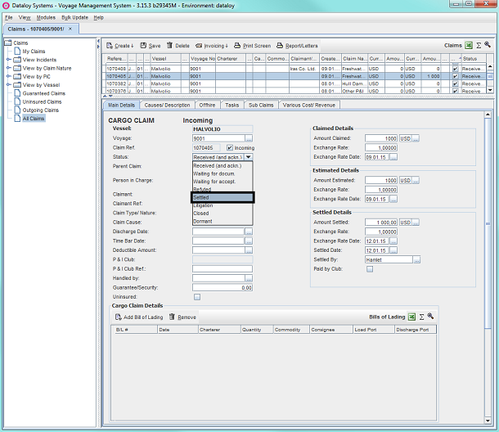
- In the Settled Details panel:
- Click Save. The claim will be settled (or closed) and the information will update throughout Dataloy VMS where applicable. Status of the claim will change to Settled in the upper Claims field under Status.
Example: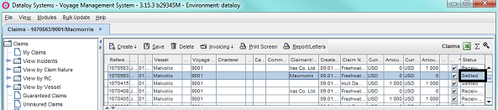
Invoice a Claim
Based on the deductible amount and deductible type (per claim or per voyage), the system can generate invoicing data. Invoicing data will appear in “Accounts Payable” and “Accounts Receivable” modules for settled claims.
There is also an accounts payable invoicing module that handles claims across voyage, based on the claimant. This way the user can invoice all claims for the same claimant at the same time.
There are four options in invoicing a claim in Dataloy VMS:
- Accounts Receivable by Voyage
- Accounts Payable by Voyage
- Accounts Receivable by Defendant
- Accounts Payable by Claimant
- Accounts Receivable by Voyage
- Go to
Modules > Post FixtureThe Claims window opens.> Claims. - Open the settled claim to be invoiced. The claim to be invoiced appears as a row in upper Claims field (highlighted) with its details displaying in the lower field.
- Go to the Invoicing menu and from the drop-down select Accounts Receivable by Voyage.
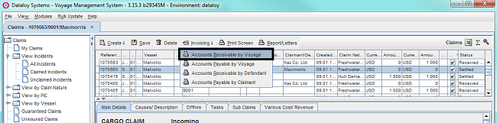
- The Accounts Receivable module will open, displaying the pending claims invoices, grouped per voyage.
Example: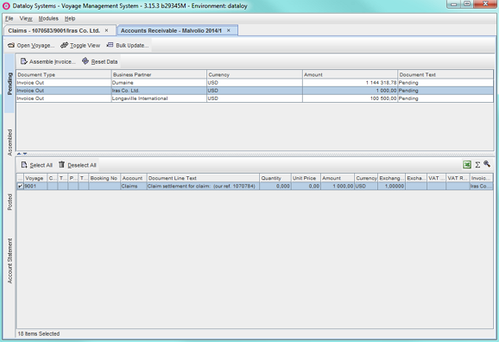
- Go to
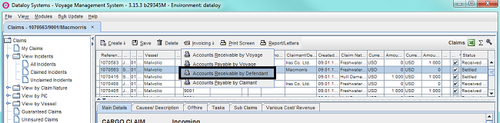
- Accounts Payable by Voyage
- Go to
Modules > Post FixtureThe Claims window opens.> Claims. - Open the settled claim to be invoiced. It will appear as a row in upper Claims field (highlighted) with its details displaying in the lower field.
- Go to the Invoicing menu and from the drop-down select Accounts Payable by Voyage.

- The Accounts Payable module opens, displaying the pending payable claims invoices, grouped per voyage.
Example: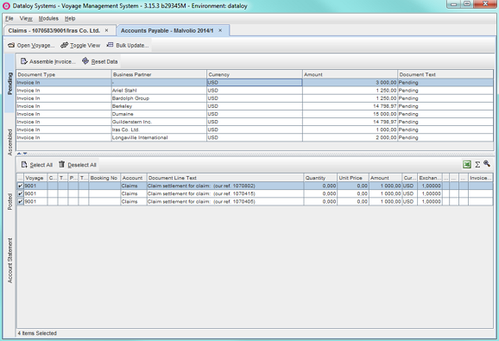
- Go to
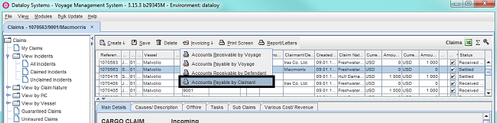
- Accounts Receivable by Defendant
- Go to
Modules > Post FixtureThe Claims window opens.> Claims. - Open the settled claim to be invoiced. It will appear as a row in upper Claims field (highlighted) with its details displaying in the lower field.
- Go to the Invoicing menu and from the drop-down select Accounts Receivable by Defendant.
- The Accounts Receivable module will open, displaying the pending claims invoices, grouped per defendant (i.e. the person to be invoiced).
Note: This option also enables multiple claims against one defendant that are spread across multiple voyages to be settled in one invoice at the same time.
Example: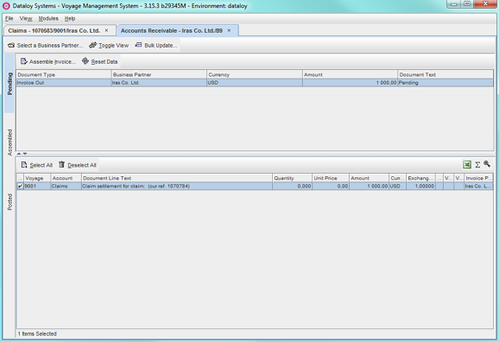
- Go to
- Accounts Payable by Claimant
- Go to
Modules > Post FixtureThe Claims window will open .> Claims. - Open the settled claim to be invoiced. It appears as a row in upper Claims field (highlighted) with its details displaying in the lower field.
- Go to the Invoicing menu and from the drop-down select Accounts Payable by Claimant.
- The Accounts Payable module opens, displaying the pending payable claims invoices, grouped per claimant (i.e. person/company to be paid).
Note: This option also enables multiple claims from one claimant that are spread across multiple voyages to be settled in one invoice at the same time.
Example: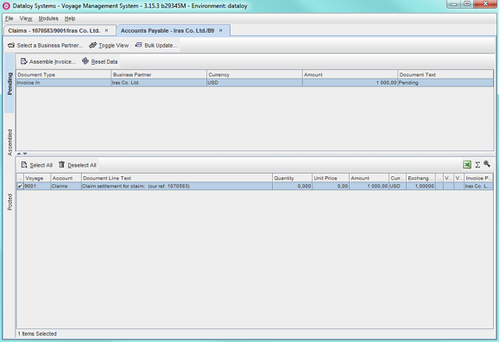
- Go to
Maintain/Edit/Delete an Incident/a Claim
- Maintain (Update)/Edit an Incident/a Claim:
- Go to
Modules > Post fixture > Claims.The Claims window opens. - Open applicable incident/claim to be maintained/edited. Its fields will display.
- Update (maintain)/edit as appropriate the fields displayed in relevant tabs.
- Click Save.
- Go to
- Delete an Incident:
- Go to
Modules >Post fixture > Claims.The Claims window opens. - Open applicable incident to be deleted. Its fields will display.
- Click Delete. A pop-up opens asking to confirm removal.
- Click Yes. The pop-up will close and the selected incident delete.
- Go to
- Remove a Claim:
- Go to
Modules >Post fixture > Claims.The Claims window opens. - Open applicable incident to be deleted. Its fields will display.
- Click Delete. A pop-up opens asking to confirm removal.
- Click Yes. The pop-up will close and the selected incident delete.
- Go to
Print Screen Option
The Claims module provides a print screen option available to all types of incidents (claimed and unclaimed) and claims (settled and unsettled).
To print a screenshot of the incident/claim in Dataloy VMS:
- Go to
Modules > Post Fixture > Claims.The Claims window opens. - Open the incident/claim to make a screenshot from. It will appear as a row in upper Claims field (highlighted) with its details displaying in the lower field.
- Open relevant tab to print (lower Claims field).
- Click Print Screen.

- A hard-copy (paper) screenshot is printed.
Report/Letters
The Reports/Letters option is not a standard option and only available and working if activated and customized either by Dataloy or the customer. Please contact your administrator for further information.
From the Booking and Operations Module: View/Edit an Incident and View a Claim
Incidents can be viewed and edited from the Booking and Operations module. Claims can only be viewed in Read-Only mode.
1. View and Edit Incident
2. View a Claim (Read-Only Mode)
View and Edit Incident:
Go to
Modules > Booking and OperationsThe Booking and Operations window opens.> Booking and Operations.Select applicable vessel and open applicable voyage. Its details displays.
- Go to the Incident/Claim menu and from the drop-down select Open Incident.
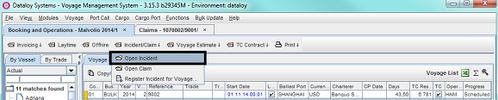
- Either
- an incident dialogue box will open with previously entered details of the incident (if only ONE incident exists) - Go to Step 1e -
- or a pop-up opens requesting choice of which incident to open (if MORE than one incident exists). Select incident to open and click OK.
- An incident registration dialogue box will open containing details previously entered.
Example: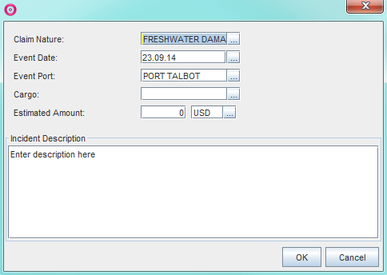
- Review, (and if applicable, edit/update) the details and click OK.
- The dialogue box will close (any changes will automatically be saved).
- View a Claim (Read-Only Mode):
- Go to
Modules > Booking and OperationsThe Booking and Operations window will open.> Booking and Operations. - Select applicable vessel and open applicable voyage. Its details will display.
- Go to the Incident/Claim menu and from the drop-down select Open Claim.
- The Claims module will open in Read-Only mode, listing as rows all claims linked to the voyage in the upper Claims field. The most recent will be automatically highlighted with its details displayed in the lower Claims field
Example: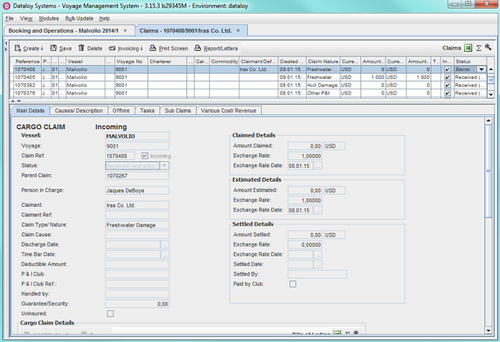
- Review the claim/s as applicable.
- Go to