Internal Allocations
- Former user (Deleted)
Short Description
The Internal Allocations module enables a user to generate, verify, post and store inter-business unit (also inter-company) accounting transactions based on already available data in Dataloy VMS to Accounting. In Accounting, the transactions (or internal allocations) are used to adjust the periodisation of cost, revenue and profit/loss for business units (and company when applicable). The module is part of the Period-End-Closing process in Dataloy VMS – please read the Period-End-Closing process prior to utilising the Internal Allocations module.
Internal Allocations are used by companies that have internal markets and agreements requiring allocations between business units. The Internal Allocations module automatically checks all relevant voyage estimates for Internal Relets and Profit Sharing contracts between units. For each relationship between units a revenue and cost transaction is created periodically for each voyage and/or contract until the activities are completed. An internal allocation record (or transaction) can be defined as a prorated internal allocation amount for each voyage/business unit/company combination.
The module consists of three sections:
- Pending:
- Displays generated internal allocations (including reversals) pending posting to an accounting system.
- Ready For Posting:
- Displays internal allocations in queue to be posted to an accounting system.
- Posted:
- Stores posted internal allocations.
Once generated, the module displays the transactions (as per set parameters) pending posting to an accounting system. Internal allocations will only be generated for open voyages and each will have a document date equalising the last day of the period the allocations were generated for. A reversal record for each internal allocation with a document date equal to the first day of the next period is also listed.
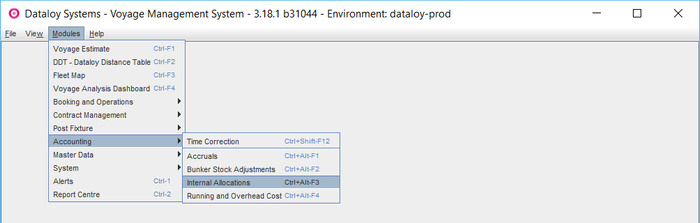
Location: Modules > Accounting > Internal Allocations
Chapters:
Long Description
Generate, Post and Store Internal Allocations (with Accounting System Integration)
Go to
Modules > Accounting > Internal Allocations.The Internal Allocations window open.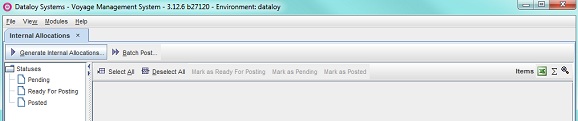
- Generate internal allocations:
- Click Generate Internal Allocations... The Choose Parameters for Internal Allocations Generation dialog box opens.
Example: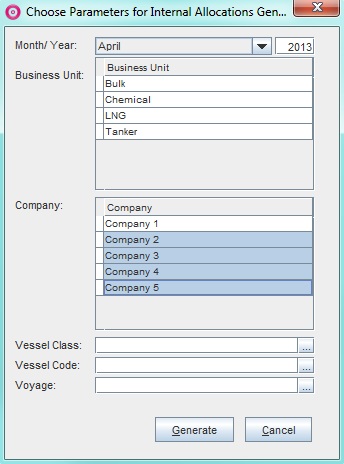
- Fill in the fields as follows:
- Select the month from the drop-down menu and enter the year to run the internal allocations for under Month/Year.
- Click the applicable business unit/s under Business Unit.
Note: To select several - press the Control (Ctrl) key and click relevant rows. - Click applicable company/ies under Company.
Note: Internal allocations will only be generated for selected companies. If none are selected internal allocations will be generated for all. - Enter the vessel class to generate data for a single vessel class (if applicable) under Vessel Class.
- Enter either
- the vessel code to generate data for a single vessel (if applicable) under Vessel Code
- or click the Triple Dot Selector next to the field. A pop-up with a list of input values opens. Select field and click OK.
Example: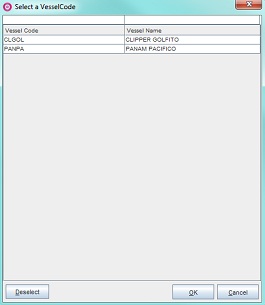
- Enter either
- the voyage generate data for a single voyage (if applicable) under Voyage
- or click the Triple Dot Selector next to the field. A pop-up with a list of input values opens. Select field and click OK.
Example:
- Click Generate. A pop-up opens advising the start of generating internal allocation. Generating internal allocations may take a while.

- Click OK. The pop-ups will close and the generating of internal allocations commence.
- Once the generating of internal allocations is complete, a pop-up opens advising this.
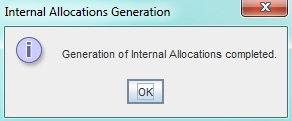
- Click OK. The pop-up will close and the generated internal allocations displays as rows in the Pending folder.
- Click Generate Internal Allocations... The Choose Parameters for Internal Allocations Generation dialog box opens.
- Post internal allocations to an accounting system by selective - (selecting the internal allocations to be posted) or batch (posting all internal allocations of selected business unit/s) posting.
- Selective posting:
- Either
- click the internal allocation row/s to be posted - it/they will highlight -
Note: To select several - press the Control (Ctrl) key and click relevant rows. - or click Select All... to post all listed internal allocations - they will highlight.
Note: To deselect - click the Deselect All... button.
Example: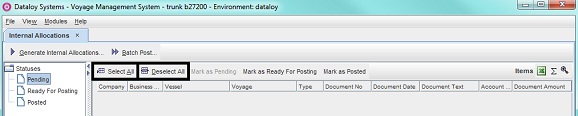
- click the internal allocation row/s to be posted - it/they will highlight -
- Click Mark as Ready For Posting. A pop-up opens asking to confirm move.
- Click OK. The pop-up will close and the selected internal allocations moves to the Ready For Pending folder until they are sent to an accounting system. This occurs almost immediately. Once sent, the internal allocations automatically moves to the Posted folder for storage.
- Either
- Batch posting:
- Click Batch Post...
Example: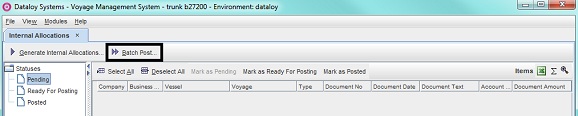
- A pop-up with a list of business units appears. Select business unit/s and click OK.
The pop-up will close and all internal allocations of the selected business unit/s moves from the Pending to the Ready For Pending folder until they are sent to an accounting system. This occurs almost immediately. Once sent, the internal allocations automatically moved to the Posted folder for storage.
- Click Batch Post...
- Selective posting:
The Mark as Posted button SHOULD NOT BE USED where integration with an accounting system exists.
To Generate, Post and Store Internal Allocations (without Accounting System Integration)
- Generate internal allocations by following the step-by-step instructions of the To generate, post and store internal allocations (with accounting system integration), Steps 1-2 section above.
- Post internal allocations either directly to the Posted folder or first to Ready for Posting if, for example, the internal allocations are to be posted at a later date.
- Post directly to the Posted folder:
- Either
- click the internal allocation row/s to be posted - it/they will highlight - or
Note: To select several - press the Control (Ctrl) key and click relevant rows. - click Select All... to post all listed internal allocations - they will highlight.
Note: To deselect - click the Deselect All... button.
- click the internal allocation row/s to be posted - it/they will highlight - or
- Click Mark as Posted. A pop-up will open asking to confirm move.
Example: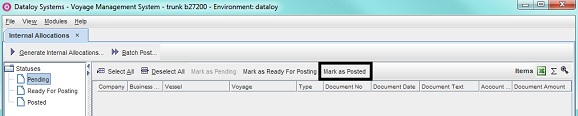
- Click OK. The pop-up will close and the selected internal allocations will move to the Posted folder for storage.
- Either
- Post including the Ready For Posting folder:
- Selective posting:
- Either:
- click the internal allocation row/s to be posted - it/they will highlight - or
Note: To select several - press the Control (Ctrl) key and click relevant rows. - click Select All... to post all listed internal allocations - they will highlight.
Note: To deselect - click the Deselect All... button.
- click the internal allocation row/s to be posted - it/they will highlight - or
- Click Mark as Ready For Posting. A pop-up appears asking to confirm move.
- Click OK. The pop-up will vanish and the selected internal allocations will move to the Ready For Pending (placed in queue for posting).
- Go to Step iii.
- Either:
- Batch posting:
- Click Batch Post...
- A pop-up with a list of business units appears. Select business unit/s and click OK.
- The pop-up will close and all internal allocations of the selected business unit/s moves to the Ready For Pending folder (placed in queue for posting).
- Go to Step iii.
- In the Ready for Pending folder select the internal allocation row/s due to be posted in the queue - it/they will highlight (selective posting).
- Click Mark as Posted. A pop-up opens asking to confirm move.
- Click OK. The pop-up will close and the selected internal allocations moves to the Posted folder for storage.
Related Content