Accruals
- Former user (Deleted)
- Karl-André Dalby
Short Description
The Accruals module is where accruals for open voyages belonging to one or several business units are generated, verified, stored and posted to Accounting. Where there is integration with an accounting system, it is also used for importing and verifying actuals. The module is part of the Period-End-Closing process in Dataloy VMS – please read the Period-End-Closing process prior to utilising the Accruals module.
Accruals are generated based on already available data in Dataloy VMS and are used for proration of cost and revenue for an accounting period and for period-end-closing, i.e. matching cost and revenue to the accounting period in which they were earned/incurred rather than when payment was received/made. The module consists of three sections:
- Pending:
- Displays generated accruals (including reversals) pending posting to an accounting system.
- Ready For Posting:
- Displays accruals in queue to be posted to an accounting system.
- Posted:
- Stores posted accruals and actual records.
Once generated, the module displays the accruals (as per set parameters) pending posting to an accounting system. Accruals will only be generated for open voyages. Each will have a document date equalising the last day of the period the accruals were generated for. A reversal record for each accrual with a document date equal to the first day of the next period is also listed. Accruals are identified as document type ACP (Accruals Posting) under Type and a reversal as ACR (Accruals Reversal).
An accrual record in Dataloy VMS is the difference between the to-date estimated and actual amounts for each cost and revenue item for all open voyages, periods and accounts. When verifying accruals, ensure that where there is a difference between the estimated and actual amounts of an item there is an accrual and the accrued amount is the estimate minus the actual. When verifying posted accruals, ensure that the same number of accruals posted have both been moved to the Posted folder in and reached the accounting system. Note: It is possible to split accruals for demurrage and despatch on relet vs. non-relets.
Actuals (or physicals) in accounting can be defined as actual costs and revenues that have occurred as opposed to amounts budgeted or projected into the future. Verifying actuals is part of the Period-End-Closing process and simply means ensuring that the actuals (or actual year-to-date costs and revenues) have been transferred correctly from an accounting system. Transferring actuals is normally done by running specific jobs either in the accounting system itself or in a third party tool between the systems. Once transferred the are stored as rows ONLY in the Posted folder (never in the Pending or Ready For Posting folders). Actuals are identified as document type ACC (Accounting) under Type.
To verify, filter to show only the actuals for the relevant period and review and verify the final resulting list of data, especially the YTD Actual Amount column with data in Accounting. Several records for different vessels and voyages for varying accounts will be displayed. Filter the list further by for example vessel and voyages to further verify the amounts. Once verification is made, the Period-End-Closing process can proceed to the next step.
- Accruals will NOT be generated (alone or grouped with another account) if:
- the voyage's progress status set to Closed.
- there is a complete match between the estimated and actual amounts of an account, i.e. year-to-date estimate is equal to the year-to-date actual - thus the accrual is zero.
Note: To show zero-amount-accrual accounts, check the Write All (Include Zero Accruals) box when re-generating accruals for a particular voyage. - the fulfilment level of the account in the Accounts module is set to zero.
Note: To enable accuals to be generated - change the fulfilment level from zero (typically to 100%). - the account is mapped to another account in the Account Mappings module.
Note: To enable accuals to be generated - change the account mapping to applicable account. account mappings that are deleted (i.e. soft deleted).
- Importing actuals into Dataloy VMS and automatic posting of accruals requires integration with an accounting system – this is usually done by Dataloy during initial system setup. Please contact Dataloy for further information.
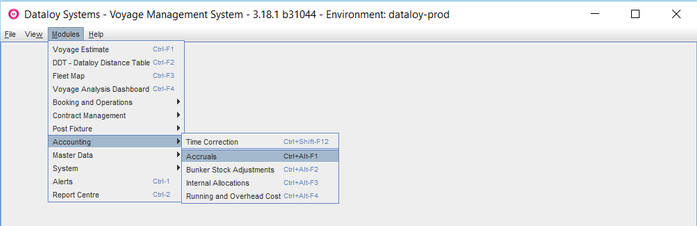
Location: Modules > Accounting > Accruals
Chapters:
Long Description
Verify that Actuals have been Transferred Correctly
- Go to
Modules > Accounting > Accruals.The Accruals window opens. - Click Posted in the left-hand menu tree. Its fields appears to the right displaying all posted documents. The posted document types to display are accruals (ACP), accrual reversals (ACR) and actuals (ACC).
- Filter the document list to display actuals (ACC) only.
- Click the magnifying glass icon at the top-right corner.

- A row displays above the columns.

- Type ACC in the field above the Type column.
Example:
- Press Enter to filter.
- Click the magnifying glass icon at the top-right corner.
- Filter the actuals list for relevant period.
- Type relevant date in the field above the Document Date column.
Note: Enter date as dd.mm.yy, for example: if running for December 2012, type: '=01.12.12' to show only those actuals posted during this period. - Press Enter.
- Type relevant date in the field above the Document Date column.
- Review and verify the final resulting list of data, especially YTD Actual Amount column with data in Accounting.
Note: The list can be filtered further, by for example vessel and voyage, to further verify amounts (as applicable).
6. Once the verification is complete: to continue accounting period closing - return to the Period-End-Closing page.
To distinguish between original and modified data records when data for the same period is sent several times the Audit Log can be used to check when the actuals were created.
To eliminate the need for constant verification due to slow transfer of data between systems an alert can be set to inform once the data upload into Dataloy VMS is complete. Please contact Dataloy for further information.
Generate, Verify and Post Accruals (with Accounting System Integration)
Go to
Modules > Accounting > Accruals.The Accruals window opens.
- Generate accruals:
- Click Generate Accruals... The Choose Parameters for Accruals Generation dialogue box opens.
Example: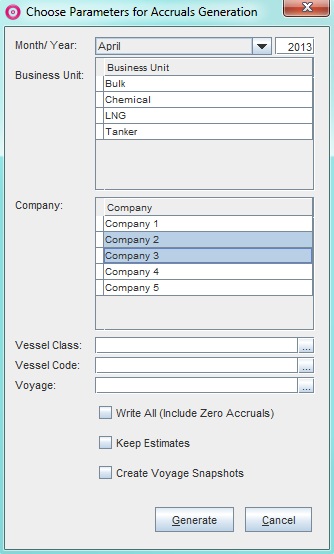
- Fill in the fields as follows:
- Select the month from the drop-down menu and enter the year to run the accruals for under Month/Year.
- Click the applicable business unit/s under Business Unit.
Note: To select several - press the Control (Ctrl) key and click relevant rows. - Click applicable company/ies under Company.
Note: Accruals will only be generated for selected companies. If none are selected accruals will be generated for all. - Enter the vessel class generate data for a single vessel class (if applicable) under Vessel Class.
- Enter either
- the vessel code to generate data for a single vessel (if applicable) under Vessel Code
- or click the Triple Dot Selector next to the field. A pop-up with a list of input values opens. Select field and click OK.
Example:
- Enter either
- the voyage to generate data for a single voyage (if applicable) under Voyage
- or click the Triple Dot Selector next to the field. A pop-up with a list of input values opens. Select field and click OK.
Example:
- Check Write All (Include Zero Accruals) if accounts with a zero amount accrual is to be included for a particular voyage.
Note: To remove the the zero amount accrual - re-generate the accruals for the voyage. - Check Keep Estimates to re-generate accruals without re-calculating the estimated to date amount.
- Check Create Voyage Snapshots if a snapshot is to be created documenting the voyage at the time of the snapshot.
Note:The Show Voyage Snapshot button is by default deactivated. It will activate if accruals are run with the Create Voyage Snapshots box checked. The possibility of automatically creating snapshots of each voyage processed allows the created snapshot to be linked back to each accrual created at the particular time. This way each accrual can be referred back to an exact copy of the voyage estimate at the time of running the accrual calculation.
Example:
- Click Generate. A pop-up opens advising the start of generating accruals. Generating accruals may take a while.
Note: If the Create Voyage Snapshots box is checked a pop-up will open advising that a copy of all accruals involved in the accruals will be created and asking to proceed. Click OK. The pop-up will close and the pop-up advising commencement of generating accruals opens.
- Click OK. The pop-ups will close and the generating of accruals commence.
- Once the generating of accruals is complete, a pop-up opens advising this.

- Click OK. The pop-up will close and the generated accruals displays as rows in the Pending folder.
Note: At the lower left of the screen a status bar will indicate that generating of accruals is completed and state the total number of generated accruals.
Example: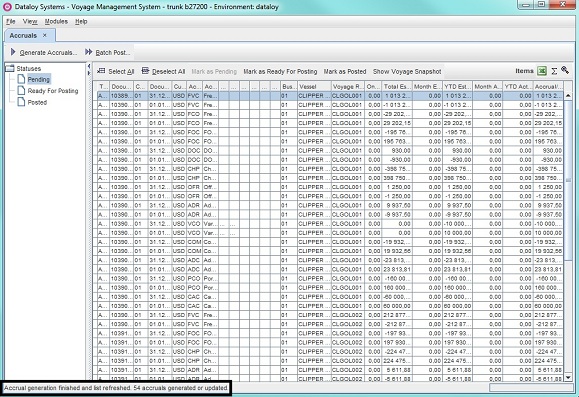
- Click Generate Accruals... The Choose Parameters for Accruals Generation dialogue box opens.
- Verify accruals ensuring
- that where there is a difference between the estimated and actual amounts of an item there is an accrual
- and that the accrued amount is the estimate minus the actual.
Example:
- Post accruals to an accounting system by selective - (selecting the accruals to be posted) or batch (posting all accruals of selected business unit/s) posting.
- Selective posting:
- Either
- click the accrual row/s to be posted - it/they will highlight -
Note: To select several - press the Control (Ctrl) key and click relevant rows. - or click Select All... to post all listed accruals - they will highlight.
Note: To deselect - click the Deselect All... button.
Example:
- click the accrual row/s to be posted - it/they will highlight -
- Click Mark as Ready For Posting. A pop-up opens asking to confirm move.
- Click OK. The pop-up will close and the selected accruals moves to the Ready For Pending folder until they are sent to an accounting system. This occurs automatically and almost immediately. Once sent, the accruals automatically moves to the Posted folder for storage.
- Either
- Batch posting:
- Click Batch Post...
Example:
- A pop-up with a list of business units opens. Select business unit/s and click OK.
The pop-up will close and all accruals of the selected business unit/s moves from the Pending to the Ready For Pending folder until they are sent to an accounting system. This occurs automatically and almost immediately. Once sent, the accruals automatically moves to the Posted folder for storage.
- Click Batch Post...
5. To continue accounting period closing - return to the Period-End-Closing Process page.
The Mark as Posted button SHOULD NOT BE USED where integration with an accounting system exists.
Generate, Verify and Post Accruals (without Accounting System Integration)
- Generate accruals by following the step-by-step instructions of the To generate, post and store accruals (with accounting system integration), Steps 1-3 section above.
- Post accruals either directly to the Posted folder or first to Ready for Posting if, for example, the accruals are to be posted at a later date.
- Post directly to the Posted folder:
- Either
- click the accrual row/s to be posted - it/they will highlight -
Note: To select several - press the Control (Ctrl) key and click relevant rows. - or click Select All... to post all listed accruals - they will highlight.
Note: To deselect - click the Deselect All... button.
- click the accrual row/s to be posted - it/they will highlight -
- Click Mark as Posted. A pop-up opens asking to confirm move.
Example:
- Click OK. The pop-up will close and the selected accruals moves to the Posted folder for storage.
- Either
- Post including the Ready For Posting folder:
- Selective Posting:
- Either:
- click the accrual row/s to be posted - it/they will highlight -
Note: To select several - press the Control (Ctrl) key and click relevant rows. - or click Select All... to post all listed accruals - they will highlight.
Note: To deselect - click the Deselect All... button.
- click the accrual row/s to be posted - it/they will highlight -
- Click Mark as Ready For Posting. A pop-up opens asking to confirm move.
- Click OK. The pop-up will close and the selected accruals moves to the Ready For Pending (placed in queue for posting).
- Go to Step iii.
- Either:
- Batch Posting:
- Click Batch Post...
- A pop-up with a list of business units appear. Select business unit/s and click OK.
- The pop-up will close and all accruals of the selected business unit/s will move to the Ready For Pending folder (placed in queue for posting).
- Go to Step iii.
- In the Ready for Pending folder select the accrual row/s due to be posted in the queue - it/they will highlight (selective posting).
- Click Mark as Posted. A pop-up opens asking to confirm move.
- Click OK. The pop-up will close and the selected accruals moves to the Posted folder for storage.
Verify Accruals have been Posted Correctly
- Go to
Modules > Accounting > Accruals.The Accruals window opens. - Click Posted in the left-hand menu tree. Its fields appears to the right displaying all posted documents. The posted document types to display are accruals (ACP), accrual reversals (ACR) and actuals (ACC).
- Filter the document list to display accruals (ACP) only.
- Click the magnifying glass icon at the top-right corner.
- A row displays above the columns.
- Type ACP in the field above the Type column.
Example:
- Press Enter to filter.
- Click the magnifying glass icon at the top-right corner.
- Filter the accruals list for relevant period.
- Type relevant date in the field above the Document Date column.
Note: Enter date as dd.mm.yy, for example: if running for December 2012, type: '=01.12.12' to show only those accruals posted during this period. - Press Enter.
- Type relevant date in the field above the Document Date column.
- Review and verify that the number of accruals in the final resulting list matches
- the number of accruals posted to Accounting from Dataloy VMS
Note: The amount of accruals to be posted is always stated in the confirmation pop-up when posting from the Pending folder. - and the number of accruals received by the accounting system.
- the number of accruals posted to Accounting from Dataloy VMS
6. To continue period closing - return to the Period-End-Closing Process page.