Toolbar, Menus, Additional Features (VC)
Short Description
The Voyage Estimate module contains several features designed to simplify navigation and ease of use and functions to further improve accuracy and effectiveness of a calculation. The functions and features are both general (applies to the entire system), for example Tear Off option, Set Title, etc. but most are module specific for the Voyage Charter section of the module, for example sensitivity analysis, deviation calculation, scheduling, etc. The functions and features are manly located in the menus, toolbar and buttons.
The File, View, Modules and Help menus are available on all screens in all modules and are not covered on this page.
Toolbar
Module Browser Tab Menu
Navigation Tips and Additional Features
Chapters:
Long Description
Menus
The Voyage Estimate module menus are located at the very top of the interface. The module specific menus for Voyage Charter interface of the Voyage Estimate are the Voyage, Cargo, Port Call, Cargo Port, Functions and Bulk Update menus. The Cargo, Port Call, Cargo Port menus are covered below and the Voyage Menu (located under Features for Voyage- and Time Charter), Functions Menu and Bulk Update Menu on their respective pages.
1. Cargo Menu
2. Port Call Menu
3. Cargo Port Menu
Cargo Menu
Go to Modules > Voyage Estimate > Cargo. The menu opens and is identical to the buttons of the Cargoes field having the same functions. For further information, usage, etc. go to Multiple Parcels unless otherwise stated.

- Add: Adds a new cargo to a voyage charter calculation. Displays as a row in the Cargoes field.
- Remove: Removes a selected cargo in the Cargoes field from a calculation.
- Relet: Used for creating cargo relets. - More information, go to Relets.
- Duplicate: Duplicates a selected cargo. Displays as a row in the Cargoes field.
- From COA...: Used for creating a voyage calculation based on a Contract of Affreightment (COA), thereby linking the estimate. - More information, go to Create Voyage Charter Calculations.
- Copy...: Used to copy and insert in a calculation any previously entered cargo. The Opens the CopyMove dialogue box opens from where the cargo/es to be copied are chosen.
- Create CP (Charter Party): Enables a user to create a charter party to group multiple cargo/es into a CP (frozen voyage calculations ONLY).
- Go to
Modules > Voyage Estimate > Port Call.The menu opens and is identical to the buttons of the Ports (or Port Rotation) field having the same functions. For further information, usage, etc. go to Advanced Port Rotation (Routing) (VC) unless otherwise stated.
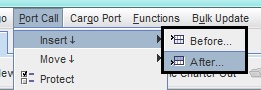
- Insert opens a drop-down menu with the selections Before and After: Used to add a port call to a port rotation before or after a selected port call.
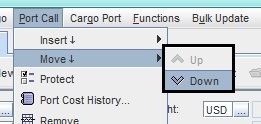
- Move opens a drop-down menu with the selections Up and Down: Used for making port rotations (i.e. changing order of port calls). Moves a selected port call one step, i.e. it will sort either above or beneath the port calls preceding or following it.
- Protect/Unprotect: Port calls can be sorted into actual rotation order (i.e. rotate port call order) in the Ports (or Port Rotation) field, but will, if for example an additional cargo and/or ports are added, revert to default listing (load ports first, discharge second). To avoid this the port rotation can be protected, i.e. fixed, despite changes being made elsewhere in the calculation which would otherwise affect. Any new port calls must then be manually added to the Ports (or Port Rotation) field.
- Select Protect - the voyage port rotation is protected from change and Protect changes to Unprotect in both the field toolbar and Port Call menu.
- Select Unprotect - the voyage port rotation is unprotected from change and Unprotect reverts to Protect in both the field toolbar and Port Call menu.
- Port Call History...: Can be used when entering the estimated port cast for a specific port call. Selecting Port Call History... opens the Port Call History dialogue box which displays all previously entered fixture port calls to the port as rows, each with both the Preliminary and Adjusted port cost estimates. The list can be filtered by date, vessel, charterer and commodity. - More information, go to Create Voyage Charter Calculations.
- Remove: Removes a selected port call in the Ports (or Port Rotation) field from a calculation.
- Add Port Call Various...: Used to add a various cost/revenue item to specific port call (applies to all cargoes) in a voyage calculation. The added cost/revenue item displays in the Various Cost/Revenue field. - More information, go to Create Voyage Charter Calculations.
- Insert opens a drop-down menu with the selections Before and After: Used to add a port call to a port rotation before or after a selected port call.
- Go to
- Go to
Modules > Voyage Estimate > Cargo Port.The menu opens with features not displayed in the Cargo Ports field.
- Add Load Port and Add Discharge Port: Adds a new port call (load or discharge) to a to the Cargo Ports field, but will not automatically show in the Ports (or Port Rotation) field. This option can be used when:
- a port is for example visited twice as a load port (or twice as discharge port) for the same cargo during a voyage. The second port call must then be entered manually in both the Ports (or Port Rotation) and Cargo Ports fields.
- a port call is added manually through the Port (or Port Rotation) field to calculations with two or more cargoes. As Dataloy VMS does not automatically recognise which cargo/es the added port call is associated with it must be manually linked to each respective cargo.
- a detailed breakdown (freight rates, terms etc.) has been entered in the Cargo Ports field and for example an additional port call needs to be added. By adding it directly into the Cargo Ports field avoids the breakdown from being lost.
- Remove: Removes a selected port from the Cargo field. When removed, the port call is also removed in the Cargo panel (Main Calculation field), but not in the Ports (or Port Rotation) field.
- Transship/Preship: Used for creating transshipments and/or preshipments of cargo, either full or partial. Changes to Preship if a load port is selected in the Cargo Port field, will otherwise read Transship. More information, go to Transshipments and Preshipments.
- Add Load Port and Add Discharge Port: Adds a new port call (load or discharge) to a to the Cargo Ports field, but will not automatically show in the Ports (or Port Rotation) field. This option can be used when:
- Go to
Toolbar
The Voyage Estimate Toolbar is located just above the calculation fields, its purpose to aid in navigation and performing essential functions.
1. Open Voyage...
2. Navigation Arrows
3. New Voyage Charter
4. New Time Charter Out
5. TC In Contract...
6. Print
7. Map
- Open Voyage...: opens the Select a Voyage dialogue box which contains all previously entered voyage calculations. The dialogue box displays when opened by default only a user's own calculations, but can be filtered to display all previous calculations. Using the filter option, a search can be narrowed down, for each search parameter added, the more detailed the search. The Select a Voyage dialogue box can also be used to copy and to delete a voyage.

- Filter for a voyage:
- Click Open Voyage... The Select a Voyage dialogue box opens.
- In the filter row above the listed voyages, enter a search parameter in appropriate column row.

- Press Enter to filter. The dialogue box will update and list voyages according to search.
Example: To list all voyages with Singapore as a load port, enter the parameter "Singapore" above Load and press Enter.
- Copy (or duplicate) a voyage:
- Click Open Voyage... The Select a Voyage dialogue box opens.
Filter (if applicable) to locate the voyage to be copied.
- Select the row of the voyage to be copied - it will highlight.
Click Copy. The dialogue box will close and a copy of the selected voyage calculation display.
- Delete a voyage:
- Click Open Voyage... The Select a Voyage dialogue box opens.
Filter (if applicable) to locate the voyage to be deleted.
- Select the row of the voyage to be deleted - it will highlight.
- A pop-up opens asking to confirm deletion.
- Click Yes. The pop-up will close and the selected row delete.
- View Select a Voyage dialogue box in Preview/Normal mode:
- Select a Voyage dialogue box displays by default in Normal mode.
- Click Goto Preview Mode. The dialogue layout changes to preview mode and Goto Preview Mode will read Goto Normal Mode.
- To revert - click Goto Normal Mode.
- Close dialogue box - click Close.
- Filter for a voyage:
- Navigation Arrows: The Navigation Arrows allows a user to move left and right between voyage calculations (they list in the order they were entered).

New Voyage Charter: Opens a new (blank) Voyage Charter Calculation.
Note: A new Voyage Charter calculation can also be created by selecting Voyage Menu > New Voyage Charter.- New Time Charter Out: Opens a new (blank) Time Charter Calculation. - More information, go to Time Charter.
Note: A new Time Charter calculation can also be created by selecting Voyage Menu > New Time Charter.
- TC In Contract...: Is by default deactivated. Only activates if the vessel in the calculation is under a TC In contract. (TC In Contract field (Lower Result panel, Main calculation field) will automatically populate upon vessel name entry stating the charter date. Retrieved from the Time Charter Contracts module). If activated - click to open pop-up with main details of contract (read-only).
- Print: Print opens a drop-down menu with the selections Voyage and Post Voyage Analysis. The Voyage option generates a report (or voyage printout) of the current status of a voyage calculation (estimate or fixture) including a cargo list and a breakdown of various cost and revenue. It can be run at any time. The Post Voyage Analysis option generates a Post VC Voyage Analysis report (.i.e. either a Preliminary Report displaying all initial estimates or an Adjusted Report showing a breakdown of all actual results of a voyage upon voyage completion depending on if the report is run on a frozen voyage's preliminary or adjusted calculation). The reports can be run at any time during a voyage and will then display the most current and up-to-date results at the time. Note: Applicable for Actual Voyages (or fixtures) ONLY.

- Generate a voyage printout:
- Open the voyage charter calculation to run a voyage printout on. Its fields will display.
- Either
- click Print and from the drop-down select Voyage
- or go to the Voyage menu and from the drop-down select Voyage.

- A voyage printout generates and displays as an electronic printout in PDF-format (separate window).
Example:
- To generate a Post Voyage Analysis, go to Post Voyage Analysis.
- Generate a voyage printout:
- Map: Displays the entered port rotation of a calculation graphically on a map in a separate browser. If, at any time, changes are made to the voyage rotation, the map will update.
Example:
Kandla/Singapore-Osaka
Module Browser Tab Menu
The Module Browser Tab menu contains additional functions and requires the Voyage Estimate module to be open to be accessed. To open the menu right-click the calculation's browser tab. The menu will display.

1. Close
2. Tear Off
3. Reset Title
4. Set Title
5. Set as Default Module
- Close: Closes the Voyage Estimate module.
Tear Off: Moves the module from the current window to a separate one (opens automatically). This feature enables several calculations to be displayed simultaneously.
Note: To view in a separate window, click the title bar of the embedded video (opens in YouTube).
- Reset Title: Resets a calculation's title (or name) to the original, if it has been changed.
- Reset a voyage title:
- Open the Additional Features menu and from the drop-down select Reset Title.
- The voyage title will automatically revert to the original title.
- Reset a voyage title:
- Set Title: Enables a title (or name) change to a calculation.
- Set a new calculation title:
- Either
- double-click the calculation's browser tab
- or open the Additional Features menu and from the drop-down select Set Title.
- The Select Port to Insert pop-up opens.

- Enter the new tab title under Enter a tab title.
Click OK. The pop-up will close and the new title display in the browser tab replacing the calculation type (VC or TC) and the vessel name. The unique calculation number remains.
Example:
Original title: VC - OCEAN TRAVELLER - #786, Replaced with VOYAGE XYZ - #786.
- Either
- Set a new calculation title:
- Set as Default Module: Sets the module currently opened (in the tab) as the default module to be automatically opened upon system log in. Useful for users using a single module for most of the work performed, for example a charterer using the Voyage Estimate module for performing daily calculations.
Navigation Tips and Additional Features
There are additional features available in the system designed to simplify navigation and ease of use.
1. Automatic Quick Search of Vessel and Port Names
2. Moving Between Fields
3. Information Dialogue Boxes
4. Various Cost/Revenue Category Quickfilters
- Automatic Quick Search of Vessel and Port Names: Only the first few characters of a vessel name or port need to be entered under Vessel and Port respectively in the Main Calculation field. Dataloy VMS will search available vessels and ports and display the first matching entered characters, for example enter "VISAK" and "VISAKHAPATNAM" displays.
- Moving Between Fields:
- Use <Tab> or <Enter> for quick navigation between fields.
- Use <Shift-Tab> to move backwards between fields.
- Use <Tab> to move from column to column in a table/list.
- Use <Enter> to move from row to row in a table/list.
- Information Dialogue Boxes: Certain fields have hidden information boxes attached. Hover the cursor over such a field and information sign will display indicating availability of further data about the field contents retrieved from other modules. Click the sign to open available information dialogue box. Note: The contents of the dialogue box can only be altered in the module it is retrieved from.
Example:
- Various Cost/Revenue Category Quickfilters - used for searches and listing of cost/revenues into four different categories:

- Voyage: Lists Voyage Various entries related to voyage only.
- Cargo: Lists Cargo- and Cargo Port Various entries per selected cargo.
- Port Call: Lists Port Call Various entries per selected port call.
- All: Lists all cost/revenue entries for all cargoes, cargo ports, voyage entries and port calls.
Each entered cost/revenue is automatically grouped and displayed according to type (i.e. add a cost/revenue using for example Add Cargo Various... - it will automatically sort under the Cargo filter).